-
CALL US:
- (866) 952-3456
Thinking about putting in an outdoor playset? It might seem like a big job, maybe even a little daunting when you first consider it. Lots of folks want to turn their backyards into fun zones for kids but aren't sure where to begin with the actual outdoor playset installation. This guide gathers advice from seasoned installers and happy homeowners to help you understand what's involved before you even start digging, so you'll feel ready for the project.
It usually starts with a picture in your mind: that plain piece of lawn becoming an amazing adventure spot your children will enjoy for a long time. To bring this idea to life, it’s important to look at all the different kinds of outdoor playsets out there. You can find everything from basic, traditional swing sets, great for younger kids or smaller yards, to more complex, multi-level structures that have slides, climbing walls, and fun playhouses. Getting to know these options is key to making the right pick.
With all these choices, figuring out what features are really important for your family can be tricky. Think about how old your kids are, what they like to do most – climb, swing, or pretend play – and how many kids will usually play on it together. Focusing on what your family specifically needs will help you sort through the choices. This way, you'll make sure your investment provides plenty of fun and use, making the outdoor playset installation process smoother right from the beginning.
Okay, so you've got a style of playset in mind. What's next? Looking closely at your yard and its specific features is super important. There are a few key things about your property that will really affect how you plan your outdoor playset installation.
Several environmental aspects will play a big role:
These aren't just small things; they're essential for a good, secure installation.
Aside from what your yard is like, it's also interesting to see how outdoor playsets themselves are changing. New technologies and what people want are making a difference. Old-school metal and wood playsets are still well-liked, but there's a big move towards using recycled plastics and other eco-friendly materials. You're also seeing more interactive and digital elements being added to make playtime even better.
Market studies show that spending on play areas, both public and private, has gone up a lot. It's estimated that by 2030, about 60% of city playgrounds in developed countries will have at least one smart or digital play feature. You can learn more about these outdoor toy market trends on Dataintelo. This shift towards earth-friendly and captivating choices gives families new and cool possibilities when planning their outdoor playset installation.
With all this information, you'll be better prepared to avoid common slip-ups that could make this exciting project a real pain. Getting expert advice, like always checking for underground pipes or cables before you dig, or making sure you have enough soft material under the playset for safety, is really helpful for a trouble-free outdoor playset installation. Knowing these practical things will help you feel sure and ready as you start building that perfect outdoor play area for your family, getting it ready for tons of fun times.
Once you've got a good handle on different playset types and what your site offers, the next big thing for your outdoor playset installation journey is careful planning. This isn't just guesswork; it's about using proven methods that seasoned installers and happy families use for a hassle-free setup and great results. Good planning is really the foundation for a successful outdoor playset installation.
A key early action is to accurately measure the spot you've picked for the playset. It might sound basic, but this is a common place for mistakes. Remember, you need to account for more than just where the playset will stand.
Safety clearance zones are super important. You'll generally want at least a minimum of 6 feet of open, clear space all around the playset. This extra room is key for helping prevent injuries if someone takes a tumble or from the swings.
For example, a family in Austin, Texas, carefully planned their yard, considering how far the swings would go and the space needed for the slide's end, before their outdoor playset installation. This smart thinking saved them from an expensive move later on. They realized that getting these space requirements right isn't just advice; it's a major safety point. Measuring well also lets you picture how it will look and fit in with your yard.
Each backyard has its own distinct features. Don't try to force things; it’s better to adapt to what you have. Spend some quality time really getting to know your yard. So, what should you look for?
Lots of homeowners have found clever ways to work with their yard's specific layout. For example, one family turned a gentle, uneven slope into a plus by adding a rock-climbing wall on the uphill side. This made a cool, natural entrance to their kids' new play area.
Before you start building, it’s a good idea to touch base with your city or town hall, or your homeowner's association (HOA), about any permit requirements for an outdoor playset installation. Some places have rules about how big or tall structures can be, or how far they need to be from your property line. It might feel like extra paperwork, but sorting this out early can prevent major hassles and possible fines later. Usually, a quick call or a look at their website will do the trick.
Also, setting realistic timelines is really important for your project to go well. A basic swing set might go up in a weekend. But a big, fancy playset could take a few days, even if experienced people are putting it together. So, it’s smart to expect this and make your plans fit.
Don't forget to think about potential weather delays, particularly if your outdoor playset installation is planned for a time of year when the weather can be all over the place. Being prepared for this with a flexible schedule and having things like tarps ready to cover parts if it rains can make things much less stressful. You might find this useful: How to master the essentials for your project setup.
This kind of detailed planning turns what could be an overwhelming job into a well-organized and doable project. It helps make sure your new playset is just what your family is hoping for.
Many families face a big choice: build that new outdoor playset themselves or call in the pros? It's a frequent dilemma, and honestly, the best way forward really hinges on your personal situation, what you're good at, and what matters most to you. We've chatted with folks who've gone the DIY route and professional installers to get the lowdown on both options.
Going the DIY route for your outdoor playset installation can feel amazing. There's a real pride in putting together something big for your kids with your own two hands. And, of course, the most obvious plus is the chance to save money on labor costs. You also get to set your own schedule and work when it suits you.
But, let's be real about what you're signing up for. Saving cash is great, but a DIY project will eat up a good chunk of your time, often anywhere from several hours to a few days, especially if the playset is complicated. It’s also hard work – think lifting heavy pieces, getting everything perfectly lined up, and dealing with what feels like endless bolts.
To give you a better idea of what a standard DIY outdoor playset installation looks like, check out this breakdown of common needs:

As you can see, even a medium-sized playset needs particular tools, the right materials (like hardware and anchors), and a good amount of time – usually 4-6 hours for most basic models. Don't forget, if you don't have the tools, you’ll need to buy or rent them, adding to the cost.
On the other hand, hiring pros for your outdoor playset installation comes with its own set of perks, mainly convenience and skill. Experts can usually get the job done in just a few hours – way faster than someone doing it for the first time. They’re quick because they know all sorts of playset models and have their building process down pat.
Plus, professional installers work with expert precision. They make sure everything is level, tightly secured, and put together exactly as the manufacturer intended, which is super important for safety and making the playset last. This really cuts down the chances of mistakes that could make the playset wobbly or dangerous. For those big, fancy playsets with multiple levels, slides, and tricky climbing parts, having a pro is often a game-changer, especially if they need special tools.
To help you weigh your options more clearly, let's break down the key differences between professional and DIY installation in this comparison table. It offers a look at costs, time, tools, and expertise required for each approach.
| Factor | Professional Installation | DIY Installation | Best For |
|---|---|---|---|
| Cost | Higher upfront (labor fees) | Lower upfront (parts only, potential tool rental/purchase) | DIY: Budget-conscious individuals, those with necessary tools. Pro: Those valuing time and assured expertise. |
| Time Investment | Few hours | Several hours to multiple days | Pro: Busy individuals needing a quick turnaround. DIY: Those with flexible schedules and enjoy the process. |
| Tools Required | Provided by installer | Must own, borrow, or rent (specific tools often needed) | Pro: Those who don't own or want to acquire specialized tools. DIY: Those with a well-stocked toolkit. |
| Expertise | Expert precision, familiar with various models, safety-focused | Requires careful reading of instructions, some handyman skills, attention to detail | Pro: Complex playsets, ensuring maximum safety and structural integrity. DIY: Simpler playsets, confident builders. |
| Effort | Minimal physical effort for homeowner | Significant physical labor, lifting, and problem-solving required | Pro: Those preferring convenience and avoiding strenuous work. DIY: Those who enjoy hands-on projects and physical tasks. |
| Safety/Warranty | High assurance of safe assembly, often preserves manufacturer warranty | Risk of improper assembly if not careful, may affect warranty if installation is not per specifications | Pro: Individuals seeking peace of mind regarding safety and warranty. DIY: Meticulous individuals confident in their assembly skills. |
This table should give you a clearer idea of which route might be a better fit based on what you value most: significant cost savings, efficient use of your time, or the peace of mind that comes with expert assembly.
So, how do you pick the best path for your family? Think about these crucial points:
At the end of the day, safety and making sure the playset lasts should be your top priorities. Proper installation techniques are a must, whether you build it or someone else does. A playset put together wrong isn't just an eyesore; it's a genuine safety hazard. Keep in mind that some playset warranties might not cover issues if you installed it incorrectly yourself. If you're thinking about professional help for other big assembly jobs, you might find this interesting: Why You Should Hire a Professional to Build IKEA Furniture for You.
Choosing wisely involves balancing your budget, your abilities, and how much you value your time versus the certainty of a safe, correctly built outdoor playset installation. Consider which option will give your family a secure and fun play area for many years.
Getting an outdoor playset installed is a thrilling prospect for any family! But to keep the project enjoyable from start to finish, it’s really important to get a handle on all the potential costs. It's easy to just look at the playset's price, but there are often other expenses that pop up. Good budget planning can help make sure your amazing new play area brings joy, not financial headaches.
The price you see on the playset itself? That’s really just where your spending begins. Whether you're eyeing a basic swing set or a grand fort, that initial number is easy to spot. But the true investment for your outdoor playset installation involves more than just the equipment; it’s about the complete project cost.
Looking at what other families have spent can be really eye-opening. It's not just about the playset parts; several other items add to the final bill. These easily missed details can really affect your total budget, so knowing about them upfront is super helpful.
It’s pretty common for homeowners to get surprised by extra costs that they didn’t factor into their original outdoor playset installation budget. Knowing about these possible expenses ahead of time can save you a lot of stress and unexpected bills down the line.
Here are some of those sneaky costs that can catch you by surprise:
A few big things will directly shape the final bill for your outdoor playset installation. The complexity of the playset itself is a huge one – a fancy multi-level fort with lots of bells and whistles will cost more than a simple set. The materials you choose matter too; cedar or vinyl usually cost more than pressure-treated pine, but they often last longer.
It's interesting to see how much value is being placed on these outdoor play areas. The worldwide market for outdoor playsets and playground gear shows this trend. As of 2024, this market was worth about USD 6.21 billion. It's expected to grow to roughly USD 10.93 billion by 2033, which is a growth rate (CAGR) of around 6.5% each year. This really shows how much families and communities are investing in good outdoor fun. You can dig into more numbers on playground equipment market trends and statistics here. Don't forget, when you buy can also affect the price, with possible deals in the off-season or higher prices when everyone wants one in spring and summer.
You definitely want a safe and sturdy playset, but there are still smart ways to keep the costs of your outdoor playset installation in check. Think about these ideas:
Safety should always be your top priority. Never try to save a few bucks by skimping on important safety gear or not following the right installation methods.
It helps to have a general idea of what you might spend. Prices can change a lot based on where you are and what you pick, but here’s a rough guide to give you a starting point:
| Playset Scenario | Key Cost Components | General Investment Level |
|---|---|---|
| Basic Swing Set Installation | Playset, minimal site prep, possible DIY or basic professional install fee | Lower |
| Mid-Range Playset Installation | Playset, moderate site prep, safety surfacing, professional installation | Moderate |
| Large/Custom Playset Installation | Premium playset, significant site prep, permits, high-end surfacing, pro install | Higher |
If you're hiring contractors for your outdoor playset installation, always ask for a detailed quote that lists everything out. It’s also smart to check their reviews and ask for references to make sure you’re picking a trustworthy company that does good work.
Ultimately, a clear understanding of all potential costs upfront is the best way to achieve your playset goals without breaking the bank.
When you're planning an outdoor playset installation, thinking about the budget is important, sure. But the biggest and most vital investment? That’s your family's safety. We want our kids to play freely and for us parents to breathe easy, and that means going beyond just putting pieces together. It’s about understanding and using safety steps that really count, focusing on practical things that make a real difference, not just a pile of rules.
A super important part of any safe outdoor playset installation is setting up proper fall zones. Think of these as the special spots around and under the playset, made to soften a tumble. You'll want a clear space of at least 6 feet all around the playset.
This clear area is a big deal because falls are, unfortunately, a common reason for playground ouchies. For instance, if you have swings, the clear zone underneath and around them should be twice the height of the swing beam, both in front and back. Good planning for these fall zones really cuts down the chance of a bad bump, giving kids a gentler landing if they fall.
Just having a fall zone isn't the whole story; what you put in that zone matters just as much. We call this protective surfacing – it's the stuff on the ground that helps absorb the shock of a fall. You've got a few choices here, each with its own good points:
No matter which material you go with, depth is super important. For those loose-fill types, aim for at least 9-12 inches deep. The exact depth can depend on the material and how high the equipment is, but getting this right means good shock absorption for your outdoor playset installation.
Beyond those immediate fall zones, the general spacing in your yard is also a big safety factor. You need enough room between different parts of the playset so kids don’t bump into each other or the equipment. Also, make sure the whole playset is a good distance away from things like fences, trees, sheds, or anything else that could be a hazard.
This part of your outdoor playset installation links back to when you first looked at your yard. Thinking about where kids will be most active – like at the bottom of a slide or where swings fly – helps you plan a layout that’s both enjoyable and safe. Good spacing really helps cut down on kids running into things while they’re having fun.
Picking out equipment that fits the age and development of your kids is a core safety rule. A playset made for big kids can be risky for little toddlers, and older kids might get bored fast with something too simple. Age-appropriateness really affects how safely kids can play on the equipment.
Lots of playsets these days come in modular designs. This is great because it means you can change things up or add new bits as your children get older. Thinking about this when you first do your outdoor playset installation can make your playset last longer and stay safe and fun for years to come.
How sturdy your playset is really comes down to its hardware and how well it's anchored – these are the backbone of its safety. All the bolts, screws, and other connectors need to be rust-resistant and you should check them often to make sure they're tight. It's also better to have hardware that’s recessed or has caps, so there are no sharp bits to cause cuts or snag clothes.
Secure anchoring is what stops the playset from tipping over or moving around when kids are playing hard, and this is especially vital for playsets with swings or climbing parts. The number of outdoor playset installations happening is pretty big, showing that more people are serious about safe play areas. Just in the United States, thousands of new playgrounds are built or updated every year. Over in Europe, there’s a cool focus on designs that are good for the planet and easy for everyone to use; reports show that over 50% of new playground projects there are now using sustainable materials and making sure there’s easy access for all. You can explore this topic further and see how widespread these initiatives are. This worldwide attention really highlights how important strong building and safe installation are.
Lastly, keep in mind that safety is an ongoing commitment. It doesn’t just stop once the outdoor playset installation is done. Regular checks and upkeep are key to making sure the playset stays safe for everyone. Here’s what you should be looking out for:
Having a checklist you go through each season can really help you keep track of these things. Consistent upkeep does more than just make your playset last longer; it makes sure it stays a safe spot for fun. If you want to learn more, you might be interested in these Playground Safety Standards to Keep in Mind. Following these practical safety steps will give you peace of mind, so your family can have years of carefree outdoor playtime.

Turning that big box of playset parts into a real backyard adventure hub for the kids is definitely something to look forward to. This guide will walk you through the main stages of outdoor playset installation. Getting these right means you'll end up with a playset that’s not just fun, but also safe and built to last. A step-by-step plan can help you achieve results like a pro, even if the playset looks a bit complicated at first.
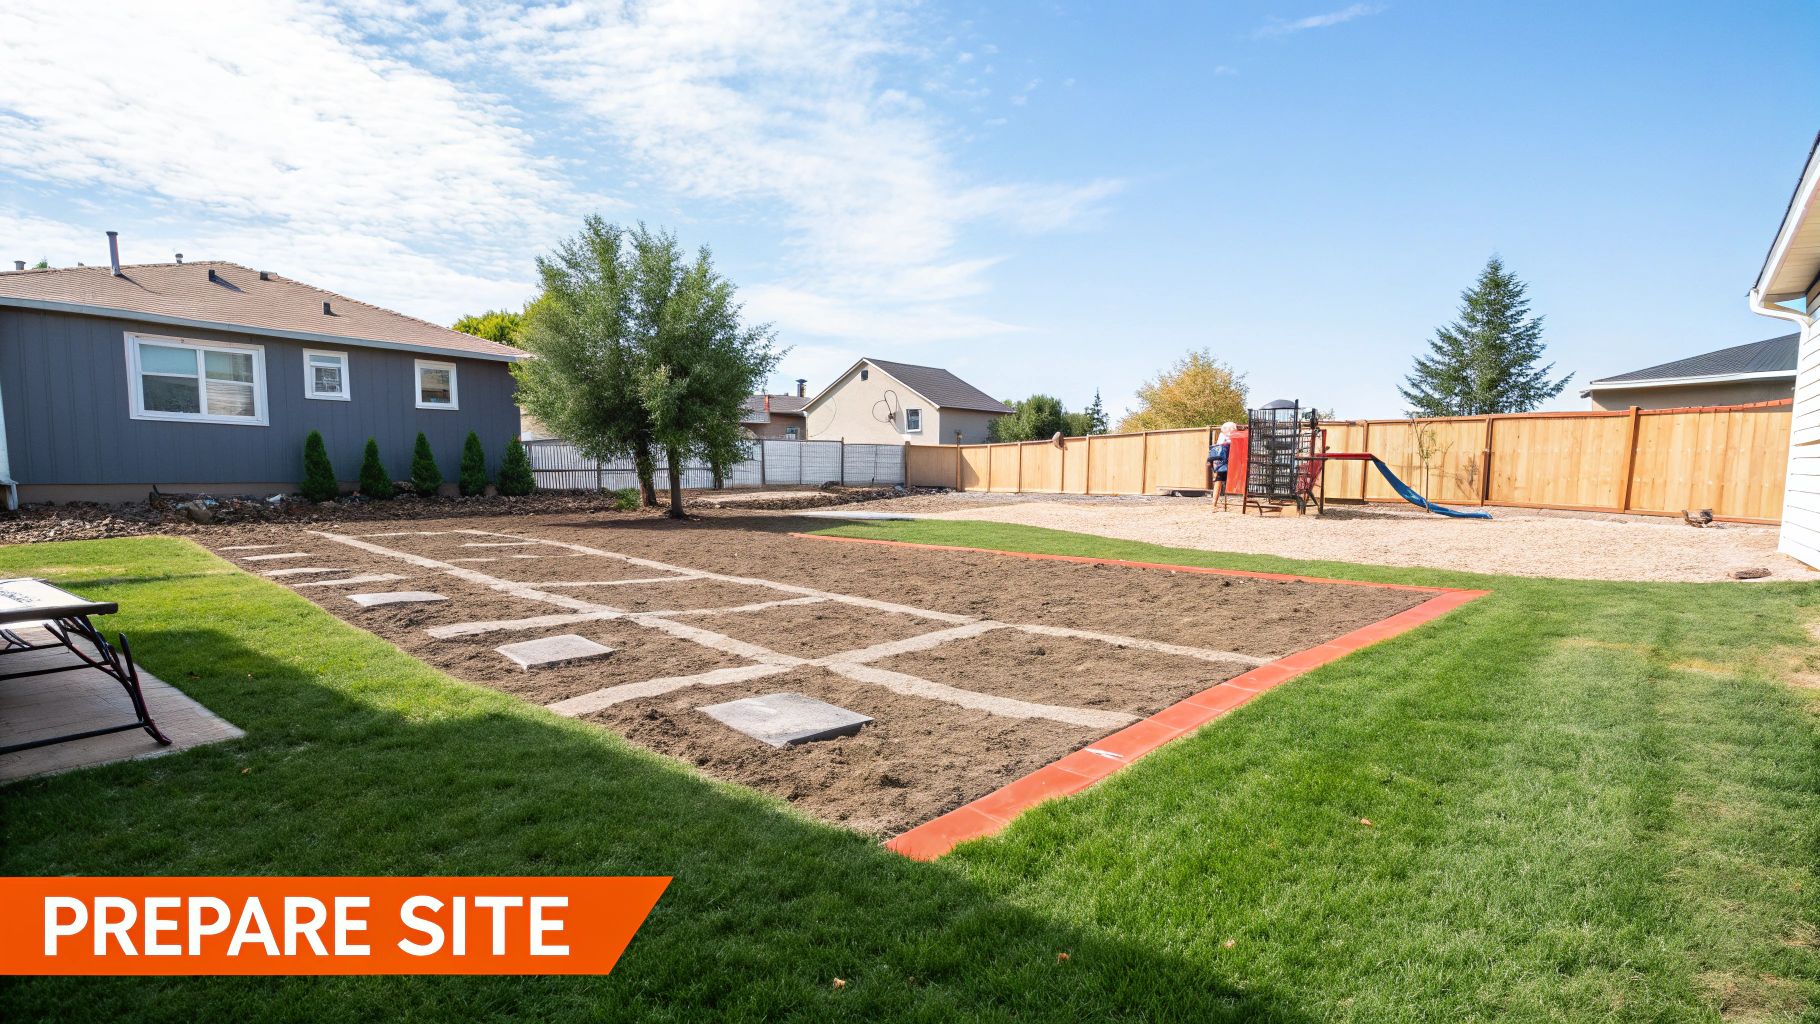
Before you even think about opening those boxes, careful site preparation is incredibly important for a successful outdoor playset installation. This groundwork really sets the stage for how stable and long-lasting your playset will be. First things first, make sure the spot you've picked is perfectly level. If it's not, the playset structure can get stressed, wear out faster, and even become a safety risk, so you might need to do a bit of digging or move some soil around.
Also, make absolutely sure that all underground utilities are clearly marked – this is a vital safety step to avoid any dangerous or expensive mistakes. Lastly, get the foundation sorted. This means planning for ground anchors, which are key to keeping the playset from tipping over, especially when the kids are really going for it or if strong winds pick up. Good foundation work means your playset will be a solid fixture for many playtimes to come.
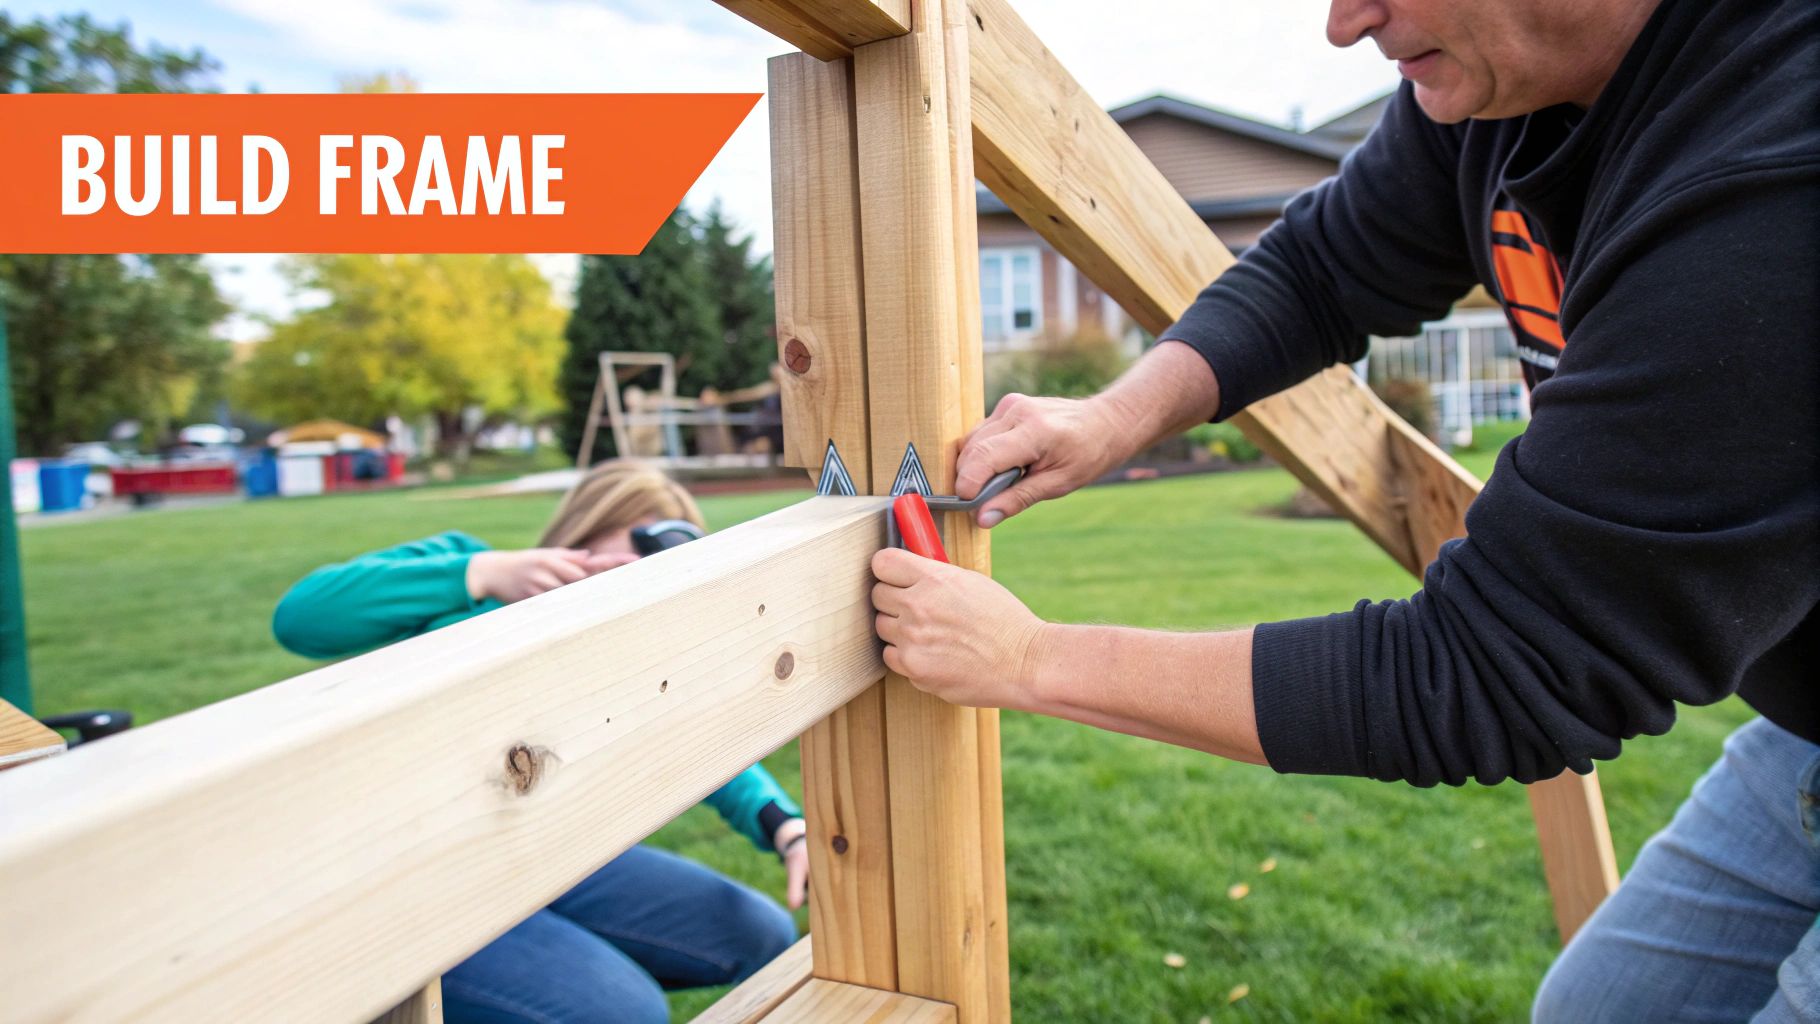
Once your site is prepped and ready, it’s time to tackle the assembly. Your best friend here will be the manufacturer's instructions – stick to them closely, as going off-script can cause mistakes or an unsafe setup. A top tip from folks who do this all the time is to organize all your parts and hardware before you even begin. Spread everything out and tick items off the parts list; this little bit of prep can save you a ton of headaches later on.
It’s often easiest to build in stages, usually starting with the main frame or the support towers. As you put pieces together, always check that each section is square and level before you tighten down all the bolts. This methodical way of working is important, whether you're just putting up a swing or building a massive play fort. This kind of careful work pays off for other outdoor setups too; for example, you can see similar advice in our guide on How to master outdoor furniture assembly.
To give you a clearer picture of how the installation might unfold, we've put together a general timeline. This table, "Installation Timeline and Milestones," breaks down the different phases, estimated timeframes, what you'll be doing, and important safety checks along the way for your outdoor playset setup.
Detailed breakdown of installation phases, estimated timeframes, and key checkpoints for outdoor playset setup
| Installation Phase | Estimated Time | Key Tasks | Safety Checkpoints |
|---|---|---|---|
| 1. Site Preparation | 2-4 hours | Clear & level ground, mark utilities, prepare anchor points | Verify no underground lines, ensure stable base, confirm safety zone clearances |
| 2. Parts Inventory & Org. | 1-2 hours | Unpack boxes, verify all parts against list, organize hardware by step | Check for damaged/missing parts, ensure correct hardware for each stage |
| 3. Main Structure Assembly | 4-10 hours (varies) | Build frame/towers, ensure squareness & levelness at each step | Double-check bolt tightness, verify structural integrity before adding weight |
| 4. Attaching Accessories | 2-5 hours (varies) | Install slides, swings, climbing features, roof sections | Ensure all accessories are securely fastened per guidelines, check clearances |
| 5. Final Checks & Cleanup | 1-2 hours | Re-tighten all hardware, test stability, install safety surfacing, clear area | Perform weight tests, inspect for sharp edges/protrusions, review all connections |
Just a heads-up: these times are estimates. How long it actually takes can change quite a bit depending on how complex your playset is and how much experience you have with this kind of project.
Making sure your playset is square, level, and secure is absolutely essential for a safe outdoor playset installation – there’s no cutting corners here. Keep a carpenter's level handy and use it often on all the posts and platforms. When we say "square," we mean that all the corners are true 90-degree angles. This stops the structure from wobbling or becoming unstable. A good trick is to measure diagonally from one corner to the opposite; if the measurements are the same, your structure is square.
Proper hardware management is also a big deal. Start by hand-tightening the bolts. Once you've confirmed a section is level and square, then go back and tighten everything up properly. It's also smart to go over all the hardware and tighten it again about a week or two after you've finished, just because wood can sometimes settle a bit. This final check ensures lasting stability.
Keep an eye on the weather, as it can throw a wrench in your installation plans. It's wise to build in some buffer time for delays and make sure you can protect the playset parts if rain is on the way. Having all the correct tools ready, as listed by the manufacturer, will definitely make the whole process go more smoothly and safely. You might run into common issues like holes not lining up perfectly (try loosening nearby bolts a bit to get some wiggle room) or a particularly confusing step in the instructions. The key is to take your time and never try to force parts together.
Before you unleash the kids on their new playset, conduct thorough final testing. Give the structure a good push and pull from different angles to check for any sway or movement. Test out the swings and slides to make sure they're securely attached and working as they should. If you find any problems, fix them right away. This ensures your outdoor playset installation meets all safety standards, creating a secure environment for countless hours of fun.
So, your outdoor playset installation is finished, and with any luck, your backyard is already echoing with the happy sounds of kids at play. To keep those good times rolling safely for years to come, and to look after the money you've put into it, staying on top of maintenance is key. We've gathered some real-world tips from families who've successfully kept their playsets in great shape, and we're here to share what really works.
Think of regular check-ups as your best defense for a long-lasting and safe playset. The U.S. Consumer Product Safety Commission (CPSC) points out that proper maintenance can prevent many playground-related injuries, which is a pretty big deal. Spotting little things early on, after your outdoor playset installation, stops them from turning into big headaches.
What exactly are you searching for? Make it a habit to look for loose or missing hardware – things like bolts, screws, and S-hooks. These can wiggle loose after a lot of play or big weather shifts. Give all the wooden bits a good look for splintering, cracks, or any hint of rot. For metal parts, check for rust or any sharp edges. And don't skip the ropes, chains, and swing seats; check them for obvious signs of wear.
Try to give it a quick once-over weekly or every other week, especially if it’s getting used every day. Then, set aside time for a more detailed, hands-on look at least seasonally – that's about four times a year. This more thorough inspection helps make sure you don’t miss anything important, keeping your outdoor playset installation solid.
Breaking down maintenance by season can make the whole process feel less overwhelming and more effective. When spring rolls around and the weather warms up, it’s prime time to get your playset ready for heavy use after sitting through winter.
As summer gets going, keep an eye out for things like bugs – wasps, for instance, really like to build nests in those little nooks and crannies. Also, check plastic parts for any sun-fading or warping.
When the leaves start to turn in autumn, make sure to clear them off the playset regularly. This stops moisture from getting trapped, which can cause staining or speed up rot. If your winters are tough, think about covering your playset or taking off bits like fabric canopies or some types of swings. This protects them from snow and ice and makes your spring clean-up a lot simpler.
On top of the regular seasonal upkeep, a few smart moves can really help your outdoor playset installation last longer. We talked about protective treatments for wooden playsets, and they're a big deal. A well-cared-for wooden set can easily last 15-20 years or even more. Untreated wood, on the other hand, can break down much quicker. This one step is a smart way to protect what you paid for.
Also, don't put off replacing worn or rusted hardware. Just one bad bolt or a frayed rope can mess with the playset's strength and safety. Making timely hardware replacements costs a little now but can save you from much bigger, pricier fixes later. In the same vein, strategic component upgrades can give an older playset a new lease on life. Instead of a whole new set, think about swapping out old swings, a sun-beaten slide, or adding a cool new climbing wall. This not only makes it safer but can also get kids excited about playing on it again as they grow.
Most of the time, you can handle the upkeep for your outdoor playset installation yourself. But sometimes, bringing in a professional is the smartest move. If you spot any significant structural issues – like posts that are leaning, rot that’s making things wobbly, or big cracks in the main support beams – it’s definitely time to call an expert. These kinds of problems usually need more than a quick DIY fix.
Also, if a repair job looks too tricky for you or needs special tools you don’t have, pros can make sure it’s done right and safely. Some folks even choose to get a professional safety check-up once a year just to be extra sure an expert has looked things over. Being practical about maintenance like this helps your family keep enjoying safe fun outdoors.
By sticking to these straightforward maintenance tips, you’re making sure your outdoor playset installation stays a safe and happy place for your family’s outdoor fun for a long time. This careful attention not only keeps your kids safe but also makes the most of what you spent on it, ensuring the good times continue, no matter the season.
Want to make sure your playset is set for years of safe enjoyment, or do you need a hand with putting it together or tackling some tricky repairs? The team at Assembly Smart provides professional outdoor playset installation and maintenance services to keep your playset in excellent condition. Get in touch with us today for a worry-free way to manage it!
