-
CALL US:
- (866) 952-3456
We've all been there. That feeling you get when the new IKEA box lands on your floor—a weird mix of excitement for your new furniture and a quiet, creeping dread of the assembly process. This guide is designed to tip that balance firmly toward excitement.
I’m going to walk you through a proven method that turns a potentially frustrating chore into a genuinely satisfying project.
Forget about the confusing diagrams, the mysterious leftover screws, and the classic "did I put this shelf on backward?" panic. We'll cover everything from setting up the perfect workspace and identifying the few tools that make a massive difference, to deciphering those IKEA pictograms and, just as importantly, knowing when to wave the white flag and call in a pro.
Think of this as your personal roadmap from a sealed, intimidating box to a perfectly built piece of furniture. No arguments or stress required.
If you've ever felt completely overwhelmed by a pile of particleboard and a bag full of tiny, unfamiliar hardware, you are definitely not alone. It's a universal experience. In fact, one study analyzing social media found that around 33% of global tweets mentioning IKEA were about the stress of putting the furniture together. It’s a shared struggle.
This feeling comes from the very nature of the product. The first step to conquering the beast is understanding what is flat-pack furniture and why it’s designed the way it is.
The whole point is to make shipping efficient and keep costs down for you, which means the final, crucial step of assembly is left entirely in your hands. This can be empowering, but it also opens the door for a few common frustrations:
The secret to success isn't about being a DIY genius; it's all about preparation and patience. A methodical approach transforms the entire experience from a test of your sanity into a rewarding accomplishment. You get a great piece of furniture, plus the bragging rights that you built it yourself.
Before you even think about cutting that box open, taking a few minutes to get organized can save you hours of frustration later. It’s the single most important part of the process.
Follow these essential steps before you open the box. This simple routine will guarantee a much smoother assembly experience.
| Checklist Item | Why It Matters | Time Estimate |
|---|---|---|
| Clear Your Workspace | You need more floor space than the finished item will occupy. Trust me. Clear the area completely to avoid tripping or scratching new parts. | 10-15 minutes |
| Verify the Box Count | Many larger items (like wardrobes or beds) come in multiple boxes. Check the side of each box (e.g., "Box 1 of 3") to ensure you have them all. | 2 minutes |
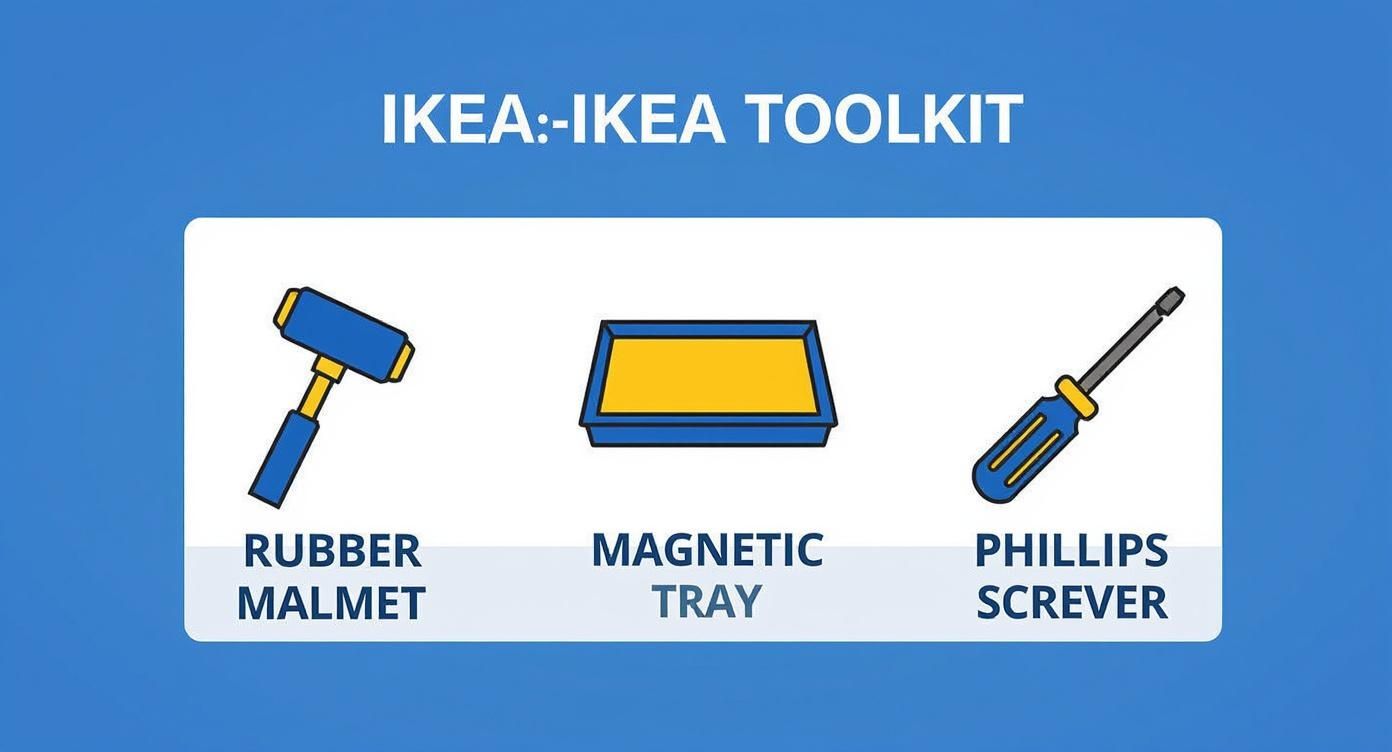
| Gather Your Tools | Get your tools ready now. Having a screwdriver, rubber mallet, and Allen key set on hand is far better than hunting for them mid-build. | 5 minutes |
| Protect Your Floors | Lay down the flattened cardboard box, a blanket, or a rug to prevent scratches on both your floor and the new furniture. | 5 minutes |
| Scan the Instructions | Don't build yet! Just flip through the entire manual once to get a feel for the flow, spot any tricky steps, and see the big picture. | 5-10 minutes |
Taking these 20-30 minutes to prepare is the difference between a project that flows and one that grinds to a halt because you can’t find the right screw or realize you assembled a piece upside down.
Before you even think about turning a single screw, setting up your environment is the most important thing you can do. Trust me. A cramped, poorly-lit space is a one-way ticket to frustration, lost parts, and accidental dings on your new furniture.
Think of this initial setup not as a chore, but as laying the foundation for a smooth and efficient build.
The first rule of thumb is to clear out an area that's way bigger than the finished piece of furniture itself. You need enough room to lay out all the panels, sort your hardware, and actually move around the item as you build. Trying to assemble a tall BILLY bookcase in a narrow hallway is just asking for scratched walls and a sore back.
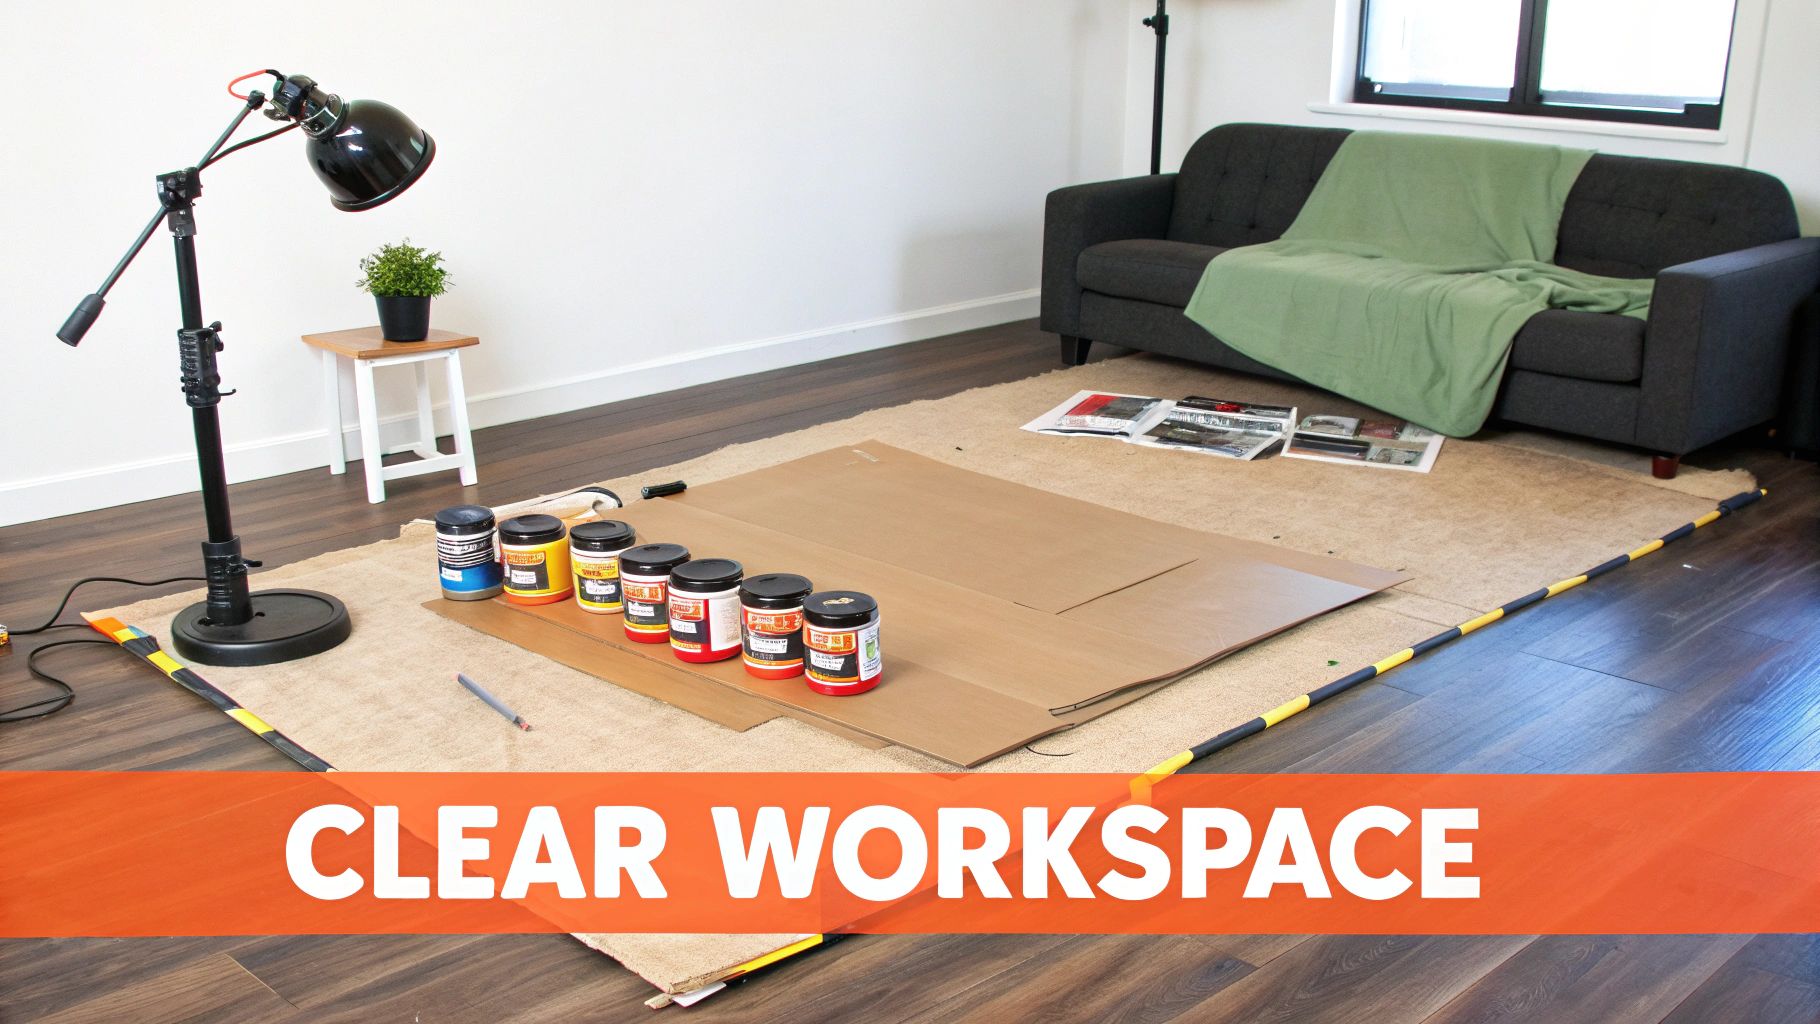
Once you've got the space, you need to protect both your floor and your new furniture. Here's a simple but effective trick: just flatten the big cardboard box the furniture came in and use that as your work mat. An old blanket or a soft rug works great, too.
This creates a buffer that keeps your hardwood floors from getting scratched and stops the laminate finish on that new MALM dresser from getting scuffed up before you've even used it.
Good lighting is another non-negotiable. Trying to tell the difference between two almost-identical screws in a dim room is a classic mistake we see all the time. If you need to, bring in an extra lamp to make sure you can clearly see every little detail in the manual and every pre-drilled hole.
A well-prepped workspace does more than just prevent mistakes. It turns what could be a stressful chore into a pretty satisfying project. Taking 15 minutes to set the stage can seriously save you hours of backtracking later.
Distractions are the enemy of a successful IKEA build. If you have kids or pets running around, it’s best to keep them safely out of your assembly area. Those small, shiny pieces of hardware are magnets for little hands and paws, and a single missing CAM lock can bring your entire project to a screeching halt.
This is also the perfect time to get all your hardware in order. Instead of digging through those little plastic bags, take a few minutes to sort all the screws, dowels, and fasteners into separate containers. If you really want to step up your game, checking out some dedicated hardware organization ideas can be a game-changer, especially for the more complex builds.
Setting up your area with intention creates a zone of control. It's a lot like how effective home staging tips are crucial for a smooth house sale. Preparing your workspace is just as essential for a successful build. This little bit of prep work sets a positive tone and makes the whole process feel less daunting and a lot more achievable.
IKEA famously includes that little Z-shaped Allen key in every box, but relying on it alone is a classic rookie mistake. We've all been there. To actually put IKEA furniture together efficiently and without wanting to tear your hair out, you need a small, affordable arsenal of basic tools.
Having the right gear on hand completely transforms the experience. It takes it from a frustrating struggle into a smooth, satisfying project. Relying on that flimsy included tool often leads to stripped screws and seriously sore hands. A few simple upgrades give you better leverage, speed, and precision, and you'll end up with a much sturdier piece of furniture. These aren't expensive, specialized items; they're common tools that will serve you well for years.
First things first, let's talk essentials. A quality Phillips head screwdriver with a comfortable, ergonomic grip is non-negotiable. It gives you so much more torque than the Allen key, making it way easier to tighten screws securely without wrecking your wrist.
Next up, a rubber mallet. This will be your best friend for tapping delicate pieces together. It’s perfect for gently seating wooden dowels or aligning panels without leaving dents or scratches on that laminate finish. Whatever you do, never use a metal hammer directly on the furniture parts.
Here are a few other lifesavers I never start a build without:
Building your own toolkit isn't about being a professional; it's about being prepared. Just a few key items can cut your assembly time in half and dramatically reduce the potential for mistakes and rework.
Now for the question I get all the time: can you use a power drill? The answer is a resounding yes, but with extreme caution. A power drill can be a massive time-saver, but it can also destroy your new dresser in seconds if you're not careful.
The secret is to use a cordless drill with an adjustable torque clutch. That's the rotating ring with numbers on it, right behind the part that holds the bit. Start by setting the clutch to a very low number (like 2 or 3). This makes the drill stop turning once the screw is snug, preventing you from over-tightening and stripping the hole in that soft particleboard.
For a deeper dive into the specific gear that professionals use, our complete guide to essential furniture assembly tools offers detailed recommendations.
One last thing: never use a high-powered impact driver. Its hammering action is way too aggressive for this type of material. It's also a good habit to finish the final quarter-turn of any critical screws by hand to make sure they're perfectly tight without causing any damage.
Those wordless, cartoon-filled instruction manuals are an IKEA signature. While they're designed to be universal, let's be honest—they can sometimes feel like you're trying to decipher hieroglyphics. The real secret to a successful IKEA build isn't about being a DIY genius; it's about learning their visual language and getting organized before a single tool comes out of the box.
My number one, non-negotiable rule? Do a full parts inventory before you begin. Seriously. Open up those little plastic bags of hardware and lay everything out. You need to meticulously count every screw, dowel, and cam lock against the parts list on the first few pages of the manual. This one simple step, which takes maybe ten minutes, completely prevents that soul-crushing moment when you're halfway through and realize a critical piece is missing.
Once you've confirmed every part is accounted for, it's time to sort. Don't just leave all the hardware in one big, chaotic pile. This is where a little upfront organization pays off in a big way.
For a project with this many small, moving parts, thinking along the principles of creating a Standard Operating Procedure can be a game-changer. It helps you turn that jumbled mess of components into a structured, step-by-step process.
To help you get familiar with the hardware you'll be sorting, here's a quick rundown of the most common pieces you'll find in almost any IKEA box.
| Hardware Name | What It Looks Like | Its Primary Job |
|---|---|---|
| Cam Lock Nut | A small metal cylinder with a Phillips or flathead slot and an arrow. | Works with a cam lock screw to create a strong, tight right-angle joint. The arrow points to the screw head. |
| Cam Lock Screw | A screw with a machine-threaded end and a flat, disc-like head. | Screws into one panel and locks into the cam lock nut in another panel, pulling the two pieces together. |
| Wooden Dowel | A small, fluted wooden pin. | Used for alignment and adding shear strength to joints. They keep panels from shifting side-to-side. |
| Locking Nut | A small, cross-shaped or barrel-shaped nut. | Fits into a pre-drilled hole and tightens onto a connecting bolt to secure shelves or structural pieces. |
Getting to know these four pieces is half the battle, as they form the foundation of most IKEA furniture connections.
IKEA's instructions are famously minimalist, which means you have to assume every single line, dot, and symbol has a purpose. Most mistakes happen when people breeze past the small but critical details.
Pro Tip: Keep an eye out for the big "X" symbol. When you see an "X" drawn over a picture of a tool (like a power drill) or an action, that's IKEA's universal sign for "Don't you dare do this!" Ignoring these warnings is the fastest way to strip a screw or crack a panel.
Another detail that trips people up is panel orientation. The diagrams will show tiny, unfinished holes versus larger, finished holes on the edges of the boards. Pay very close attention to which way these are facing in the illustration. Putting a panel on backward is one of the most common—and most frustrating—mistakes to fix later on.
The infographic below shows a few simple tools that can make your assembly day go a lot smoother.
This entire consumer-assembly model is what allowed IKEA to completely revolutionize the furniture market. By 2024, its global revenue hit nearly €45.1 billion (around $49 billion), marking a staggering 334% growth since 2001. The system clearly works, with 482 stores worldwide drawing in roughly 900 million customers in 2024 alone. The whole empire is built on the simple idea that with clear instructions and all the right parts, anyone can build their own furniture.
Look, there’s absolutely no shame in calling for backup. In fact, sometimes it’s the smartest and most cost-effective move you can make.
While the satisfaction of a DIY build is real, certain projects are just better left to those who assemble IKEA furniture for a living. Recognizing when to hand over the Allen key can save you a ton of time, prevent costly mistakes, and honestly, protect your sanity.
The decision to hire a pro usually comes down to two things: complexity and scale. A small LACK side table? You’ve got this. But a massive, floor-to-ceiling PAX wardrobe system with sliding glass doors and a dozen interior organizers? That's a completely different beast. These large, multi-box projects demand precision, strength, and experience to make sure they're stable and safely secured.

Think about hiring an expert if you find yourself in any of these situations. It's often a small investment for a guaranteed great result.
This need for professional help isn't surprising when you look at the numbers. The ready-to-assemble furniture market hit a value of around $29.1 billion in 2024. It's projected to climb to nearly $41.2 billion by 2030, all because people love the style and savings but don't always have the time or patience for assembly. You can find more details about the growth of the ready-to-assemble furniture market on strategicmarketresearch.com.
The biggest benefit of hiring a professional isn't just saving time—it's gaining peace of mind. You know the job will be done correctly, safely, and efficiently, with no risk of damaging your new purchase or your home.
Ultimately, the decision is yours. Weigh the project's complexity against your available time and confidence level to make the right choice. For a deeper dive, check out our guide on why you should hire a professional for IKEA furniture. It breaks down the cost-benefit analysis in more detail.
Even with the best plan, you can hit a snag during an IKEA build. You’re cruising along, and then one little problem grinds the whole project to a halt. We've seen it all, so we’ve gathered the most common frustrations and put together some straightforward answers to get you unstuck and back on track.
First things first, take a breath. Before you panic, carefully check all the packaging one more time. I can't tell you how many times a tiny screw or dowel has been found hiding in a cardboard fold or tucked away in the corner of a plastic bag. A second look often solves the problem.
If you’re positive the part is gone or it arrived broken, grab the instruction manual and find its unique part number. With that number in hand, you can head to the customer service desk at your local IKEA or fill out their online parts request form. IKEA is generally fantastic about sending out replacements, usually at no cost.
Whatever you do, don't just grab a random screw from your junk drawer. Using the wrong hardware might seem like a quick fix, but it can seriously compromise the furniture's stability and safety down the road.
That little two-person icon in the manual? It's not a suggestion; it's there for a critical reason: safety. For big, bulky items like wardrobes, bed frames, or tall bookshelves, you absolutely need one person to hold a heavy panel steady while the other secures it.
Trying to wrestle these pieces alone is just asking for trouble. You could easily drop a panel, damaging the furniture, your floor, or even yourself. It’s also the fastest way to have a screw rip right out of the particleboard because you’re trying to hold and fasten from an awkward, unstable angle.
If you have no other choice but to go solo, use walls for support and move incredibly slowly. But honestly, the smartest and safest bet is to phone a friend. The whole process will be faster, safer, and a lot less stressful.
A wobbly piece of furniture is almost always caused by fasteners that aren't fully tightened. Don't worry, this is usually an easy fix. Just go back over every single screw, bolt, and cam-lock on the entire piece. Give each one a final quarter-turn until it feels completely snug.
And pay special attention to that flimsy-looking back panel on bookshelves and dressers. It's tempting to rush this step, but a properly squared and securely nailed-on back panel adds a massive amount of structural rigidity.
A wobbly frame is a dead giveaway of incomplete connections. Ensuring every screw is tight and the back panel is secure will solve the issue 99% of the time. If it's still unsteady, you might have missed a dowel or seated a panel incorrectly in an earlier step.
Yes, you can absolutely use a power drill—but you have to be careful. A drill can be your best friend, saving your wrist a lot of agony, but it can also destroy your new furniture in seconds if you use it the wrong way.
The trick is to use a drill with an adjustable torque clutch. That's the numbered ring right behind the part that holds the bit. Set that clutch to a very low setting, like 2 or 3. This feature tells the drill to stop turning once it hits a certain amount of resistance, which prevents you from over-tightening screws and stripping the holes in the soft particleboard.
Never, ever use a high-powered impact driver. Its hammering action is way too aggressive for this material. For the more delicate hardware like cam-locks, it’s always best to do the last few turns by hand with a regular screwdriver. This way, you can feel the tension and get a perfect, snug fit without causing any damage.
If you've hit a wall or just don't have the time for the hassle, Assembly Smart is here to help. Our team of professional assemblers can have your new furniture built safely and correctly, with next-day appointments available. Get your free estimate today at https://assemblysmart.com.
