-
CALL US:
- (866) 952-3456
That sinking feeling when you sit down is more than just a feeling—it’s a dead giveaway that your sofa's springs need a look. Most of the time, fixing them is a pretty straightforward job. It usually means flipping the sofa over, pulling off the bottom dust cover, and either popping loose sinuous springs back into their clips or retying broken twine on older coil springs. With a few basic tools, you can often tackle this yourself.
Before you can fix anything, you have to play furniture detective. A sagging cushion can point to a few different culprits, and guessing is the fastest way to waste a weekend and a trip to the hardware store. Getting the diagnosis right is the most important part of the job.
It’s no surprise that sagging springs are a top complaint. The global furniture repair market hit $12.2 billion in 2024, and a good chunk of that is from people just like you trying to save a beloved couch. After all, a smart repair can save you 60-70% compared to buying new.
The first step is figuring out what kind of support system is hiding under your cushions. The two most common types are completely different animals when it comes to repairs, so you need to know what you’re up against.
So, how do you tell them apart? Take off the cushions and press down firmly on the fabric deck below. If you can feel distinct, individual springs pushing back, you've got coil springs. If it feels more like long, rigid wires running front-to-back, you’re looking at sinuous springs.
Pro Tip: Don't just assume it's the springs! I’ve seen it a hundred times—the real problem is a crack in the wooden frame right where a spring attaches. A quick visual check now will save you a massive headache later.
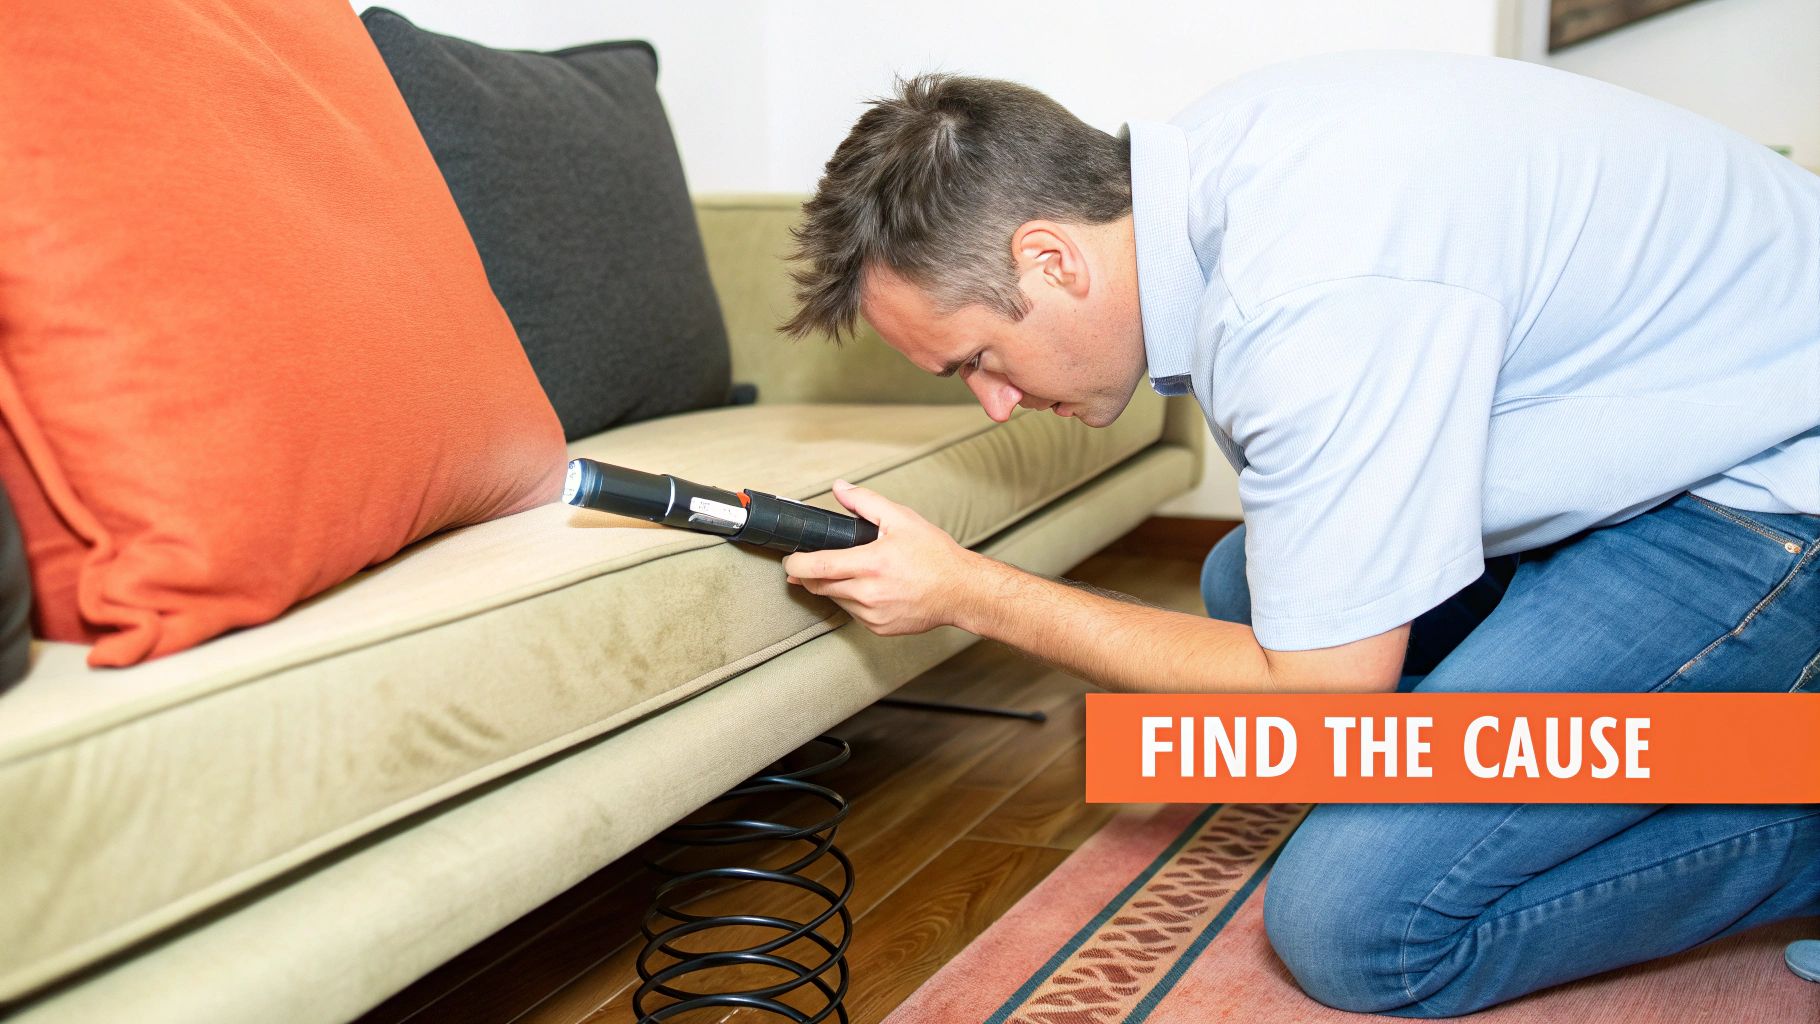
Once you’ve muscled the sofa upside down and ripped off the bottom dust cover (it’s usually just stapled on), it’s time for a proper inspection. Get a flashlight and get ready to look, listen, and feel your way to the source of the problem.
Use this table to get a head start on diagnosing what's wrong with your sofa based on what you're seeing and feeling.
| Symptom | Likely Cause (Sinuous Springs) | Likely Cause (Coil Springs) | Difficulty to Fix |
|---|---|---|---|
| A single deep sag in one spot | A single spring has popped out of its clip. | A single coil's twine has broken, causing it to lean. | Easy |
| A long, trough-like sag | Multiple adjacent springs have detached or stretched. | A whole row of twine has snapped, letting coils fall. | Moderate |
| A general "hammock" feeling | All springs have lost tension over time. | The underlying webbing support has torn or detached. | Moderate to Hard |
| Loud creaks or groans when you sit | A spring is rubbing against the frame or another spring. | A loose coil is scraping against its neighbors. | Easy |
| One side of the sofa is lower | The wooden frame on that side is cracked or broken. | The wooden frame on that side is cracked or broken. | Hard |
This should help you narrow things down, but now it's time to confirm your suspicions with a hands-on inspection.
Start with the wood. Run your hands along the entire frame, feeling for any cracks, splits, or wobbly joints. A weak frame makes the whole spring system sag, and it can feel just like a spring failure. Sometimes, a wobbly sofa is just on a wonky floor; check out our guide on how to level furniture on uneven floors to rule that out first.
Next, get your eyes on the springs themselves. For sinuous springs, look for clips that have popped out of the wood or snapped off. Are any of the S-shaped wires bent out of shape, over-stretched, or broken clean through?
If you have coil springs, the culprit is almost always broken twine. When that twine gives way, the coils can't support each other and they start to lean or fall over, creating a sag you can really feel. While you're under there, check the webbing at the base—if it’s torn or has pulled away from the frame, that’s your problem.
Finally, use your ears. Have someone press down on different spots from above while you listen underneath. A sharp "ping" or a loud groan can lead you right to a loose clip or a spring that’s rubbing where it shouldn't. This methodical approach will tell you exactly what you need to fix.
Before you even think about flipping that sofa over, let's talk about what it takes to do this job right. A successful repair starts long before you pull a single staple; it begins with having everything you need within arm's reach.
Getting your tools and materials organized first means you can stay focused on the task at hand instead of running to the garage every ten minutes. It’s the difference between a frustrating afternoon and a job well done. A little prep work now saves a ton of headaches later.
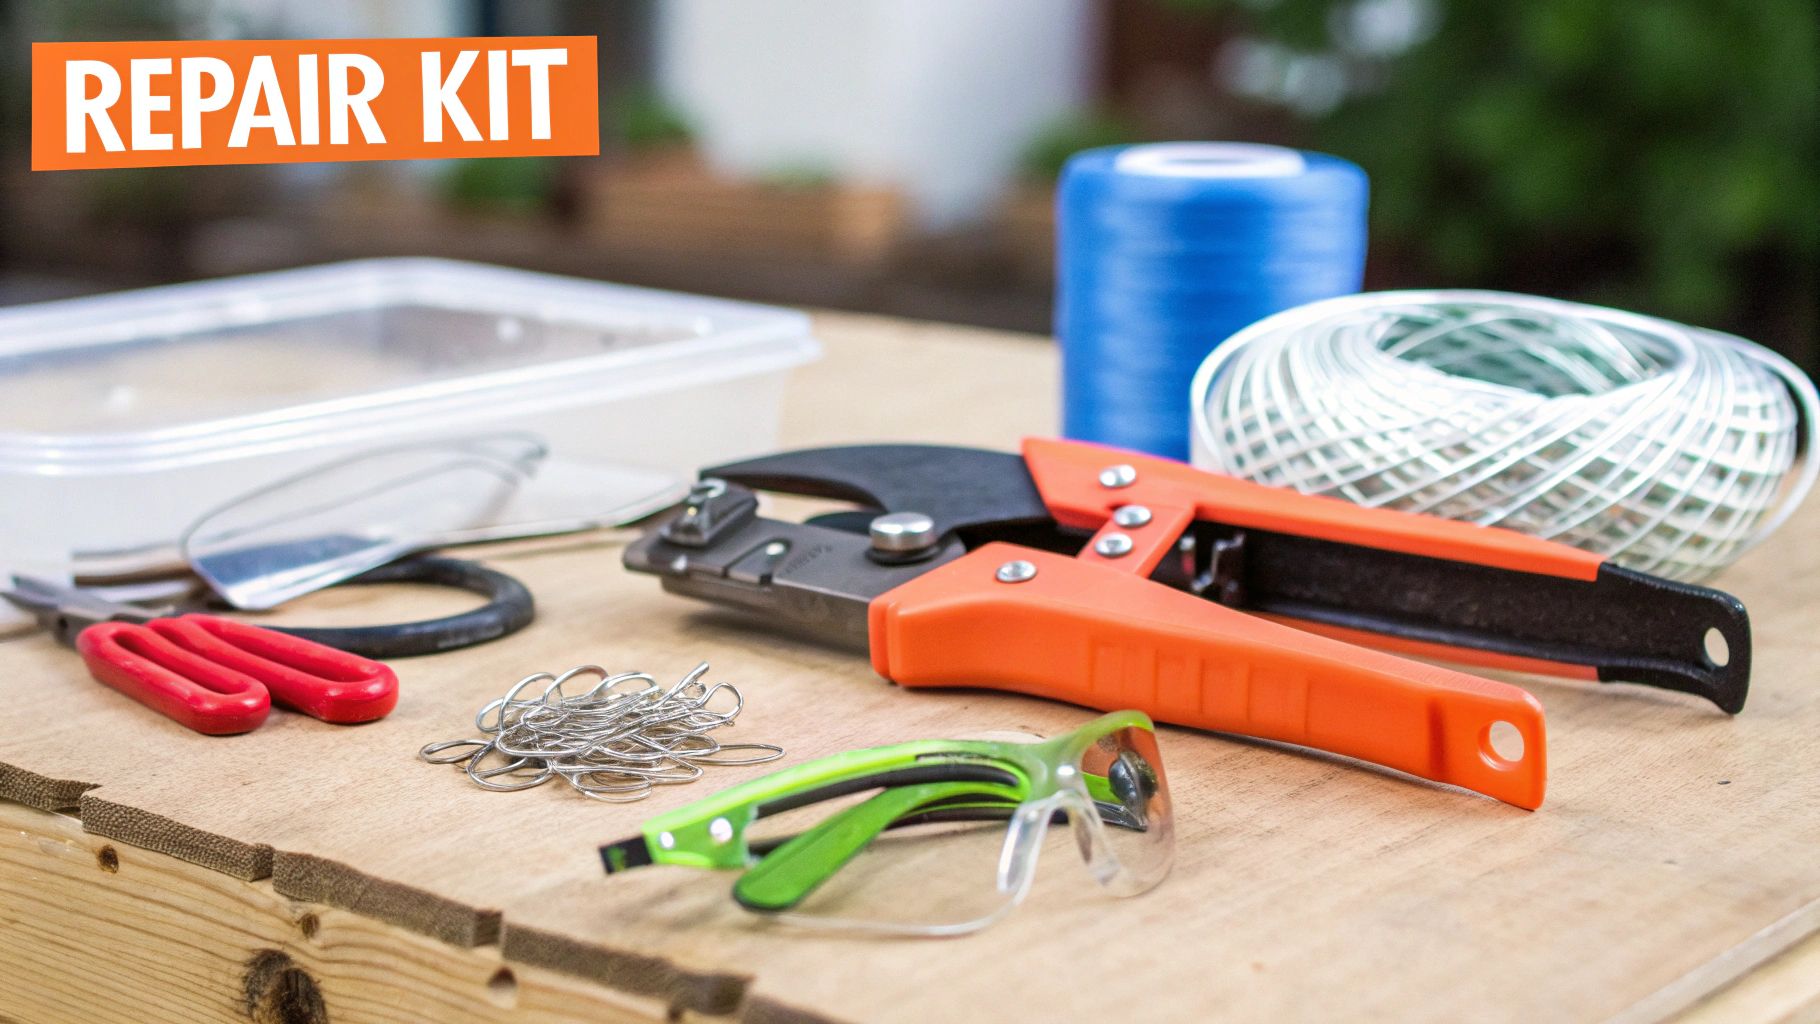
This is the core list of tools that will get you through about 90% of the job, from prying off the dust cover to getting the new springs locked in place. Don't try to substitute these—you'll thank me later.
Having the right tools isn't just about convenience; it's about doing the job correctly and safely. Trying to make do with standard pliers instead of locking pliers, for example, is a recipe for a slipped spring and scraped knuckles.
Once you’ve got the basic tools, you’ll need parts specific to your sofa’s guts. Figure out if you have sinuous or coil springs, because buying the wrong materials is a common mistake that will bring your project to a screeching halt. If you want a broader overview of helpful equipment, you can check out this list of essential furniture assembly tools.
For Sinuous (Zigzag) Springs:
For Coil Springs:
Sinuous springs, which you might know as zigzag or S-springs, are the real MVPs of most modern sofas. If your couch was built anytime in the last few decades, it's almost certainly these serpentine wires that provide the support. The best part? Fixing them is one of the most satisfying and straightforward DIY furniture projects you can take on.
This is your game plan for bringing that supportive, like-new feeling back to your favorite seat. We’ll cover the most common ways these springs fail and give you a clear path to fix each one, from a spring that simply popped loose to one that needs a full replacement.
Before you can fix anything, you have to see what you're up against. This means flipping your sofa completely upside down. Don't just prop it on its arm—you need a stable, flat surface to work safely and effectively.
With the sofa flipped, you'll see a thin fabric layer stapled across the bottom of the frame. That’s the dust cover. Grab a heavy-duty staple remover and a pair of pliers and start carefully prying out the staples around the edges. Take your time here. If you can avoid tearing the fabric, you can easily reattach it when you're done. Just fold it back out of the way to reveal the entire spring system.
This is the best-case scenario and, frankly, the most common problem you'll encounter. If you have a single, very specific saggy spot, it's a good bet one end of a spring has just slipped out of its metal clip. It’s a quick fix that can have your sofa back in business in less than an hour.
You’ll see the spring still attached on one side but dangling free on the other. Now, the trick is that these springs are under a lot of tension. Trying to muscle it back into place with your hands is a good way to get frustrated and pinch your fingers.
This is where a good pair of locking pliers becomes your best friend.
Sometimes the spring itself is perfectly fine, but the little metal clip holding it has given up. It might be bent out of shape, snapped, or even pulled right out of the wood frame. Replacing it is just as easy as the last fix.
First, you've got to get the old, damaged clip out of there. If it’s just bent, you can usually pry it out with your pliers. If it’s broken, you’ll need to pull out whatever's left along with the old staples or screws that were holding it.
Next, line up the new clip in the exact same spot. Keeping the original placement is key to maintaining even tension across all the springs. Fasten the new clip to the frame with two screws (which I find more secure) or a few heavy-duty staples from your staple gun. Once the new clip is rock-solid, just use the locking plier method we just talked about to stretch the spring back into place.
A Quick Tip from Experience: When you install the new clip, try angling it just slightly inward, toward the middle of the couch. This subtle change gives the spring end a more secure seat and really helps prevent it from popping out again down the road.
If a spring is bent into a weird shape, stretched out like a slinky, or snapped clean in two, replacement is the only real path forward. This is definitely the most involved of the sinuous spring repairs, but it's nothing to be afraid of.
Your first move is to detach what's left of the old spring. Use your locking pliers to unhook both ends from their clips—just be ready for that tension to release. You’ll also notice one or two thin wires, called "silent-tie" wires, running across the springs to keep them aligned. Use your pliers to unclip the old spring from these as well.
Now, break out the tape measure. You need the precise length of the spring from one hook-end to the other. You also need to know the gauge (the thickness) of the wire. Most sofas use a sturdy 8-gauge wire for the seat, but it's absolutely crucial to match what's already in there.
With the new spring ready to go, installation is just the reverse of removal.
The demand for this kind of work is soaring. The furniture repair market is expected to jump from $2.1 billion in 2023 to a staggering $4.3 billion by 2031, and believe it or not, spring failures account for up to 40% of all upholstery complaints. A simple DIY repair like this can save you a fortune compared to buying new. You can explore more market insights on the growth of upholstery repair services to see the trend.
By taking this on, you're not just rescuing a piece of furniture. You're saving a serious chunk of change and keeping a big, bulky item out of the landfill. Once your repair is solid, just pull that dust cover back into place, staple it back to the frame, and get ready for many more years of comfort.
Coil springs are the gold standard for high-end furniture support. They're the hidden architecture behind some of the most comfortable and durable sofas ever made. If you have an older, high-quality, or antique piece, there's a good chance these individual springs are doing the heavy lifting underneath you.
While they might look more intimidating than their simpler zigzag cousins, fixing them is usually a matter of patience and understanding how the system works together.
The most revered setup is the eight-way hand-tied system. In this classic method, each spring is connected to its neighbors and the frame in eight different directions using incredibly strong twine. This creates a web of support that distributes weight perfectly, preventing sags and providing that telltale high-end comfort. When a sofa with this system starts to dip, the culprit is almost always broken twine, not a broken spring.
Before you can dive into a repair, you need to know what you're looking at. Once you get the dust cover off, you'll see a field of individual cone-shaped springs. At the base, they're either sewn to a tough layer of jute webbing or clipped to a metal grid. The real magic, though, is what's happening at the top.
You'll find a complex network of twine running from spring to spring and anchored to the sofa's frame. This is the tying system. Its job is to hold each spring perfectly upright so they can all work together as a single, supportive unit. When one of those ties snaps, a spring loses its support, leans over, and creates that dreaded sag.
The most common repair you'll do on a coil spring system is replacing a broken or frayed piece of twine. It’s a task that requires a bit of precision, but it's very achievable. Your goal is to perfectly replicate the original tension and pattern to bring that support structure back to life.
First, find the broken twine and see which springs it was holding up. Carefully cut away any old, failed remnants in that specific area. It's important to leave the rest of the intact tying system alone—you only want to fix what's actually broken.
Your main tool for this job is a fresh roll of waxed, non-stretch spring twine and the knowledge of a couple of key knots. The clove hitch is essential for securing the twine to the spring itself, while a simple but strong knot will anchor the ends to the frame where the original nails or staples are.
Expert Insight: The secret to a successful re-tie is getting the tension just right. As you weave the new twine, pull it taut—but not so tight that it compresses the spring. The spring should stand perfectly vertical and stay level with its neighbors. You're trying to restore its position, not change it.
The tying sequence is also critical. Just follow the original path of the twine. This typically means running it front-to-back, then side-to-side, and finally diagonally in both directions to complete that classic eight-way tie.
This infographic simplifies the general repair process, whether you're dealing with coils or sinuous springs.
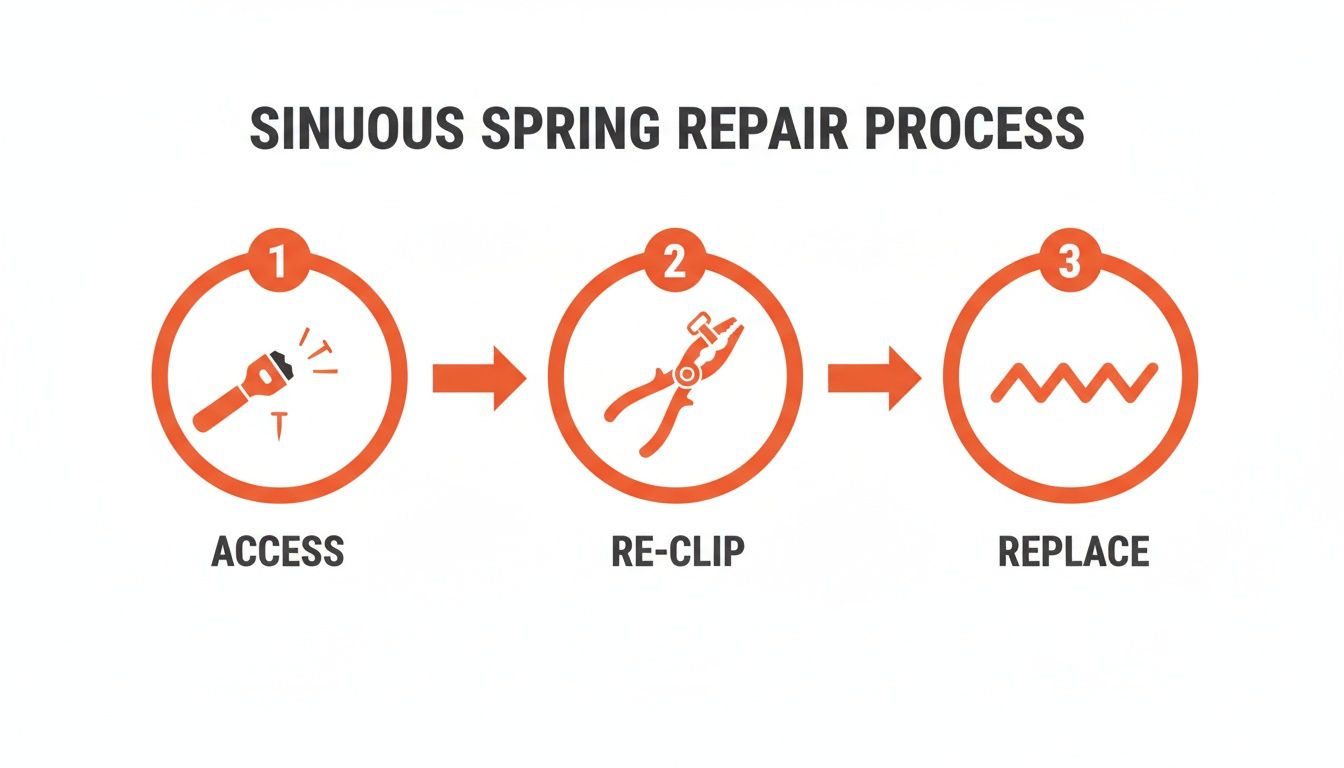
The visual flow highlights that every successful spring repair begins with proper access, followed by the specific re-attachment or replacement action.
Not sure which spring type you're dealing with or what the repair entails? Here’s a quick comparison to help you understand the key differences in repairing the two main types of sofa springs.
| Repair Aspect | Sinuous (Zigzag) Springs | Coil Springs |
|---|---|---|
| Common Problem | Broken or detached retaining clips. | Broken twine in the eight-way tie system. |
| Primary Tool | Pliers (standard and locking). | Spring twine and your hands (for knot tying). |
| Complexity | Generally simpler; involves re-hooking or replacing a clip. | More intricate; requires replicating tying patterns and knots. |
| Time to Fix | 15-30 minutes per spring/clip. | 30-60 minutes per broken tie. |
| Key Skill | Applying leverage to stretch the spring into place. | Tying specific knots (like the clove hitch) with consistent tension. |
As you can see, sinuous spring repair is often about brute force and simple mechanics, while coil spring repair is more of a precision craft. Both are completely doable with the right approach.
While it's much less common, a spring can occasionally snap. Replacing it is definitely more involved, but it still follows a logical process. The first step is to carefully snip all eight ties connecting the broken spring to its neighbors, freeing it from the rest of the system.
Next, you have to detach the base of the spring from the webbing below it, which is usually held on with heavy-duty thread or metal clips. Once the old spring is out, you can position the new one. Make absolutely sure your replacement spring is the exact same height and gauge to maintain a level seating deck.
Secure the base of the new spring to the webbing, mimicking the original method. Now for the re-tying. Using your spring twine, you'll meticulously weave the new spring back into the existing grid, tying it to its neighbors and the frame in all eight directions. This process fully integrates the new spring, making the repair virtually invisible from a structural standpoint.
Getting comfortable with the complex internals of furniture can be tricky. For instance, knowing how to disassemble a recliner chair involves similar principles of methodical, step-by-step deconstruction and reassembly.
By mastering these techniques, you're not just fixing a sofa—you're preserving a piece of quality furniture for many more years of comfort.
Sometimes, the springs themselves are perfectly fine, but the sofa still sags like a hammock. When this happens, the real villain is often a weak or cracked wooden frame. A compromised structure can’t provide the tension the springs need to do their job, which leads to a dip that no amount of spring re-clipping can fix.
While you have the dust cover off, it’s the perfect time to give the frame a thorough inspection. Run your hands along all the main support beams, paying close attention to the corners and anywhere a spring clip is attached. You're looking for hairline cracks, splintering wood, or joints that feel wobbly.
If you find a crack in a support beam, don't panic. For most minor fractures, a simple but strong repair is all that's needed. Start by forcing high-quality wood glue deep into the crack until it's completely filled.
Next, use C-clamps to squeeze the cracked wood tightly together, making sure to wipe away any excess glue that seeps out. For a truly durable fix, drill a few pilot holes and drive several wood screws through the cracked area to permanently bind the pieces. If you have wobbly corner joints, adding triangular corner blocks—small pieces of wood screwed into both sides of the joint—provides incredible reinforcement.
Need a fast and effective solution while you plan a more involved repair? The classic plywood-under-the-cushions trick is popular for a reason. It's an instant lift for sagging seats that requires minimal effort and cost.
Just measure the seating area under your cushions and get a piece of 1/2-inch plywood cut to size at your local hardware store. Slide this board directly under the cushions, and you'll immediately notice firmer support.
The Trade-Off: While this method is incredibly effective for immediate sag relief, be aware that it creates a much firmer, less forgiving seating surface. It's an excellent stopgap but can feel stiff compared to a proper spring system.
For minor sagging that doesn't quite warrant a full teardown, cushion boosters or foam inserts can be a fantastic solution. These are simply firm foam pads designed to be placed inside your cushion covers, right underneath the existing foam core.
This simple addition plumps up the cushion, counteracting minor compression and adding a layer of support right where you need it. It’s an ideal temporary fix that can buy you months, or even years, before a deeper repair becomes necessary.
Successful DIY repairs like these are a huge win. Globally, the furniture repair market was valued at $7.2 billion in 2025, and smart fixes can extend a sofa's life by over a decade. This approach cuts replacement costs by up to 65% and keeps bulky items out of landfills.
After you've handled the structural issues, keeping your sofa's appearance up is the next step. You can find a comprehensive guide on how to clean a fabric couch that walks you through keeping your upholstery looking fresh and presentable.
Even with a solid plan, jumping into a furniture repair project for the first time can feel a little daunting. You probably still have a few questions about how much this will cost, what you're really getting into, and when it might be smarter to just call a pro.
Let's clear those up right now. Think of this as your final gut-check before you flip that couch over.
Getting a professional to fix your sofa springs will usually set you back somewhere between $250 and $500. Of course, that price tag depends a lot on where you live, the kind of sofa you have, and just how bad the sag has gotten.
If it's a simple fix, like just re-clipping a few sinuous springs that have popped loose, you'll be on the lower end of that range. But if the job is more involved—like re-tying a whole eight-way hand-tied system or swapping out multiple springs and the webbing underneath—you could be looking at $600 or more. It's a bigger investment than DIY, for sure, but it’s often the right call for a valuable antique or a piece you really care about.
Yes, you almost always can. Most sofas are designed with a thin black fabric—the dust cover—stapled to the bottom of the frame. This is your access panel.
All you need to do is carefully pry out those staples and peel back the dust cover. This gives you a wide-open view of the entire spring system from below. It's the least destructive way in and usually all you need to do to re-attach clips, replace sinuous springs, or fix broken twine on coil systems. You’d only ever need to think about touching the main upholstery if the frame itself is busted or the damage is way up at the top of the spring assembly.
Here's a little secret from the pros: always try to work from the bottom. It keeps the original fabric intact and saves you a mountain of time and frustration compared to deconstructing the whole piece from the top.
Knowing when to tap out is the smartest move you can make. It's time to put down the tools and call an expert if you run into any of these situations:
Sometimes, the best DIY decision is to let a specialist take over. If you find yourself in over your head, you can learn more about various home repair handyman services that are equipped to handle these kinds of jobs.
Your time commitment really comes down to your own experience and what's broken. If you're a first-timer tackling a simple fix like re-attaching a couple of sinuous springs, you can probably knock it out in 1-2 hours.
Need to replace a totally broken sinuous spring? Budget around 2-4 hours to give yourself time to get the old one out and stretch the new one into place. For a more delicate coil spring repair, like re-tying a small section, you could easily be looking at a half-day project. My advice? Always add a little extra time to your estimate for those stubborn staples or hidden frame issues you didn't see coming.
Feeling confident about your next furniture project? At Assembly Smart, we handle everything from complex furniture assembly to setting up your new grill or playset. If you'd rather leave the tools in the box, visit our website to get a free estimate and book a next-day appointment for professional, stress-free service.
