-
CALL US:
- (866) 952-3456
Putting together a Lifetime basketball hoop boils down to three main tasks: prepping the site, setting the pole in concrete, and mounting the backboard with its rim. Gather the right gear, carve out about 1–2 hours, and you’ll soon have a dependable setup ready for hours of play.
This guide lays out how each phase—site preparation, foundation work, pole setup, and safety checks—flows into the next. Drawing on real-world DIY projects, you’ll see how a little planning goes a long way toward a smooth install.
Good groundwork is the secret ingredient for a safe, smooth build.
Before you break ground, double-check that every item is at hand. Having a full kit laid out next to your work area cuts down on trips back to the garage.
| Tool or Part | Purpose | Quantity |
|---|---|---|
| Shovel | Dig foundation holes | 1 |
| Concrete mix | Anchor stability | 200–300 lbs |
| Level | Ensure proper alignment | 1 |
| Socket wrench set | Tighten bolts and nuts | Set |
| Ladder | Reach mounting height | 1 |
| Pole segment kit | Support structure | Full set |
| Breakaway rim | Attach net and play surface | 1 |
With everything organized, you’ll breeze through the install without hunting for stray nuts or bolts.
Most homeowners wrap up a standard model in 1–2 hours, from hole-digging to final walkthrough. Keep an eye out for these common pitfalls:
For more pro tips on hoop installation, check out the detailed breakdown at FutureDataStats’ basketball hoop guide.
Below is an infographic that visualizes the three main steps of the hoop assembly flow.

Real DIY builds prove that sequenced preparation and focused execution can shave off around 15 minutes from your total assembly time.
Next up, we’ll dive deeper into each step—covering safety anchors, troubleshooting wobble, and when it makes sense to call in a professional service like Assembly Smart. Kick off your project today and get ready to shoot some hoops!
Right out of the box, give yourself room to breathe. Unpack the Lifetime basketball hoop kit and arrange every piece on a tidy work surface.
You’ll want to lay eyes on the tempered glass backboard, frame arms, breakaway rim and all hardware pouches. Match every bolt, nut and washer to your manual’s inventory.
No torque wrench at hand? An adjustable wrench or even a sturdy kitchen set will do in a pinch. Flexibility here saves you a late-night hardware run.
Use these quick checks to verify parts:
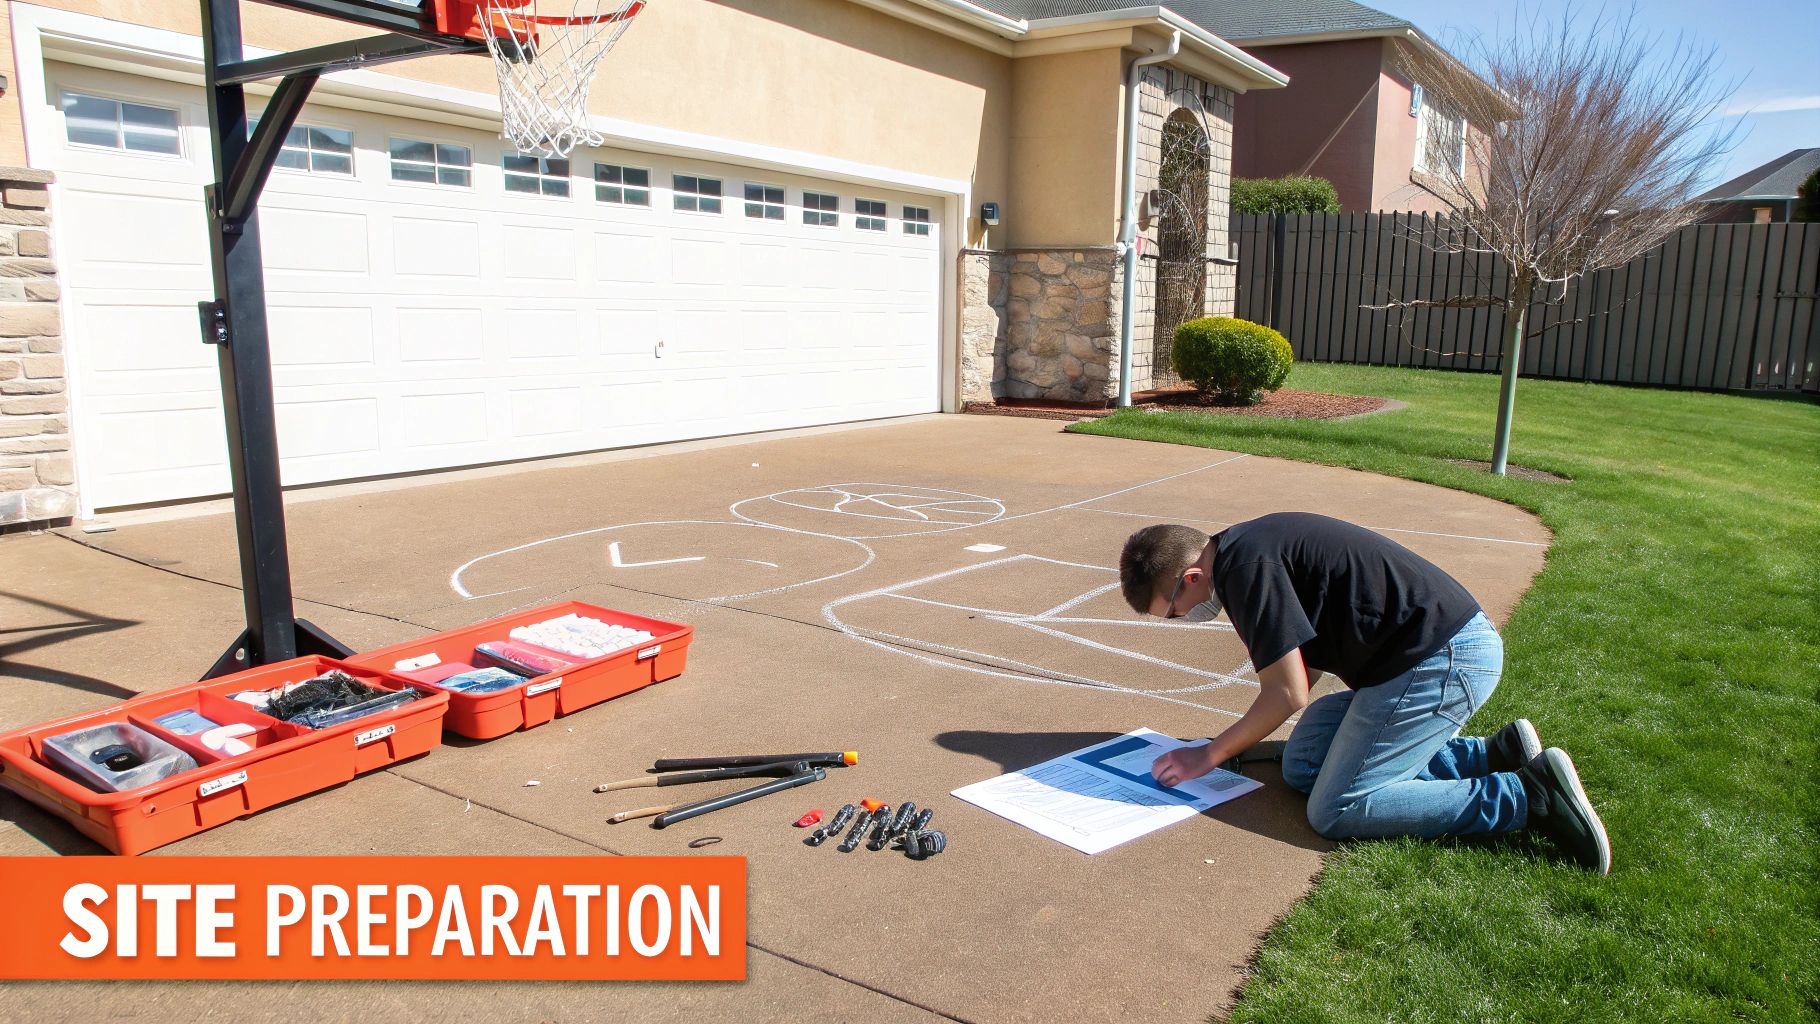
Now, think about where this beast will live. Sunlight can blind your shooter, so factor in sun angles for afternoon games. And don’t ignore wind; open yards near Lake Erie demand extra caution.
A suburban Ohio family sketched their court outline in chalk to avoid centering mishaps. By marking key boundaries, they learned that an extra foot off the driveway edge makes all the difference.
When they found their driveway sloped, they slipped plastic shims under each stand. Using a small level and scraps of lumber, they had everything evened out in under two hours.
Accurate chalk outlines and quick shim adjustments shave hours off prep work.
Next up, draft a simple site map—either on paper or snapping photos with your smartphone. Highlight where the concrete footing, upslope and cable supports will go. This visual guide keeps you on track once the shovel hits dirt.
You might be interested in our detailed basketball hoop reviews to compare models. That internal reference ties your prep to user feedback.
Finally, build a concise parts checklist:
Stash this list where you can grab it on assembly day. A little planning now prevents a scramble later.
Laying a solid base now means fewer headaches—and repairs—down the road. Whether you’re digging into the earth or clipping on a no-dig kit, taking the time to pick the right method pays off long term.
Most homeowners in temperate climates settle on an in-ground setup, sinking their pole into a 4-foot deep hole. Local frost lines or building codes might push that depth even deeper. If you’d rather skip the shovel, no-dig anchor kits with expanding brackets can cut installation time in half—but concrete footings still deliver the rock-steady hold that lasts decades.
Below is a quick glance at how traditional dig-in systems compare to no-dig anchor kits. Match installation time and cost to your ground conditions and timeline.
| Anchoring Method | Installation Time | Cost Estimate | Ground Requirements |
|---|---|---|---|
| Traditional Dig-In | 2–4 hours | $50–$100 | Soil excavation |
| No-Dig Anchor Kit | 1–2 hours | $120–$180 | Surface mounting |
Picking a method isn’t just about price tags and clocks. Think about soil type, wind exposure, and how quickly you need your hoop ready for action.
Frost depth varies by zip code, so take a minute to consult your local building department. In places like Minnesota, frost lines can top 5 feet, forcing a deeper dig or extra insulation.
When temperatures dip, mix concrete with warm water and toss in quick-set additives. Then leave those braces in place for at least 24 hours before you test the pole’s sturdiness.
The following screenshot illustrates foundation layering and frost protection measures.
That graphic highlights soil layers, footing width, and drainage details—key factors in preventing soil heave and keeping your goal rock solid.
Across North America, 60% of customers choose residential Lifetime hoops, often digging 4-foot bases themselves. Industry reports show 30% of improperly installed poles fail within five years.
Learn more about these assembly trends on Intel Market Research.
Temporary braces and a reliable level are your best friends when the concrete sets. Skip them, and you’ll end up with a tilt that gets worse every time the wind picks up.
Explore our step-by-step inground basketball goal guide on Assembly Smart for detailed footing instructions.
Proper anchoring can extend hoop life beyond a decade and withstand harsh weather.
In hurricane-prone areas like coastal Florida, tack on extra bolt kits and wind straps to lock everything down. If this feels out of your league, Assembly Smart pros will handle the entire install safely and efficiently.
Common mistakes to watch out for:
Measure your concrete precisely, clamp on braces, and level before the final set—and you’ll dodge the most costly DIY slip-ups.

Getting the pole upright and securing the backboard is where your hoop really starts to look like something you can shoot on. It’s a two-person job—proper alignment and smart lifting will save your back and set you up for years of solid play.
In Texas, many DIYers slip a lifting strap around the midpoint of each pole section before they mate the pieces. Position the loop at chest level, tip the sections together slowly, and you’ll cut a lot of muscle fatigue out of the process.
Plenty of how-to videos—some hitting 10 million views a year—show exactly how to keep bolt holes lined up.
| Component | Torque Spec |
|---|---|
| Centerlock Nuts | 18 ft-lb |
| Backboard Bolts | 25 ft-lb |
The bracket faces need to lie flat against the backboard frame—any gap turns fastbreak slams into wobble disasters.
Once everything’s in place, torque the backboard bolts to 25 ft-lb and seal those threads with silicone to keep moisture out.
Most installs bolt a 5×5-inch pole into a 48-inch concrete footing before lifting. About 70% of buyers handle this on a relaxed weekend, guided by videos that rack up over 10 million views each year.
Learn more about basketball hoop trends on Infinity Market Research.
Whether it’s a crank or lever, make sure the locking pin drops fully into a notch before you tighten the secondary catch bolt.
A Florida family told me that spraying the adjustment track with silicone cut crank resistance by 30%—it’s a small trick that makes height changes smooth.
Running a bead of marine-grade silicone around every bolt head stops water from sneaking in and eating away at your mounts.
Corrosion isn’t obvious at first, but over rainy seasons it can loosen everything.
Expert tip: Always recheck plumb alignment after the sealant cures so you don’t end up with a tilted backboard.
Once the sealant is set and bolts torqued, remove any temporary braces and use a long level to verify vertical alignment. A square backboard under load means no side-to-side shimmy when you dunk.
If you’re wrestling multi-piece poles and lifting heavy glass-backed boards, it’s easy to end up misaligned—or worse, injured.
Assembly Smart technicians handle the entire process, from hoisting to leveling. Most installs wrap in under two hours, and rates start at $69 per hour.
Visit Assembly Smart to book a pro and skip the stress of DIY.
Having an expert on site can save you an afternoon of wrestling metal and prevent those alignment mistakes that haunt you down the road.
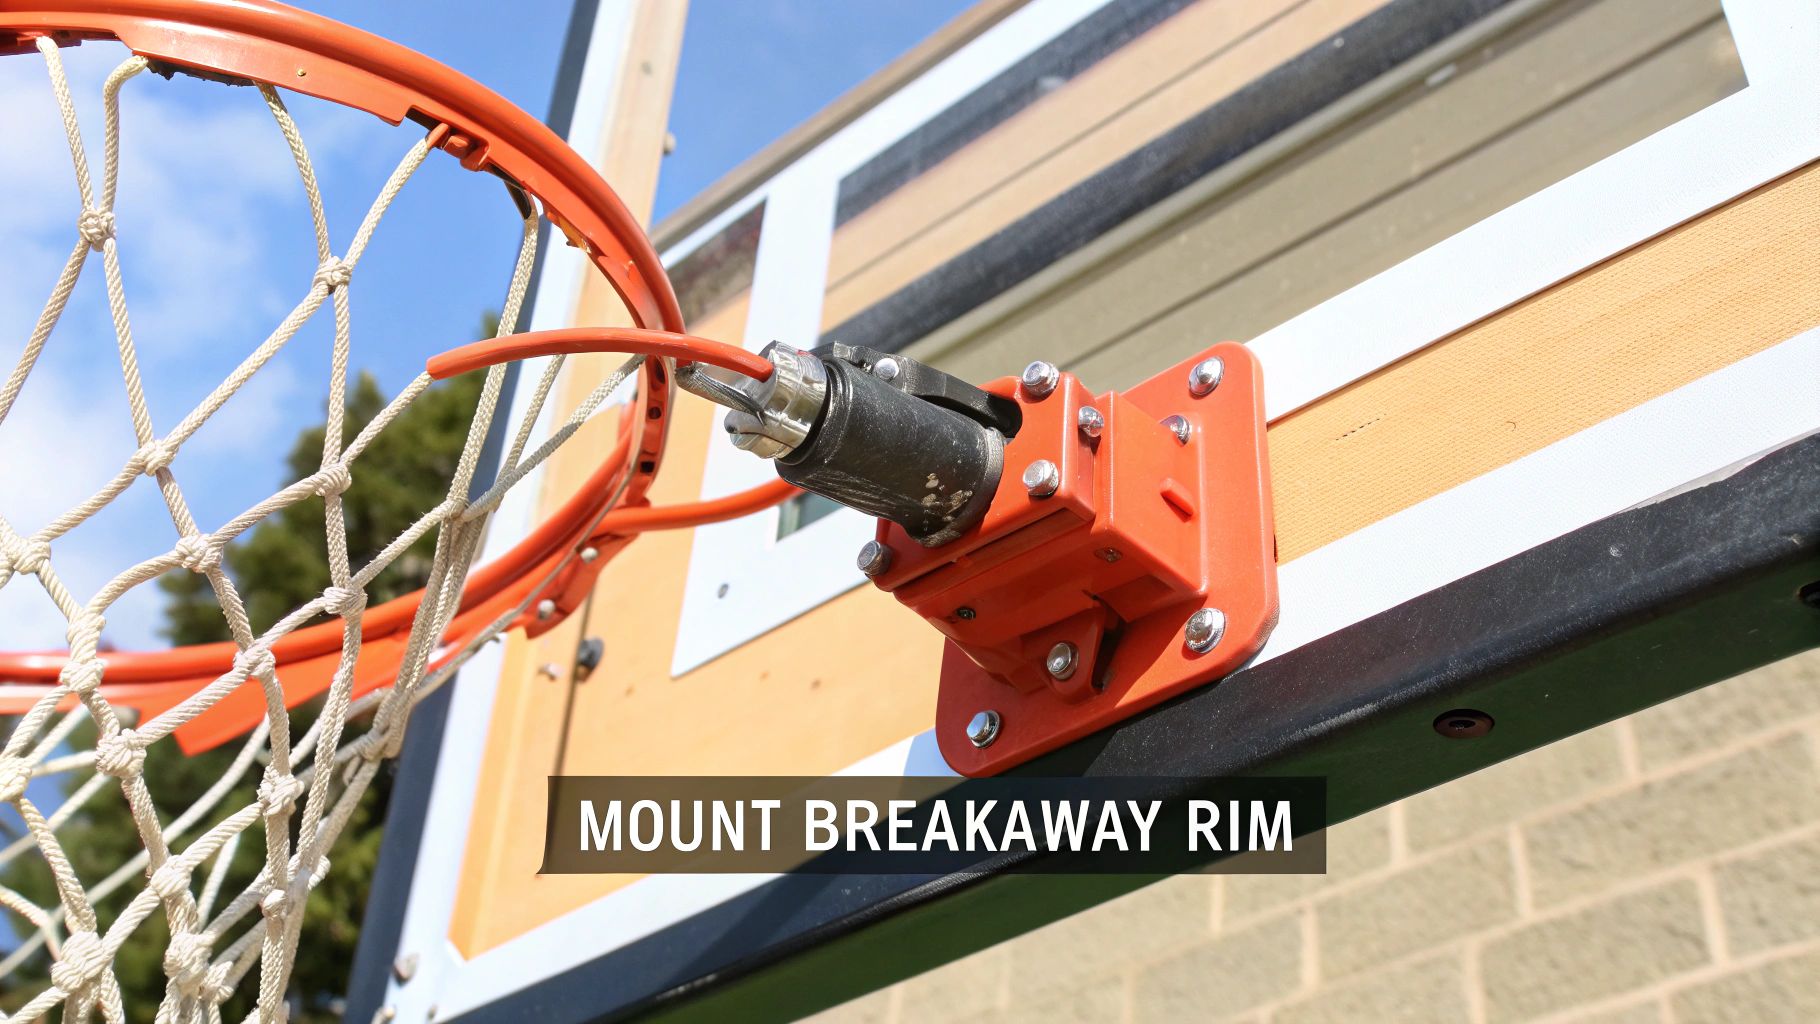
Mounting a breakaway rim isn’t just bolting on hardware—it’s what turns a static board into a living hoop. I always start by lining up the rim flush against the backboard, then double-checking torque specs and spring tension. That combo prevents stripped bolts and guarantees that satisfying rebound every time.
Never skip a spring check before you call it done. A youth-league coach I know swapped his stock spring for a pro-style kit—his players noticed the extra “pop” on dunk attempts immediately. Plus, he threaded the net tool-free in under five minutes, cutting setup time in half.
• Apply steady downward pressure to feel how much the spring compresses.
• Rotate the rim and watch the spring’s rebound action.
• Swap out any spring showing rust spots or uneven wear.
A good net outlasts weather and play. Nylon offers UV protection but tends to sag over long seasons. Polyethylene dries off quickly after rain and resists mildew. Cotton? It frays under the sun and rarely makes sense outside of indoor gyms.
• Nylon: Great sun resistance, may loosen later.
• Polyethylene: Fast-dry, mildew fighters.
• Cotton: Hands-down the weakest for outdoor hoops.
Expert Tip Spotlight: Opt for a nylon-poly blend when you want a solid mix of cost and toughness.
Before moving on, grab your torque wrench. Hand-tighten all bolts first, then dial in 40 ft-lb on a breakaway model using an X-pattern. Give the rim a firm shake—if there’s any wobble, you’ll need to realign or retorque those fasteners. A dad in Ohio once stripped a flange by crank-tightening in one shot; learning to torque gradually saves both time and replacements.
• Slide the mounting bracket over the backboard flange.
• Insert bolts, then snug them up by hand.
• Use an X-pattern with your wrench to reach spec.
Tool-free hooks speed up this process. I always start at the bottom, looping each net strand evenly around the rim. The goal is a net that hangs straight—no bunching or uneven loops.
Proper net threading ensures consistent ball release and less interference during play.
• Work clockwise, matching each loop to its hook—usually 12 or 13 total.
• Double-check that every loop sits the same distance apart.
• Avoid mixing net lengths; mismatched loops lead to lopsided nets.
One more thing: consult your manual for the spring-force range—often 20 to 25 lbs of compression force. A professional spring gauge is ideal, but a digital luggage scale will give you a close estimate.
Don’t have the right torque tools? Struggling with a stubborn spring? Assembly Smart can finish the job in about an hour, minus the headaches. Their crews arrive geared up and ready to deliver that pro-level setup you’re after.
Even seasoned DIYers run into hiccups when putting together a Lifetime basketball hoop. By slotting in quick inspections, you’ll stop small issues from turning into game-stopping headaches. A monthly rundown keeps everything tight and ready for action.
Start with a gentle wobble test at three spots: the base, midsection, and top bracket. If you feel more than half an inch of play, it’s time to snug the anchor bolts or bring in a professional. This check takes under five minutes, tops.
Next up, bolt health. Grab your torque wrench and set it to the manufacturer’s specs—usually 25 ft-lb for backboard bolts and 18 ft-lb for centerlock nuts. Walk around, spin each nut, and peek for rust or rounded threads.
Uneven rim height kills momentum. Loosen the adjustment handle, set the hoop on solid, level ground, then resecure. In about ten minutes, you’ll have a true basket every time.
If the pole still sways, inspect the anchor flange. One homeowner spotted a hairline crack after six months and swapped in a new flange in under twenty minutes—saving over an hour of reassembly.
Wobbling backboard brackets are another fast-break killer. Here’s a proven fix:
Expect about 15 minutes for this tune-up.
Preventative Maintenance every six months slashes big repairs later:
When minor fixes won’t cut it, call in the pros at Assembly Smart. They’ll pinpoint mounting errors and have your hoop back in tip-top shape—often in under two hours.
Check twice and play confidently every season.
Putting together a Lifetime basketball hoop often raises a few go-to questions—things like how long the install will take, whether you can tweak the rim height down the road, what sort of annual care is required, or if you need a permit. Having clear answers up front can turn a frustrating afternoon into a smooth, confidence-building project.
Whether this is your very first concrete pour or you’ve built drive-way basketball setups before, nailing down these details saves time and headaches.
“Charting out each step in advance cut my install time in half,” says one weekend warrior who finished his hoop in under three hours.
Bolts that refuse to align usually point to powder-coat buildup. Give the bolt a gentle wiggle and clear any excess paint before threading.
If self-tapping screws spin without biting, press firmly and let a fully charged drill do the work—this ensures each screw nests snugly.
Testing the breakaway spring early prevents sagging rims later on. Compress it by hand and swap in fresh coils if yours show any rust. For more on how installation costs break down, check our detailed guide on the cost to install a basketball hoop.
When the crank gets stiff, clean the height track and mist with silicone spray. A little goes a long way—often shaving about one-third of the effort out of each turn.
Uneven rim height? Try this:
These quick fixes usually take under 15 minutes, and they’ll save you from a full teardown later.
Regular spot checks—and jotting down each inspection—will catch small issues before they grow into game-day disasters.
Need a hand? Connect with the pros at Assembly Smart for fast, reliable hoop installations.
