-
CALL US:
- (866) 952-3456
When that big bike box lands on your doorstep, it’s a great feeling. But opening it up to a jumble of parts, foam wrap, and zip ties? That can feel a little less great. It's easy to feel intimidated.
The good news is you’re not starting from zero. Far from it. Bike manufacturers ship their bikes about 85% assembled. This not only saves on shipping but also keeps the most sensitive components safe during transit. The really tricky stuff—like installing the bottom bracket, crankset, and rear derailleur—is already done for you by pros at the factory.
Your job is to handle the final, critical steps that turn a box of parts into a safe, rideable machine. It's a logical process, and once you understand the flow, it's not so daunting.
Think of your bike build as having three main stages. First is prep—carefully unboxing everything and doing a quick inventory to make sure no tiny-but-critical parts have gone missing. Next is the main build, where you'll attach the big pieces. Finally, you’ll dive into the fine-tuning and safety checks.
A successful build isn't just about bolting parts together. It’s about understanding why you're doing each step. When you get that, the whole process transforms from a mechanical chore into a seriously rewarding experience. It's what ensures your bike is both fun and safe from the very first ride.
Before you start snipping zip ties, it's smart to gather your tools. Having everything you need on hand makes the whole process smoother and prevents you from stripping a bolt with the wrong-sized wrench. While a basic set will get you through, a few extra tools can make life much easier.
| Tool Category | Essential Tools | Recommended Additions |
|---|---|---|
| Wrenches | Allen/Hex Wrench Set (4, 5, 6, 8mm) | Torque Wrench, Pedal Wrench |
| Cutting/Gripping | Scissors or Snips (for zip ties) | Cable Cutters, Pliers |
| Tires & Wheels | Floor Pump with Gauge | Tire Levers |
| Lubrication | Bicycle Grease | Chain Lube |
| Stands | N/A (Can use the box or a wall) | Bike Repair Stand |
Having these laid out and ready to go will make you feel like a pro and keep you from having to stop mid-assembly to dig through a messy toolbox.
This structured, step-by-step approach wasn’t always the norm. The history of bicycle assembly instructions actually follows the bike's own journey. Once mass production kicked into gear back in the late 1890s, clear, repeatable instructions became absolutely vital to get bikes into the hands of everyday people.
The fundamental concepts behind clear instructions are pretty universal. Whether you're assembling a bike or putting together a bookshelf, the logic is similar, as you can see in many furniture assembly instructions. And if you're ever curious about the science of creating effective guides, learning about Mastering Instructional Design Principles can give you a fascinating look behind the curtain.
Generally, your assembly journey will tackle these key areas in order:
By breaking the project down like this, you can focus on one piece at a time. It turns a potential headache into a satisfying afternoon project.
Before you even think about snipping that first zip tie, let's talk prep. A smooth, frustration-free bike build really begins with a good workspace. This is a critical first step in any set of bicycle assembly instructions, but you don’t need a pro-level workshop. A clean spot in your garage, a clear patio, or even your living room with the coffee table shoved against the wall will do the trick.
The biggest thing? Good lighting. Trust me, trying to thread a tiny bolt or read a torque spec in a dim corner is a one-way ticket to a massive headache. If you're working inside at night, grab an extra lamp. It also pays to lay down something to protect your floors—and your new bike. An old blanket, a yoga mat, or even the flattened bike box itself works great to stop grease stains and prevent any accidental scratches to the frame.
Alright, with your space ready, it's time to face the box. I know it's tempting to tear into it like a kid on Christmas morning, but hold back. These bikes are packed in there tight, and a careless slice with a box cutter can easily leave a deep scratch in the paint before you’ve even laid eyes on your new ride.
Here’s the smart way to do it:
Once the frame is out, you can pull out the wheels and the small parts box. This is where a lot of first-timers go wrong—they just dump all the little bits into one big pile. That’s how you lose a crucial bolt under the sofa forever.
Pro Tip: Grab a magnetic parts tray or even just a few small bowls from the kitchen. As you snip parts free, sort the bolts, nuts, washers, and reflectors into them. This simple habit will save you from pulling your hair out later when you're hunting for that one specific headset cap screw.
Okay, now find the user manual or the parts list that came in the box. Before you attach a single thing, lay everything out and do a quick inventory. It’s rare, but sometimes things get missed at the factory. Finding out you’re missing a critical brake bolt after you've already built half the bike is a real momentum-killer.
This step does double duty, too. It forces you to get familiar with all the components and their names. Knowing what a "derailleur hanger" or a "seat post clamp" is before you need to install it makes the rest of the bicycle assembly instructions a whole lot clearer. While you're getting organized, make sure you've got the right equipment on hand. Having a solid set of essential furniture and bike assembly tools laid out and ready to go will make every step that follows feel ten times easier.
Once you’ve confirmed that every last piece is accounted for, you've officially set the stage for success. You’ve got a clean space, an unboxed bike, organized parts, and the confidence that comes from a methodical start. Now, the real fun can begin.
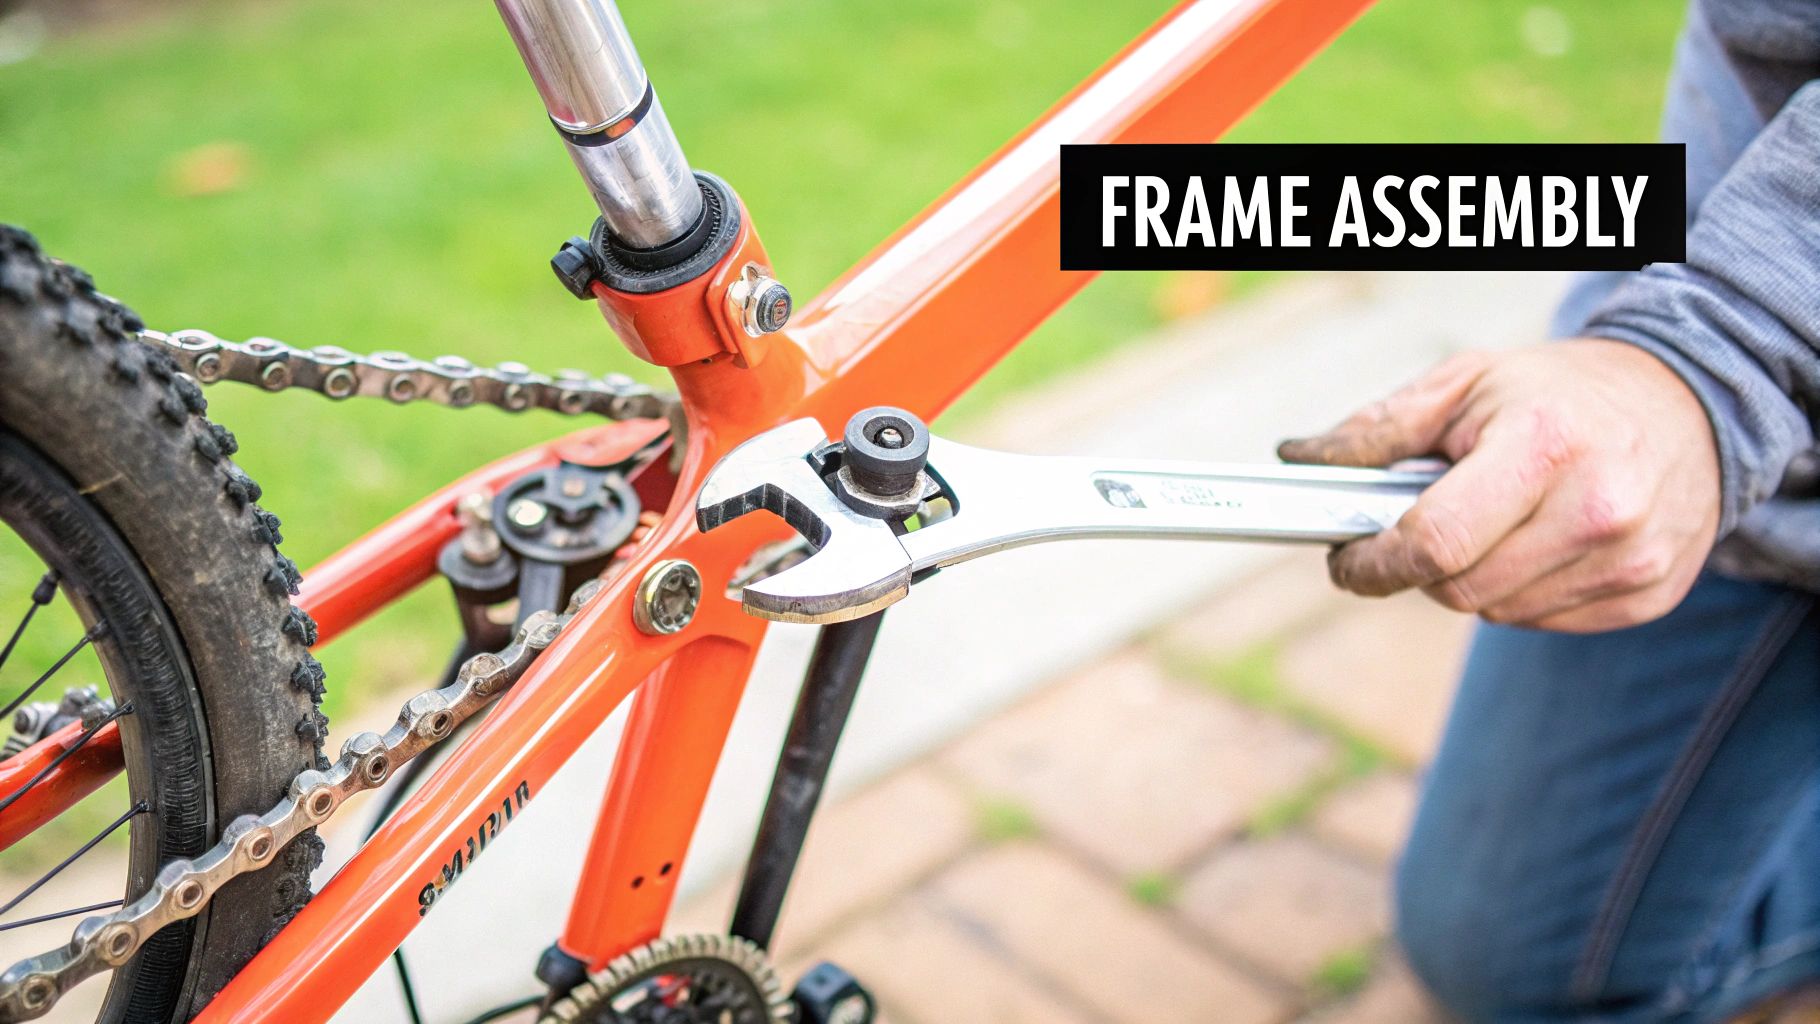
Alright, you’ve got your parts laid out and your workspace is ready to go. Now for the fun part: turning that box of metal and rubber into something that actually looks like a bicycle. This is where it all starts to come together, and seeing the frame take shape is easily the most rewarding part of the process.
We’re going to tackle this in a logical order, starting with the controls and finishing with the wheels, making sure everything is tight, straight, and safe.
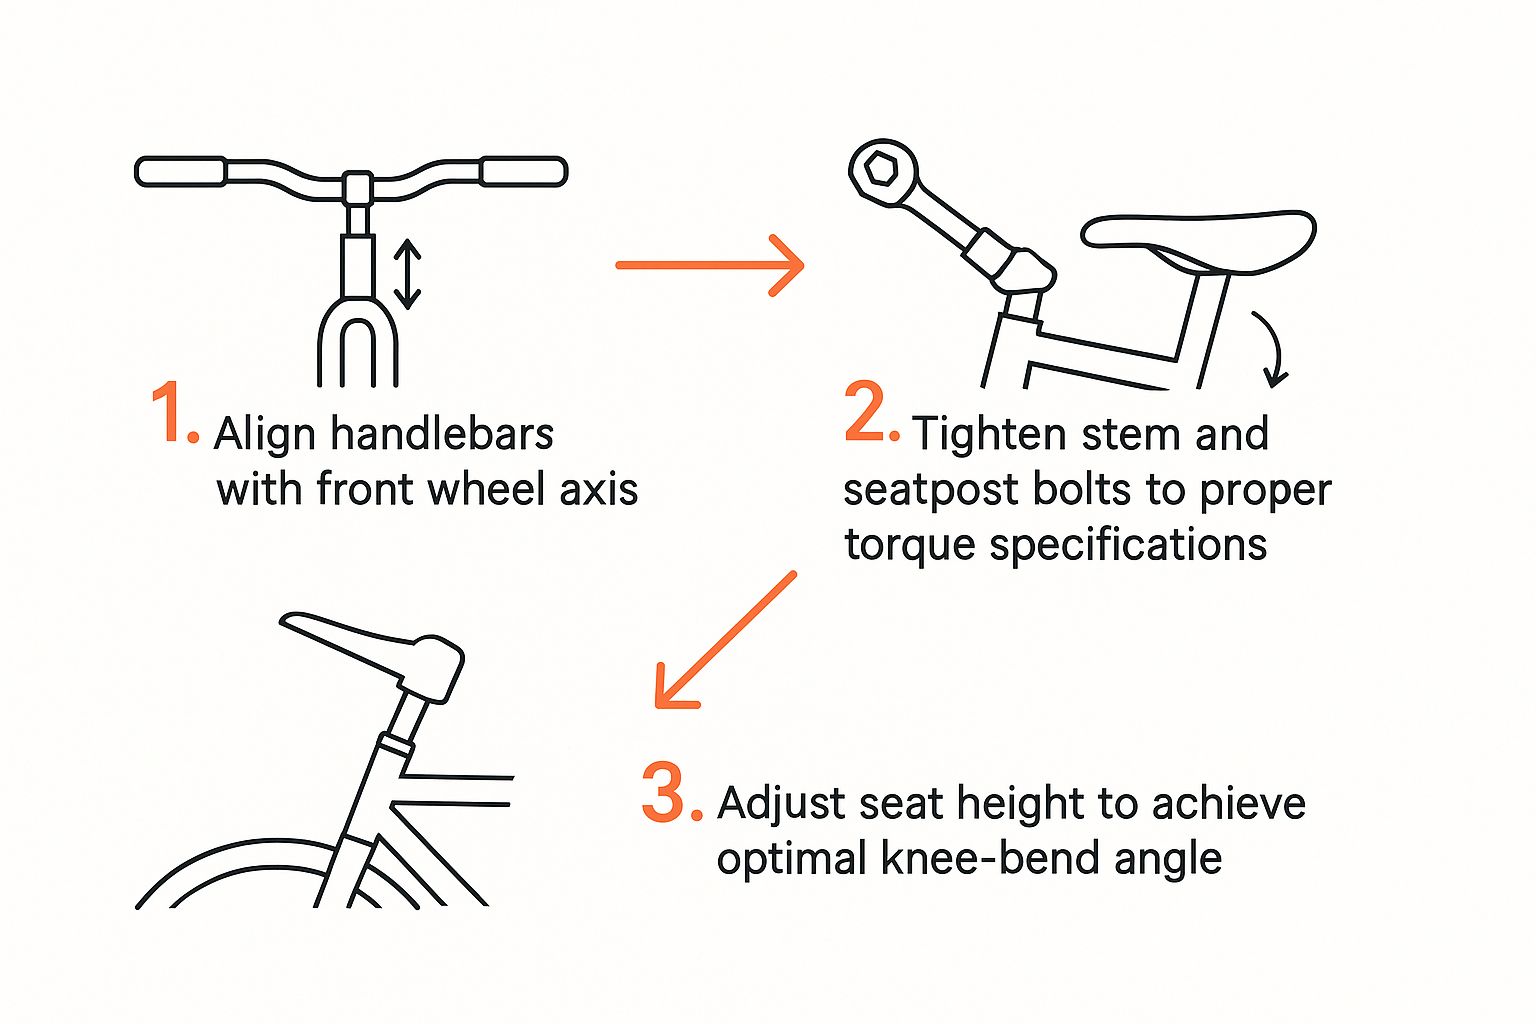
First up: the handlebars. The stem, which is the piece that clamps the handlebars to the fork, usually comes attached to the fork. For shipping, it's almost always twisted sideways. Our job is to get it pointing straight ahead and locked down.
Go ahead and loosen the bolts on the side of the stem—these are often called the "pinch bolts." You don't need to take them out, just loosen them enough so you can easily turn the handlebars. Now, stand over the front wheel, facing forward, and clamp it between your legs to hold it steady. Look straight down and line up the handlebars so they form a perfect "T" with the wheel. This is a purely visual check, but it’s absolutely essential for making sure your bike goes where you point it.
Once you’re happy that everything is perfectly straight, it’s time to tighten it all up. There’s a specific sequence here that prevents putting uneven stress on your components, so don't just crank down on the bolts randomly.
First, snug up the top cap bolt, which is the one on top of the steerer tube. A lot of people mistake this for the bolt that holds the handlebars on—it's not. Its only job is to preload the headset bearings and eliminate any wobble or "play." Tighten it just enough so that when you hold the front brake and rock the bike back and forth, you don't feel any knocking. That's it.
Now you can tighten the stem's pinch bolts. The trick here is to alternate between them, giving each one a small turn at a time, kind of like you would when tightening lug nuts on a car. This ensures an even, secure grip. If a bolt feels like it's stuck or stripping, stop immediately. It’s better to pause than to wreck a part. We have a great guide on how to get a stubborn screw out that can save the day in these moments.
Next, we'll get the seatpost and saddle in place. Just like the handlebars, the saddle is usually already bolted to the post. Your main job is to get the post into the frame and set a ballpark height.
Before you slide it in, grab some bicycle grease and apply a thin coat to the inside of the frame's seat tube. This step is absolutely critical. I can't tell you how many bikes I've seen with seatposts permanently seized in the frame from corrosion. A little grease now will save you a world of hurt later. Don't skip it.
With the tube greased, slide the seatpost in. A great starting point for the height is to stand next to the bike and adjust the saddle until it’s about level with your hip bone. You'll fine-tune this later, but this gets you in a safe and comfortable position for a first test ride. Tighten the seatpost clamp bolt, and you're good to go.
Getting the handlebars and seat right is about more than just making things tight; it's about setting the foundation for a safe and comfortable ride.
As you can see, proper alignment and torque aren't just details—they're fundamental to how the bike will handle and feel. Nailing this now prevents problems down the road.
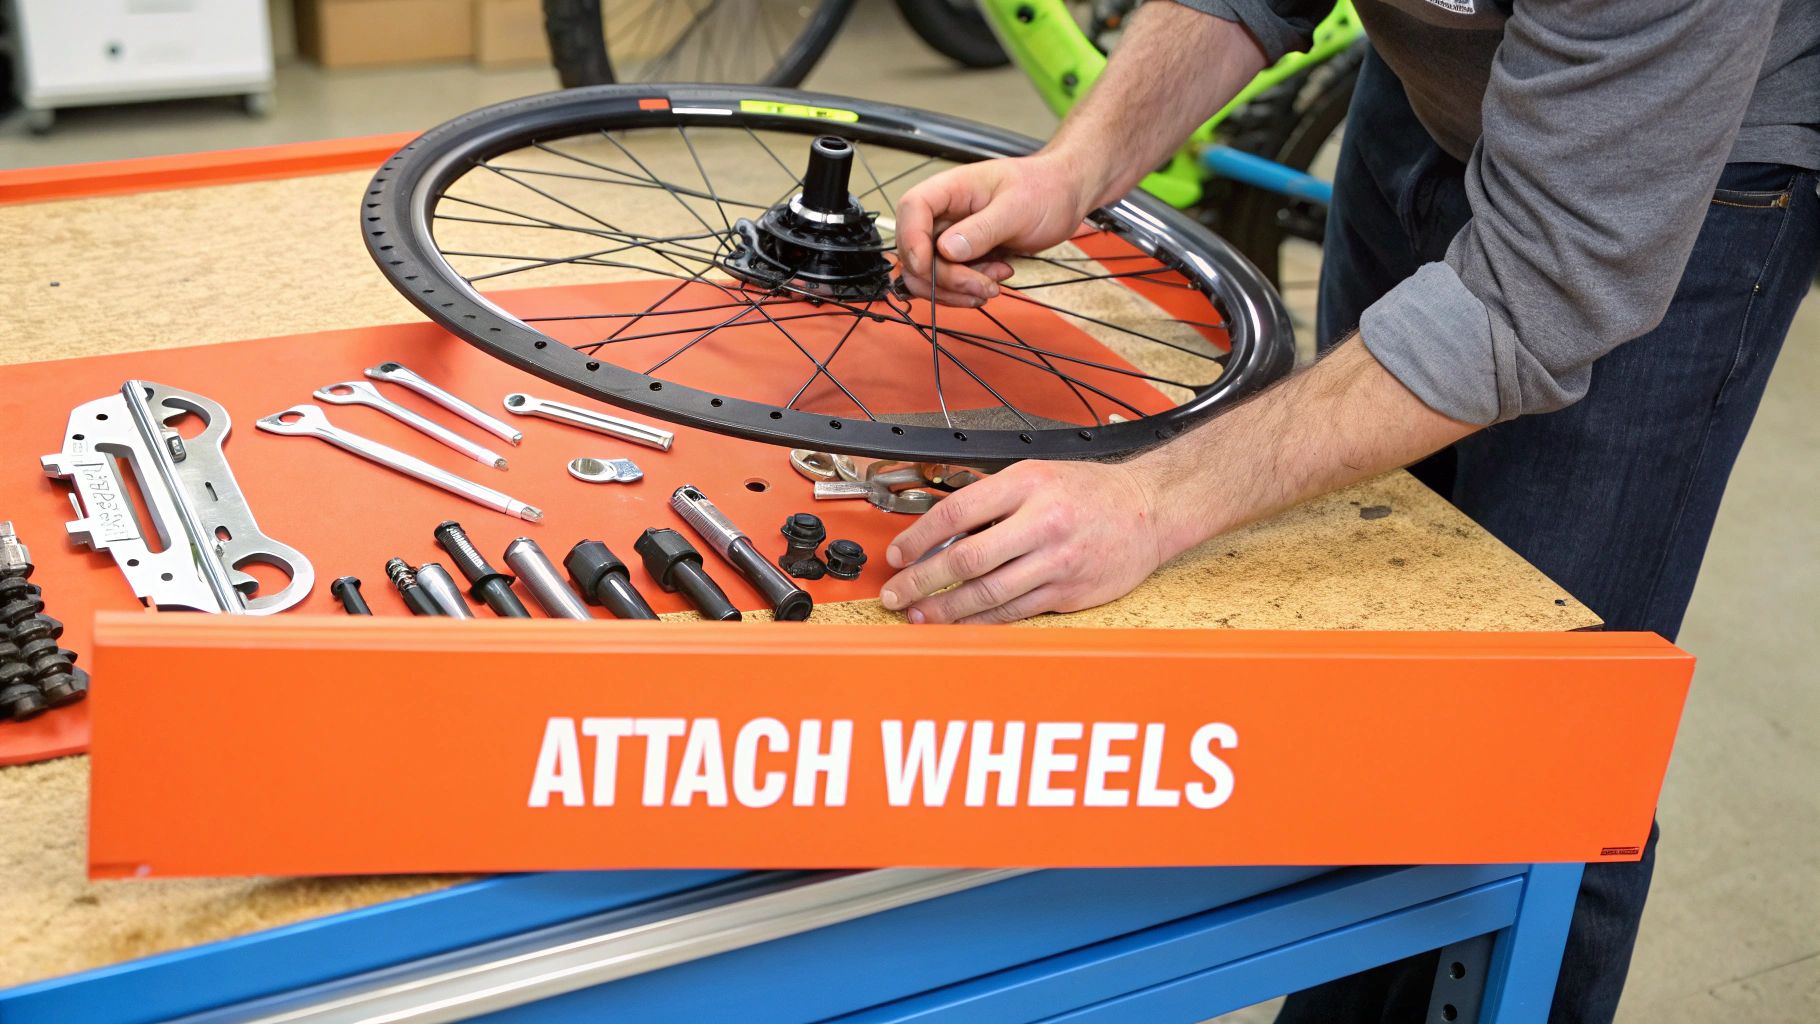
Your bike now has a cockpit and a saddle, but it won’t be rolling anywhere just yet. The rear wheel is almost always installed from the factory, so we just need to pop the front one on. Most bikes today use a quick-release skewer, which is just a long rod with a lever on one end and a nut on the other.
Start by unscrewing the nut and pulling the skewer out of the wheel's hub. Slide it back in, making sure the lever is on the non-drive side (that's the left side of the bike as you're sitting on it). The little cone-shaped springs should be pointing inward, toward the hub. Now, with the bike on the ground, guide the wheel's axle up into the fork dropouts.
Safety Critical Takeaway: That quick-release lever isn't a wingnut you spin to tighten. It's a cam. The right way to use it is to tighten the nut on the opposite side until you feel real resistance when the lever is about halfway closed. The final push to lock it should be firm enough to leave a mark on your palm. That's how you know it's secure.
We’ve saved the best (and most frustrating) for last: the pedals. More home builds are botched at this stage than any other. Here is the single most important thing to remember: the left and right pedals are threaded differently. This is a brilliant safety feature designed to keep them from unscrewing while you ride.
Thankfully, pedals are almost always stamped with a tiny "L" and "R" to help you out. Before you even think about screwing them in, put a dab of grease on the threads. This prevents them from seizing in the crank arms down the line. Always start threading them by hand for a few turns to make sure you haven't cross-threaded them. Once they're started, you can use a pedal wrench to give them a final snugging. Getting this right is a rite of passage for every new bike mechanic.
A bike with perfectly installed parts but wonky gears and mushy brakes isn't just a pain to ride—it's downright unsafe. This is where you transform a collection of parts into a responsive machine. Think of it as teaching all the components to talk to each other, so every click of the shifter and squeeze of the lever gives you an instant, predictable result.
Honestly, this fine-tuning stage is probably the most skillful part of any bike build. It’s less about brute force and more about patience and tiny, incremental changes. Getting this right is what separates a clunky, noisy ride from a bike that feels like a natural extension of your body.
The derailleur is the little workhorse that moves your chain between gears. Our goal here is to make that movement clean, immediate, and silent. No chain rubbing, no skipping, and no hesitation. We'll kick things off with the rear derailleur, since it does most of the heavy lifting.
The two most critical adjustments you’ll make are setting the limit screws. These tiny screws, usually marked 'H' and 'L', act as physical walls that prevent the derailleur from shifting the chain off the cassette entirely.
To set them, shift your chain onto the smallest cog. Look at the bike from behind; the top jockey wheel (that little pulley on the derailleur) should line up perfectly under that cog. Tweak the H-screw until it’s perfectly aligned. Next, shift all the way to the largest cog and do the exact same thing for the L-screw.
A classic rookie mistake is over-tightening the limit screws. This restricts the derailleur from even reaching the top or bottom gear. The goal is to create a perfect boundary—letting the derailleur go just far enough, but absolutely no further.
With your limits set, it's time to dial in the shifting between the gears. We call this indexing, and it’s mostly handled by the barrel adjuster—that little knob where the shifter cable enters the derailleur.
If your chain is hesitant or slow to shift to a larger cog (an easier gear), the cable needs a bit more tension. Just turn the barrel adjuster counter-clockwise a quarter turn at a time. This effectively lengthens the cable housing, which tightens the inner cable.
On the other hand, if the chain is noisy or keeps trying to jump down to a smaller cog (a harder gear), the cable is too tight. Turn the barrel adjuster clockwise to introduce some slack. Make a small adjustment, then run through the gears. Keep doing this until every single click results in a clean, quiet shift.
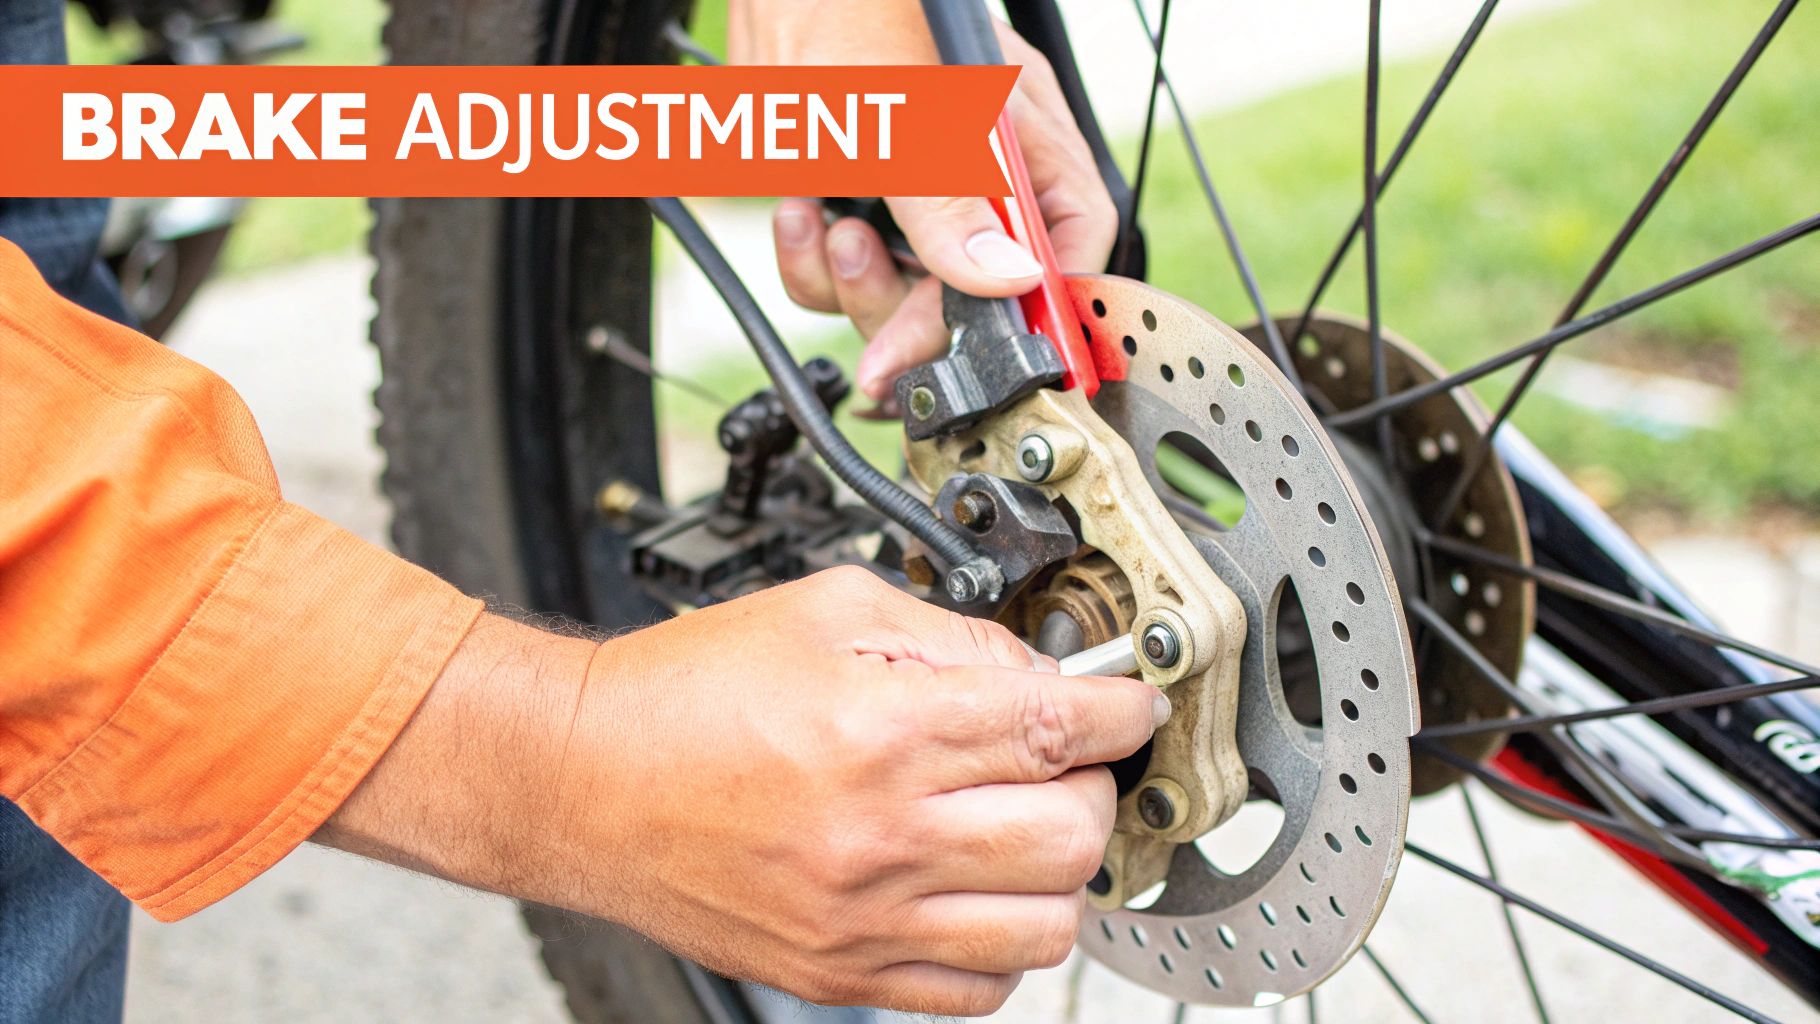
Alright, let's get to the most important safety system on your bike: the brakes. Whether you’re working with old-school rim brakes or modern disc brakes, the core principles are the same. You need the pads to hit the braking surface squarely and deliver a firm, confident feel at the lever.
For rim brakes, the process comes down to three key checks:
Disc brakes have incredible stopping power, but they can be a little fussy about alignment. Nothing is more annoying than that constant tshing-tshing-tshing of a rotor rubbing against the brake pads.
Thankfully, the fix is usually pretty simple. Loosen the two main bolts that attach the brake caliper to the frame or fork—just enough so the caliper can wiggle around. Now, squeeze the brake lever hard and hold it down. This simple action centers the caliper perfectly over the rotor. While still holding that lever, carefully re-tighten the mounting bolts, alternating between them to keep the pressure even.
Let go of the lever and give the wheel a spin. If the rubbing is gone, you're golden. If it’s still there, you might need to make tiny manual adjustments by eye. Look through the caliper to see where the rotor is making contact and nudge it accordingly. This part of the build definitely requires some patience, but the payoff is silent, powerful braking you can trust on any descent.
Alright, you've done the hard work. The parts are on, the cables are routed, and what was once a box of metal and rubber now actually looks like a bicycle. But before you even think about throwing a leg over it for that first ride, we have one final, non-negotiable step: a full safety check.
This is your last chance to catch any little oversight before it turns into a big problem out on the road. Think of it like a pilot's pre-flight checklist. You just don't skip it.
We're going to systematically go through the entire bike, a process mechanics call the "M-Check," to make sure every single component is secure and working exactly as it should.
Why "M-Check"? It gets its name from the pattern you trace with your eyes as you inspect the bike, which loosely forms the letter 'M'. You start at the rear wheel, move up to the saddle, down to the pedals and crank, back up to the handlebars, and finish at the front wheel.
It’s a simple path that guarantees you don't miss a thing. This isn't just a visual scan, either. You need to get your hands on the bike and physically confirm everything is solid.
Here's the path we'll follow:
This isn't about redoing your work; it's about verifying it. A few minutes here can save you from a major headache later.
A common mistake is assuming that a bolt that feels tight is tight enough. Critical components like your stem and seatpost have specific torque values for a reason—to prevent both dangerous slipping from being too loose and component damage from being too tight.
Let's start at the back. Grab the rear wheel and give it a good wiggle from side to side. There should be absolutely zero play. If you feel any movement, your axle bolts or quick-release skewer are not tight enough. Fix that now. While you're there, give the spokes a gentle squeeze; they should all feel pretty similar in tension.
Now, move up to the saddle. Try to twist it. It shouldn't budge. If it does, your seatpost clamp needs another quarter-turn.
Next, trace that 'M' down to the bottom bracket area. Grab both crank arms and try to pull them away from the frame. Again, no movement allowed. Give the pedals a spin to make sure they rotate smoothly without any weird grinding noises.
From there, we move up to the cockpit. This one is huge. Straddle the front wheel and clamp it between your knees. Grab the handlebars and try with some real force to twist them out of alignment with the wheel. If your stem bolts are properly tightened, you shouldn't be able to move them at all.
Finally, we land at the front wheel. Give it the same side-to-side wiggle test you did on the rear. Then, check your tire pressure one last time. Every tire has the recommended pressure range printed right on the sidewall—use a pump with a gauge and get it within that range. Properly inflated tires are your best defense against pinch flats and make the bike handle so much better.
The very last step is all about the brakes. Squeeze the front brake lever hard and try to rock the bike forward. The wheel shouldn't move, and the lever should feel firm, not soft or spongy. Do the same for the rear brake.
To finish, lift each wheel off the ground one at a time and give it a spin. You're just making sure the brake pads aren't dragging.
Once you’ve gone through this checklist, your bike is officially ready to go. The M-Check is a fantastic habit to get into before every ride, not just the first one. It’s the final stamp of approval on your build and your ticket to a safe, confident first journey.
Even with the clearest set of bicycle assembly instructions, a few questions are bound to pop up. It's totally normal. You're not just snapping plastic bricks together; you're building a machine that you’ll be trusting at speed. We've pulled together the most common questions we hear from first-time builders to help you get over those last few hurdles with confidence.
If this is your first go, give yourself a solid 2 to 3-hour window. Seriously, this isn't a race. You want to give yourself plenty of time to work methodically, double-check your work, and read the manual without feeling the pressure to just get it done. A seasoned mechanic might knock it out in under an hour, but your goal is safety and precision, not speed.
Of course, not everyone enjoys the challenge of a complex DIY project. If you often find yourself frustrated with instruction manuals and just want the job done right, looking into options to hire someone to assemble your furniture or other items can be a massive time and sanity saver.
The single biggest mistake I see—and the most soul-crushing one to make—is cross-threading the pedals. Just burn this into your memory: the left pedal is reverse-threaded, meaning it tightens counter-clockwise. Forcing the wrong pedal into the crank arm will absolutely destroy the threads, and that's an expensive part to replace.
A few other classic blunders to watch out for:
Okay, let's be real: you can assemble a bike without one. But a torque wrench is an investment you won't regret, especially if you're working with any carbon fiber components. It's the only tool that guarantees you've tightened every bolt to the exact manufacturer's specification, measured in newton-meters (Nm).
Over-tightening can literally crush a carbon handlebar or crack a frame. Under-tightening can lead to parts slipping at the worst possible moment. For critical components like your stem, handlebars, and seatpost, a torque wrench buys you priceless peace of mind.
Having a professional mechanic give your first build a quick once-over is always a brilliant move. Think of it as cheap insurance for your safety and confidence. You should definitely take your bike to a shop if you notice any of these red flags on your first test ride:
A quick safety check at your local bike shop can spot a small mistake before it turns into a big, expensive problem.
Once your new ride is assembled and ready to go, the next step is figuring out where to keep it. You might want to explore some efficient bike wall mount solutions to keep your bike safe and your living space uncluttered.
Feeling in over your head or just don't have the time? The pros at Assembly Smart are here to help. We offer professional, insured bicycle assembly services to get you on the road safely and without the headache. Book your stress-free bike assembly today!
