-
CALL US:
- (866) 952-3456
Building your own bathroom shelves is one of those projects that pays you back in spades. It’s not just about saving a few bucks—it’s about creating a custom storage solution that looks like it was always meant to be there. You get to call all the shots: the materials, the size, the finish. Total control.
Going the DIY route for your shelves turns a simple home improvement job into a real design opportunity. Let’s be honest, the off-the-shelf stuff from big box stores rarely fits perfectly. It's always a little too wide, a little too short, or just… bland. When you build it yourself, you can finally put that weirdly narrow wall next to the shower to good use. Or that empty spot above the toilet that’s been begging for some attention.
This is your chance to really nail your bathroom’s specific style.
Let's face it, we could all use more storage, especially as homes and apartments seem to be getting cozier. It's no surprise the global market for bathroom organizers is exploding—it's projected to hit USD 13.1 billion by 2032, and a huge driver for that is the need for smart solutions in smaller spaces. You can check out more on the market trends for bathroom storage at Dataintelo.com.
When you build your own DIY bathroom shelves, you’re not just tacking on storage. You're adding real value to your home by solving a common problem with a solution that's made specifically for your space.
This is the exact idea behind so many great storage solutions for small spaces, where every single inch is prime real estate. This project gives you the power to transform unused vertical space into an asset that’s both stylish and practical. It’s proof that you don’t need a massive budget to make a huge impact.
The materials you pick for your DIY bathroom shelves will define pretty much everything—their final look, how long they last, and just how much stuff they can actually hold. This is especially true in a bathroom, where humidity is a constant battle. You absolutely need materials that can handle all that moisture without warping, swelling up, or becoming a science project over time.
While it’s tempting to grab affordable woods like pine, they’ll need a serious sealing job to survive the steam from your daily shower. A much better starting point is wood that's naturally resistant to moisture. Think cedar, teak, or even a high-quality marine-grade plywood. These are great choices because they have natural oils that literally repel water. Yes, they might cost a bit more upfront, but trust me, they save you a ton of headaches down the road.
Don't forget to consider the overall style of your bathroom when you're picking out the wood. Reclaimed barn wood can inject a ton of rustic character into a space, but you have to make sure it's cleaned and sealed properly. If you're going for a more modern, spa-like vibe, a lighter wood like bamboo (which is technically a grass but acts like wood) is a fantastic option. It's both sustainable and incredibly durable in damp conditions.
To help you sort through the options, I've put together a quick comparison of the most common wood choices for bathroom shelving.
Here’s a practical look at how different woods stack up when you're building for a humid space like a bathroom.
| Wood Type | Moisture Resistance | Average Cost | Best For |
|---|---|---|---|
| Pine | Low (Requires Sealing) | $ | Budget-friendly projects with a rustic or painted finish. |
| Cedar | High | $$ | Humid environments where a natural, aromatic wood is desired. |
| Teak | Very High | $$$ | High-end, spa-like designs that require maximum durability. |
| Oak | Medium (Requires Sealing) | $$ | Sturdy, traditional shelves that can hold significant weight. |
| Bamboo | High | $$ | Modern, eco-friendly designs that are naturally resistant to mold. |
Ultimately, the best wood is the one that fits your budget, matches your bathroom's look, and can stand up to the daily moisture.
Beyond the wood itself, the actual design of your shelves is just as important. Are you aiming for that clean, minimalist look, or do you need to maximize every square inch of storage? For DIY bathroom shelves, the two most popular styles you'll see are floating shelves and bracketed shelves.
Before you even think about making a single cut, planning your layout is absolutely non-negotiable.
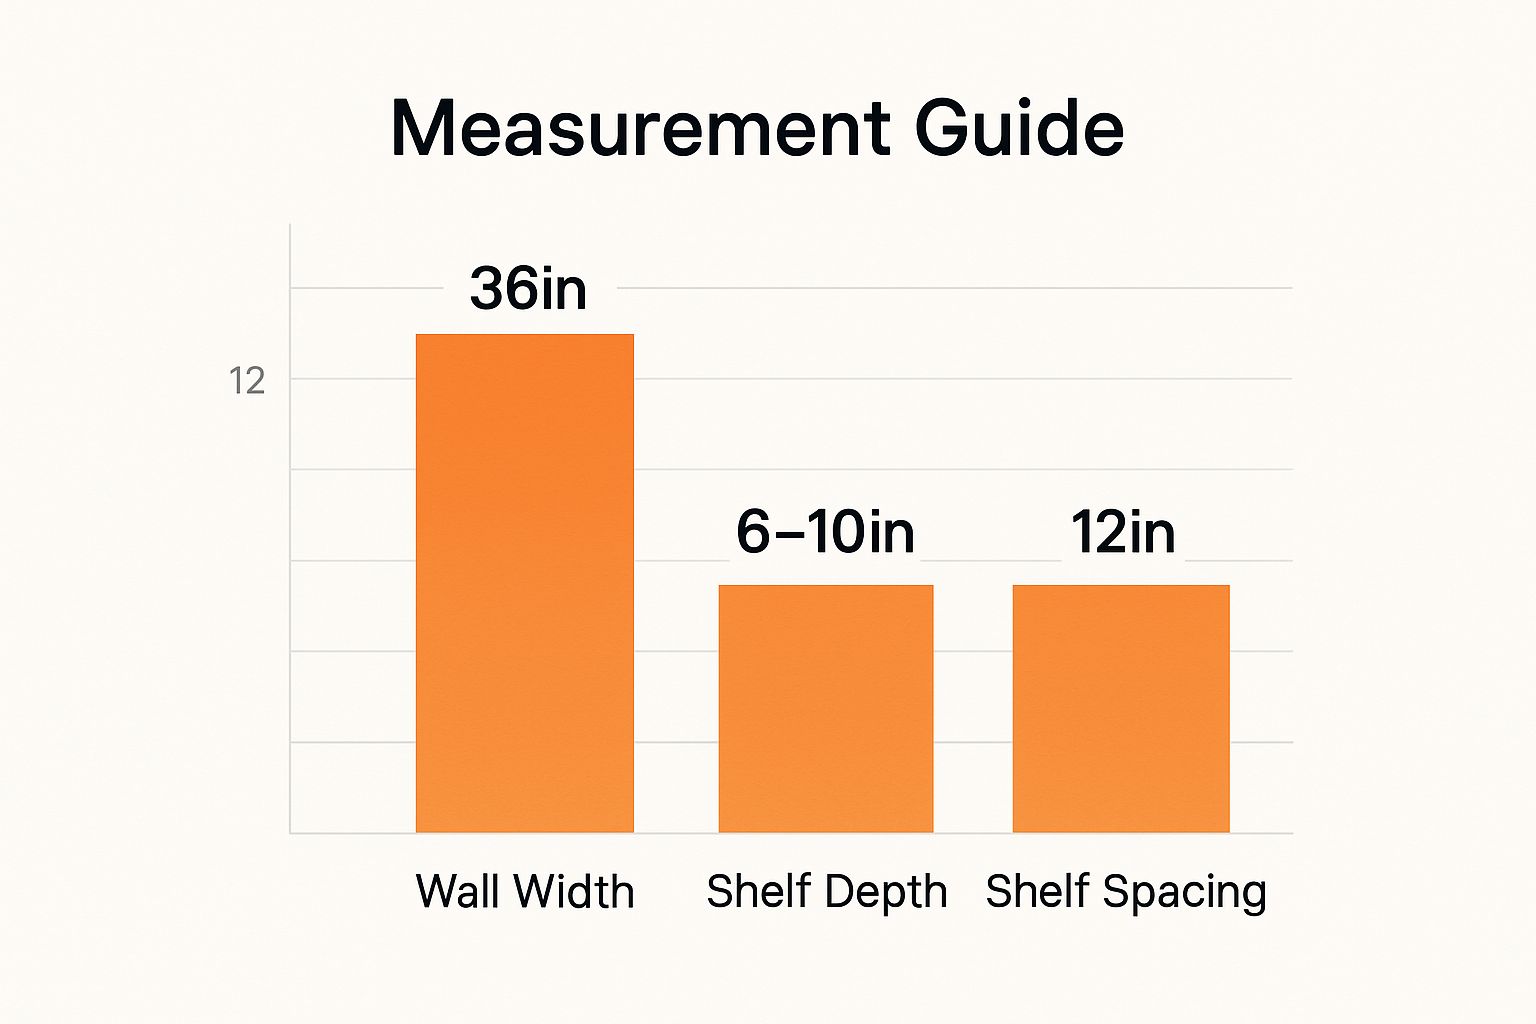
This simple chart is a great visual guide to help you figure out standard dimensions, ensuring your shelves look proportional to your space and are actually functional for the things you want to put on them. Getting these numbers right from the start is the first step to a project you'll be proud of. For a deeper dive into getting precise dimensions, our guide on how to measure furniture has detailed techniques that apply perfectly here.
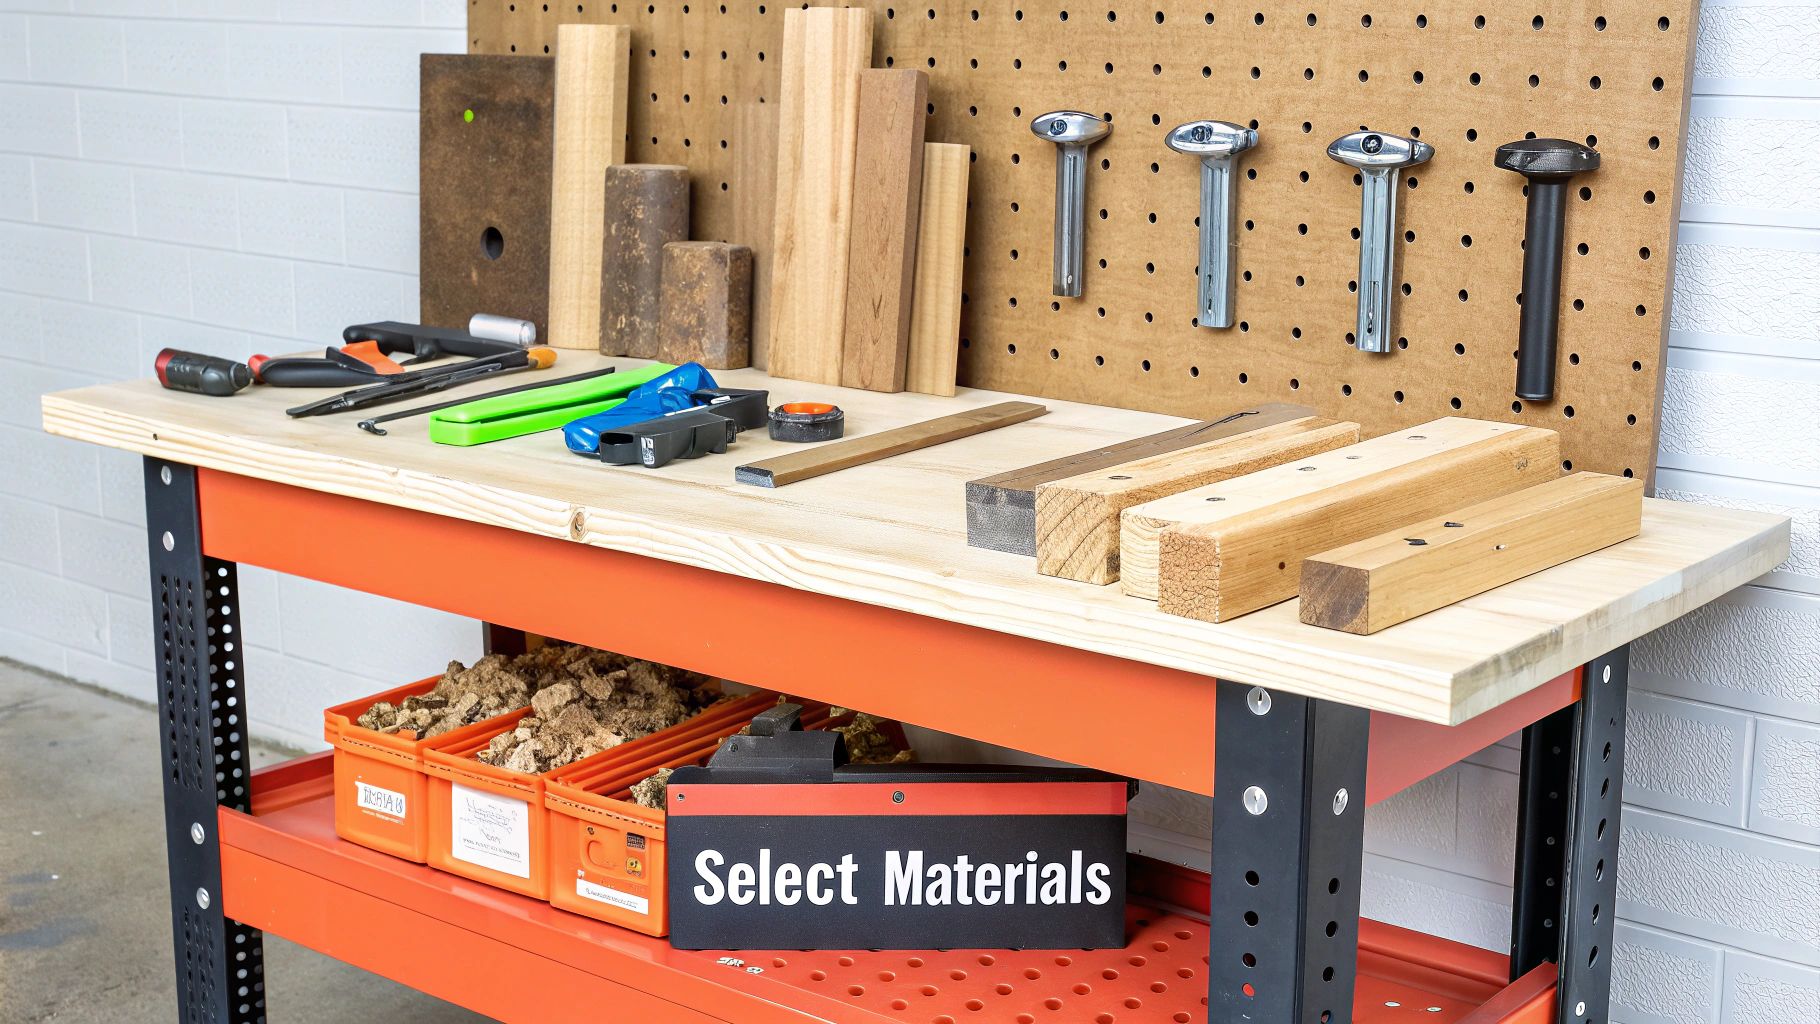
They say a successful DIY project is 90% preparation and 10% execution. I’d say that’s about right. Taking some time upfront to gather your tools and get your workspace in order is probably the single best thing you can do to make sure this project goes off without a hitch.
Think of it this way: a little bit of prep saves you a dozen frustrating trips back to the hardware store later.
You don't need some high-end, professional workshop to build a great set of bathroom shelves. Honestly, a clean corner of your garage, a basement, or even a covered patio will do the trick just fine. The main thing is to create an organized area where you can measure, cut, and assemble without feeling cramped or chaotic.
Before you do anything else, clear the floor, set up a stable work surface (like a workbench or a couple of sawhorses), and make sure you’ve got good lighting.
While every project has its own quirks, there’s a core set of tools that will get you through most builds. Having these ready to go before you even make your first cut will make everything feel so much smoother. Many of these are foundational items, and you can find a solid overview of essential furniture assembly tools that covers the basics for this project and plenty of others down the road.
Here are the absolute must-haves:
Now, if you want to take your craftsmanship up a notch and get a more polished, professional result, a couple of extra tools can make a huge difference. A pocket hole jig, for instance, is a total game-changer. It lets you create incredibly strong joints that are completely hidden from view, which looks so much cleaner than visible screws.
Another great addition is a random orbit sander. It will give you a finish that’s lightyears smoother than what you can achieve by hand—and in a fraction of the time.
Pro Tip: I like to set up a little "safety station" in my workspace. Just a small area where I keep my safety glasses, a first-aid kit, and a fire extinguisher within easy reach. If you're going to be staining or sealing your shelves, make sure you've got good ventilation by cracking a window or using a fan.
It helps to organize your tools and materials in a way that just makes sense. Keep everything you need for measuring and marking in one area, your cutting tools in another, and so on.
As you work, try to clean up as you go. A tidy workspace is a safe workspace. You’re far less likely to trip over scrap wood or lose that one critical screw right when you need it most. This simple habit really does make the whole process more enjoyable from start to finish.
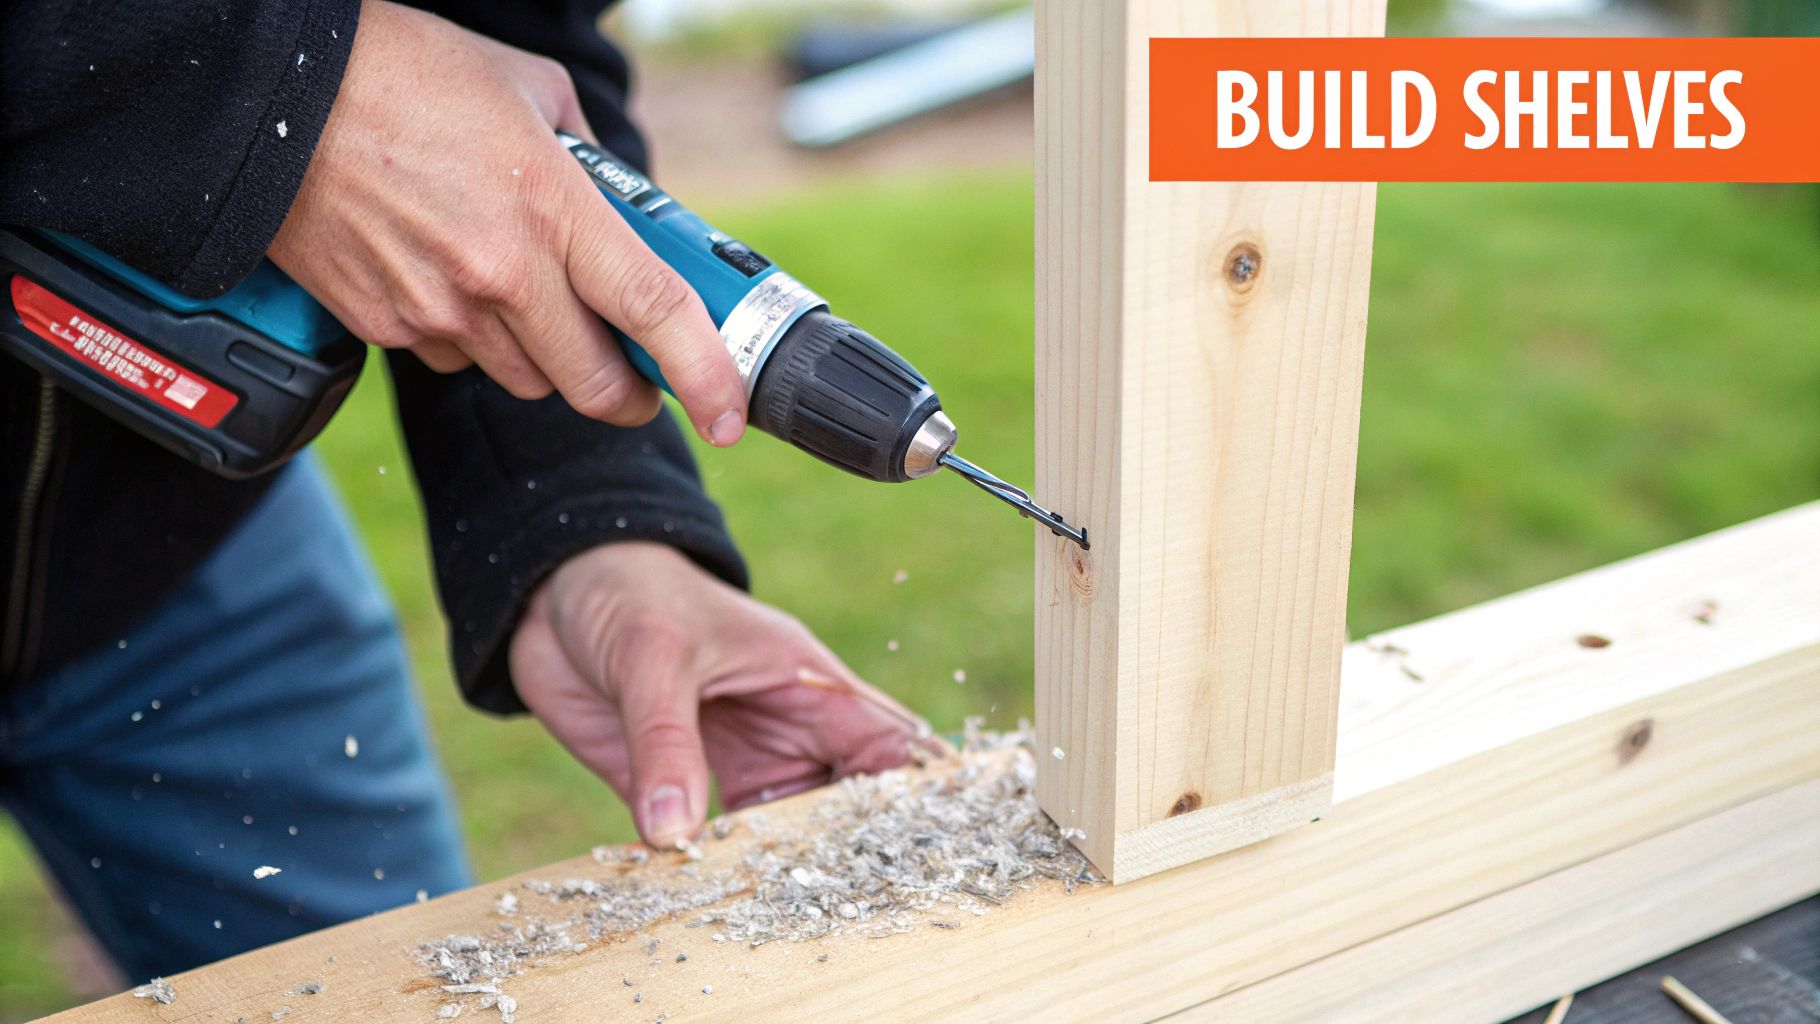
With your wood picked out and your workspace cleared, it's time for the best part: actually building your DIY bathroom shelves. This is where we turn those raw planks into something you’ll be proud to hang on your wall. We’re going to focus on making clean cuts, getting a professional-level finish, and putting it all together so it lasts.
Don't sweat it if you're new to woodworking. The whole process is pretty straightforward when you take it one step at a time. And every great project starts with the same foundation: making precise, straight cuts.
Accurate cuts are completely non-negotiable. It's the difference between shelves that look polished and fit snugly versus a project that’s wobbly and full of gaps. Precision is the name of the game here.
Once your pieces are cut down to size, the next move is sanding. It might feel a bit tedious, but trust me, this is what separates a decent DIY project from a truly great one.
Proper sanding is what makes your shelves feel professionally made. It also helps any stain or sealant you use absorb evenly for a flawless look. The secret isn't just blasting it with one coarse sheet of sandpaper; it's about working your way up through different grits.
Start with a medium grit, something like 120-grit, to knock down any saw marks and smooth out minor imperfections. After that, move on to a finer 180-grit to really refine the surface. For a finish that's just begging to be touched, end with 220-grit paper. This progression gets rid of the scratches from the previous grit, leaving the wood incredibly smooth.
A quick tip from experience: Always, always sand with the grain of the wood, never against it. Sanding across the grain creates tiny, ugly scratches that will stick out like a sore thumb the second you apply a finish.
After you're done sanding, wipe every surface down with a tack cloth or a microfiber cloth just barely dampened with mineral spirits. This picks up all the fine dust particles, making sure your finish goes on perfectly clean.
Alright, time to join your pieces together. The method you go with really depends on the tools you have on hand and the final look you're aiming for. For most basic shelf designs, a couple of methods stand out for being both simple and strong.
No matter which method you use, always have a carpenter's square handy to check that your corners are a perfect 90 degrees as you assemble. This is the only way to guarantee your finished shelf won't be lopsided.
Even if you're sticking to a simple design, it never hurts to check out some advanced DIY woodworking projects for inspiration. Seeing how others use unique finishes or joinery can spark some great ideas for your own build. Taking these careful steps now ensures your shelves are not only sturdy but also something you'll be genuinely proud to display.
Alright, this is where your project really comes to life. Getting the finish and mounting right is what turns a few pieces of wood into a set of professional-looking, durable shelves that can handle the bathroom’s number one enemy: humidity.
Let’s be honest, if you skip or rush this part, all your hard work can be ruined in a few months. An improper finish will lead to swelling wood, warped boards, and peeling paint. You really have to protect your creation.
The finish isn't just about looks; it's a protective shield. You absolutely need something that creates a waterproof barrier to keep steam and moisture from getting into the wood grain. Your standard interior paint or a simple wood stain just won't cut it here.
When you're applying the finish, find a spot with good airflow. The trick is to apply thin, even coats. Let each one dry completely, give it a super light sanding with 220-grit sandpaper, and then apply the next. This process feels a bit tedious, but it's how you get that durable, glass-smooth surface that’s a breeze to wipe down.
Now that your shelves look fantastic, it's time to get them on the wall. The goal here is to make them feel like they're a part of the house—rock solid and totally secure. How you do this depends entirely on what’s behind your drywall.
Finding the wall studs is always the best-case scenario. Studs are the vertical wood beams that make up your home's frame, and they offer the strongest anchor point possible. A stud finder is your best friend here. Use it to locate them, mark their positions with a pencil, and you'll know exactly where to drill.
Seriously, don't guess where your studs are. Hitting a stud is the difference between a shelf that can hold a stack of heavy towels and one that might come crashing down in the middle of the night. Take the extra minute to find them.
Of course, studs are rarely in the perfect spot. When there isn't one where you need it, you’ll have to use drywall anchors. I’m not talking about those small, flimsy plastic ones. For shelves, you need something robust like toggle bolts or strap toggles. These anchors are designed to expand behind the drywall, which distributes the weight over a much larger area for a surprisingly strong hold.
For a deeper dive into making sure things are attached firmly, our guide on how to secure furniture to the wall has some great techniques that apply perfectly to shelving projects.
The desire for custom solutions like this is a big reason why the DIY home improvement market hit USD 0.87 trillion in 2024. More and more homeowners are tackling projects themselves to get exactly what they want. You can discover more insights about this growing DIY trend at Mordor Intelligence.
And one final tip: always use a level during installation. Place it on the shelf while you’re marking your drill holes. It’s the only way to guarantee a perfectly straight result on the first try.
Even when you’ve got the perfect plan, a few questions always seem to pop up in the middle of a DIY project. Getting the right answers can be the difference between a smooth build and an afternoon full of frustration.
Let's tackle some of the most common questions that come up when you're making your own DIY bathroom shelves. Think of this as your cheat sheet for those little "what if" moments that can throw you off your game.
Figuring out the right shelf depth is always a bit of a balancing act. You need enough space for your stuff, but you don't want the shelves jutting out and making the room feel cramped.
For most bathrooms, a depth of 6-8 inches is the sweet spot. It gives you plenty of room to store essentials like rolled-up towels, toiletries, and a few decorative pieces without getting in your way.
Working with a really tight space, like a powder room or the area over the toilet? You can definitely get away with something shallower, maybe 4-5 inches. That’s still more than enough real estate for soap dispensers, toothbrushes, or a small succulent.
Let’s be real: protecting wood from the constant humidity in a bathroom isn't just a good idea, it's essential. The best way I’ve found to do this is with a quality sealant that creates a tough, water-repellent barrier.
My go-to method is applying at least three coats of a marine-grade or spar urethane. Unlike your standard polyurethane, this stuff is actually designed to expand and contract with moisture and temperature changes, which stops it from cracking or peeling down the road.
To get a perfect, long-lasting finish, here’s what you do:
Pro tip: Pay extra attention to the end grains of the wood boards. This is where moisture loves to sneak in, so getting a thick, solid seal there is crucial for making your shelves last.
You absolutely can, but this is one of those jobs where success comes down to using the right hardware. Forget about those little plastic wall anchors that come in some kits—they just aren’t strong enough for anything heavier than a small picture frame.
If your floating shelves are going to hold anything with real weight, you need to bring in the heavy-duty drywall anchors. I always recommend using toggle bolts or strap toggles. These anchors work by popping open behind the drywall, which spreads the load over a much larger area and gives you a ridiculously strong hold.
Before you drill a single hole, always check the weight rating on the anchor packaging and be honest with yourself about what you plan on storing up there.
If building from scratch feels like a bigger project than you have time for, don't worry. Assembly Smart can take care of any flat-pack furniture or shelving unit assembly for you, ensuring a professional and sturdy result without the hassle. Get your free estimate and book a next-day appointment at https://assemblysmart.com.
