-
CALL US:
- (866) 952-3456
Opening that flat-packed IKEA box can feel overwhelming, even for seasoned DIY enthusiasts. The sheer number of components, the numerous bags of hardware, and the seemingly minimalist instruction manual can create a sense of anxiety. But understanding IKEA's flat-pack philosophy is the key to a smoother assembly experience. Think of it as a 3D puzzle: each piece has its designated spot, and with a methodical approach, the final product takes shape.
This methodical approach begins with proper preparation. Experienced assemblers know the value of inventorying all parts and hardware before starting the assembly. This crucial step prevents the frustration of discovering a missing piece halfway through.
Organizing your workspace is equally important. Clear a dedicated area and lay out all components logically. This simple act streamlines the process, meaning less time searching for the right dowel and more time enjoying the satisfaction of seeing your furniture come together.
IKEA’s assembly-friendly design, often seen as a source of frustration, actually simplifies the building process. This design, paired with their easy-to-transport flat-packing, has allowed IKEA to maintain competitive prices and achieve high customer satisfaction. In 2024, IKEA generated global revenue of nearly 45 billion euros, a testament to the effectiveness of their business model. For more detailed statistics, visit: IKEA Statistics
Many people feel intimidated by IKEA furniture, worried they lack the skills or patience for assembly. These fears are often unwarranted. IKEA’s instructions, while appearing cryptic initially, are designed for universal understanding.
They rely on clear visuals rather than language-specific text, making them accessible to a global customer base. Understanding the patterns in these visuals – such as arrows indicating direction or highlighted sections demonstrating connection points – unlocks the intuitive nature of the assembly process.
IKEA’s design patterns make assembly surprisingly straightforward once you understand the logic. Many IKEA pieces use a system of cam locks and dowels, a simple yet effective method for joining components without visible screws.
Once you've mastered these basic connection methods, assembling various IKEA furniture becomes significantly less daunting. This allows you to approach each new project with confidence, equipped with the foundational knowledge needed for success. By understanding the why behind IKEA’s design choices, the how of assembly becomes much easier.
The secret to a smooth IKEA furniture assembly experience? Having the right tools. While the included Allen key gets you started, seasoned assemblers know a few key additions can be real game-changers. These extra tools not only speed up the process, but also help prevent damage to your new furniture. From precision screwdrivers for delicate work to rubber mallets for protecting surfaces, the right equipment makes all the difference. Learn more in our article about How to master your furniture assembly project.
Beyond the basic Allen key, consider these additions to your IKEA assembly arsenal:
A set of quality screwdrivers: Phillips-head and flathead screwdrivers in various sizes will prove useful for components beyond the scope of the Allen key.
A rubber mallet: This is essential for gently tapping pieces together without marring the finish. It's especially helpful for joining parts secured with wooden dowels.
A ratcheting screwdriver: Ratcheting Screwdriver This tool offers greater control and speed compared to a traditional screwdriver, resulting in faster, less tiring assembly.
A drill with various bits (optional): A Drill can significantly speed up assembly, especially for projects with numerous screws. Always pre-drill holes in particleboard to prevent cracking.
Level: A Level is key for ensuring your furniture is level, crucial for both aesthetics and functionality. A small level helps achieve a perfectly balanced assembly.
Before we discuss workspace setup, let's look at the essential versus optional tools you might need. The following table summarizes the key tools for IKEA assembly, categorized by their importance and typical use.
Essential vs Optional Tools for IKEA Assembly
Compare must-have tools versus helpful additions for different types of IKEA furniture projects
| Tool | Essential/Optional | Best Use | Average Cost |
|---|---|---|---|
| Allen Key | Essential | Included with IKEA furniture; basic assembly | Included |
| Phillips-head Screwdriver | Essential | General screw tightening | $5 – $15 |
| Flathead Screwdriver | Essential | Occasional use; prying | $5 – $15 |
| Rubber Mallet | Essential | Joining parts without damage | $10 – $20 |
| Ratcheting Screwdriver | Optional | Faster, more efficient screw tightening | $15 – $30 |
| Drill | Optional | Speeding up assembly with numerous screws | $50 – $150 |
| Level | Optional | Ensuring furniture is level | $10 – $20 |
As this table shows, while some tools are absolutely essential for any IKEA project, others are helpful additions that can make the job easier, especially for larger or more complex builds.
An organized workspace is key for efficient, frustration-free assembly. This means having the right tools and preparing your building area. A cluttered workspace can lead to lost parts, misplaced tools, and unnecessary delays.
The following infographic visualizes a key principle in IKEA furniture assembly: workspace preparation. The image shows a clean workbench with neatly organized tools and the instruction manual prominently displayed.
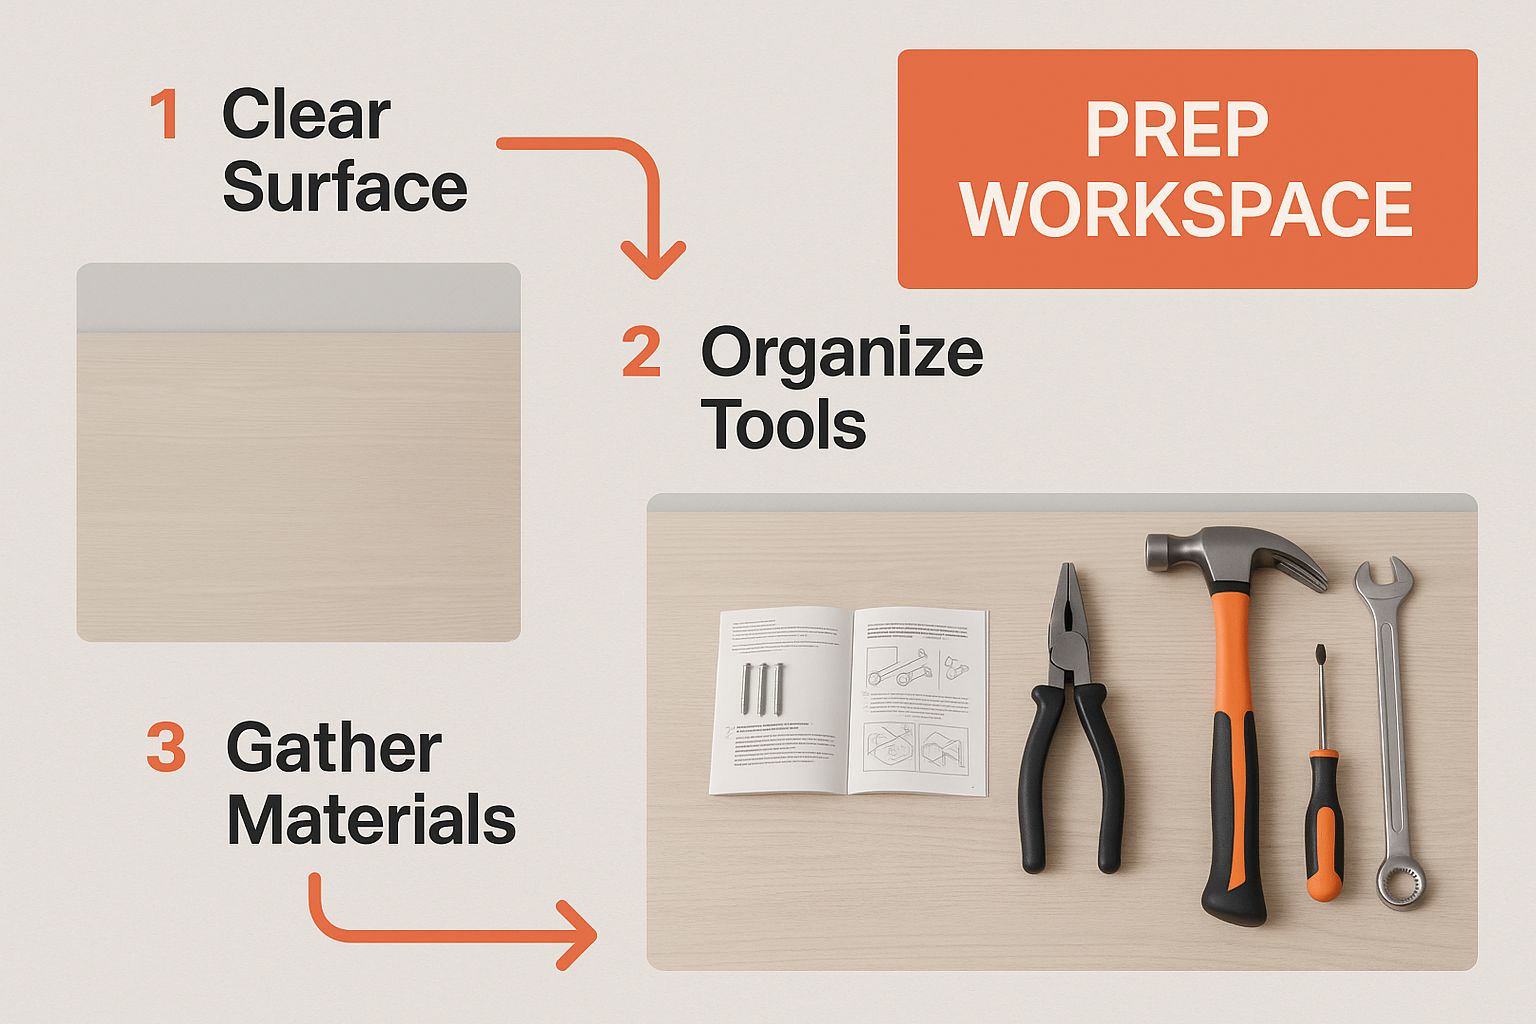
The key takeaway? A dedicated, organized space is essential for a smooth and efficient building process. Also, ensure you have adequate lighting to see the instructions and small parts clearly.
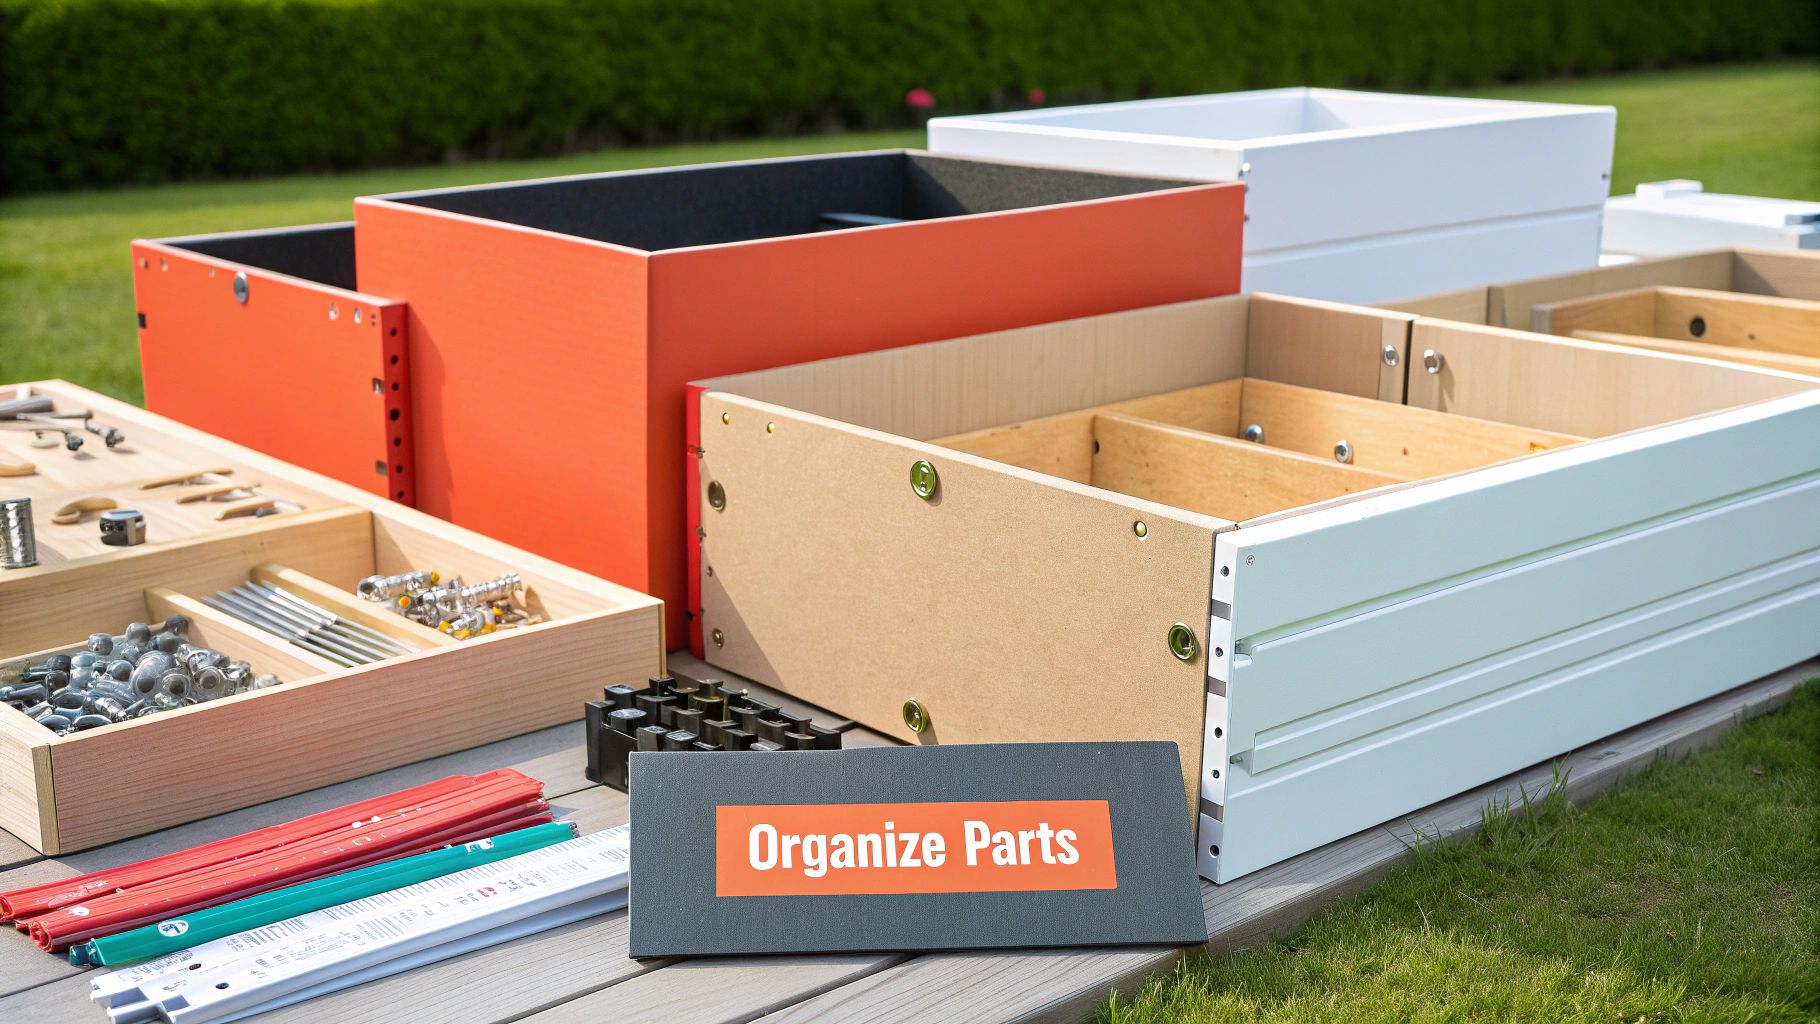
Once your tools and workspace are ready, organize the IKEA components. This step significantly streamlines assembly. Group similar screws, dowels, and other hardware together.
This organization prevents constant searching for the right piece, minimizing assembly time and frustration. Check against the parts list to ensure you have everything before starting. This proactive approach saves time and prevents mid-assembly delays. This methodical approach makes even complex IKEA furniture assembly manageable and even enjoyable.
IKEA's instruction manuals, often wordless, are a marvel of minimalist communication. Once you grasp their visual language, these seemingly complex diagrams become surprisingly clear guides. They transcend cultures and languages, relying on universally understood symbols and depictions. This section will break down this system, explaining the logic behind IKEA's unique approach to furniture assembly instructions.
IKEA’s visual instructions use a consistent set of symbols. A thick arrow might show the direction to insert a part, while a highlighted area indicates connection points. Understanding these symbols is the first step to mastering IKEA assembly. For example, two pieces shown side-by-side with a plus sign between them usually means joining those parts together.
Similarly, a circled number often shows the quantity of a specific hardware item needed for that step. You might be interested in: How to master furniture assembly instructions.
Not every step in IKEA assembly is equally important. Some need extra attention to detail to ensure stability and function. The diagrams highlight these critical steps through specific visual cues. Often, these critical steps involve connecting larger sections or attaching hardware that impacts the structural integrity of the piece. Thickened lines or arrows might emphasize these crucial points. Recognizing these visual cues can prevent frustrating mistakes later.
IKEA manuals also include warning symbols. These are vital for avoiding damage or injury during assembly. A common example is a symbol showing a hand being pinched, warning against placing fingers in specific locations during assembly. Another symbol might warn against over-tightening screws, which can strip the cam lock or damage the particleboard. Understanding these symbols is key for a safe and successful assembly.
While IKEA’s instructions usually provide the most efficient assembly sequence, sometimes another approach might be more convenient for your particular situation. For instance, if the instructions show assembling a large piece flat on the floor, you might find it easier to partially assemble it upright if you have limited space.
Additionally, sometimes parts or instructions might not align perfectly due to manufacturing variations or updated designs. In these cases, carefully examine the diagrams and use your understanding of the furniture's structure to troubleshoot the issue. Visualizing the finished product can be incredibly helpful in these situations, allowing you to figure out the correct assembly method even when the instructions seem unclear. This understanding enables adaptability and problem-solving during assembly.
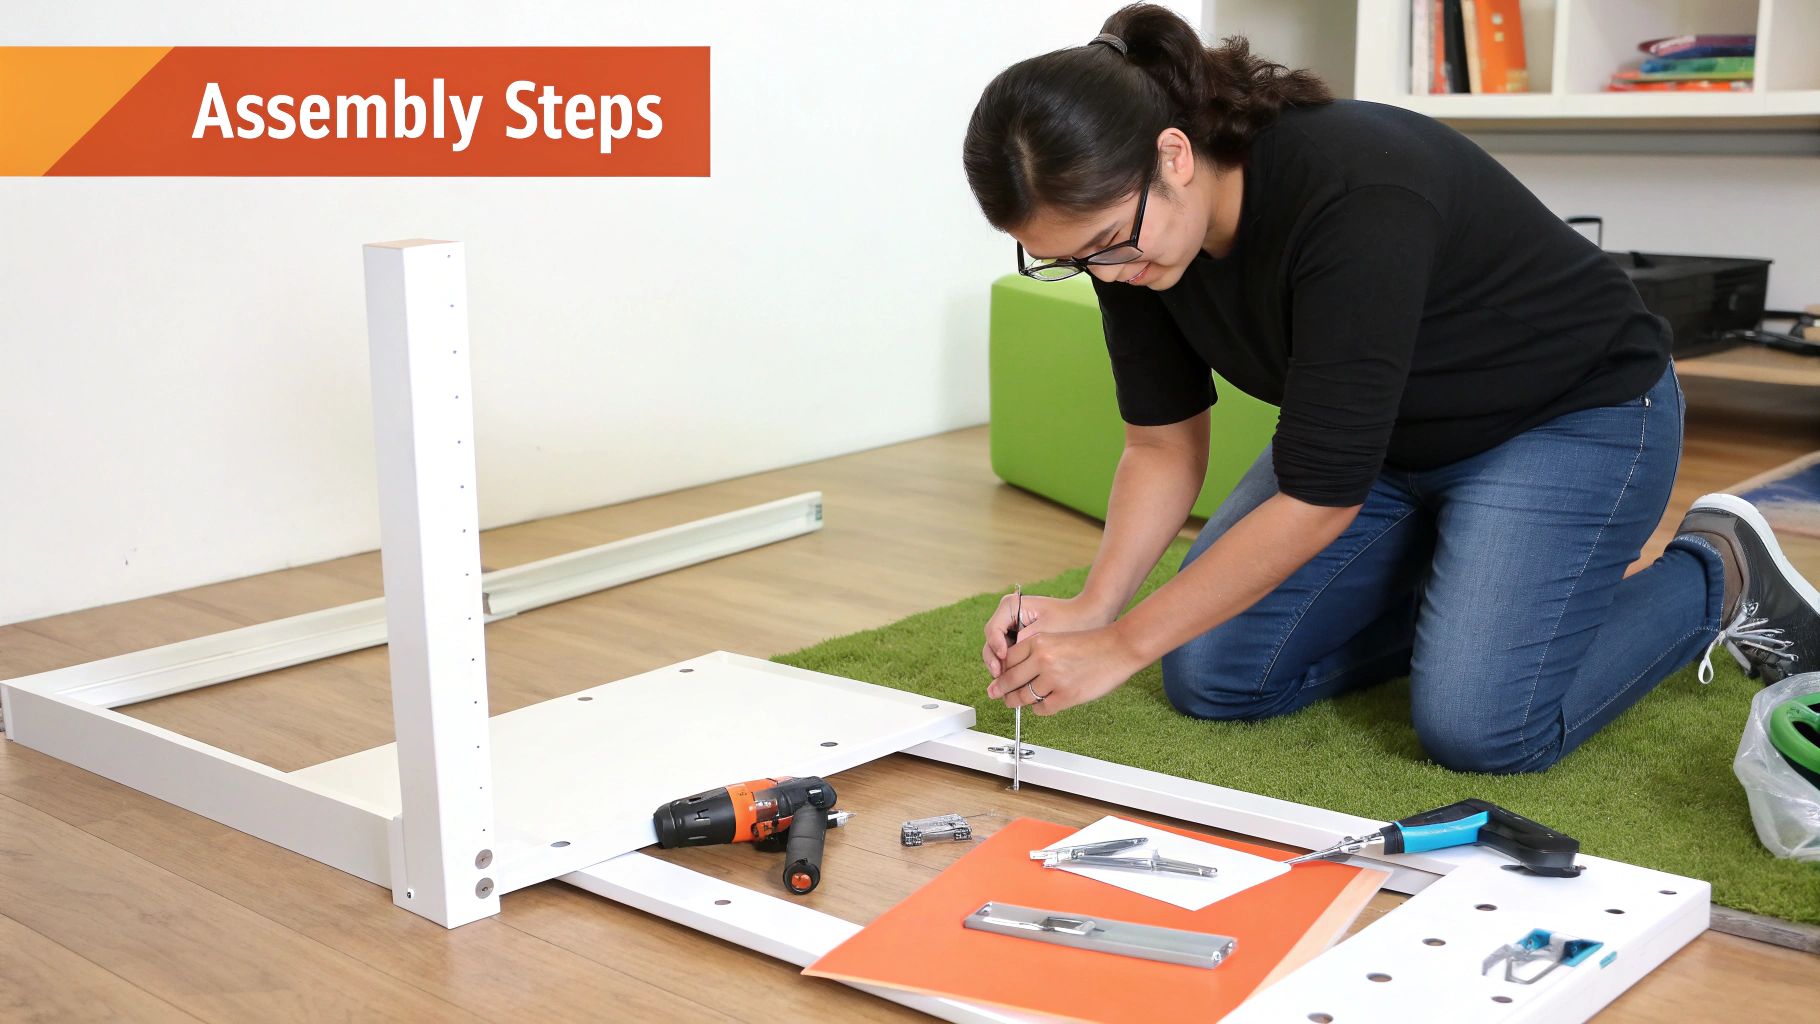
Having deciphered IKEA's visual instruction system, let's transition from planning to building. This is where interpreting those instructions results in a successfully assembled piece of furniture. Whether it's a simple BILLY bookcase or an elaborate PAX wardrobe, certain assembly strategies are universal across IKEA's product line. These strategies will minimize common mistakes and help you achieve professional-looking results.
Before grabbing your Allen key, consider the dry fit method. This involves loosely joining the components without completely tightening any screws or cam locks. A dry fit ensures everything aligns correctly before final assembly.
This simple step prevents frustration later, like realizing a piece is backward or misaligned after it’s secured. Think of the dry fit as a practice run for your furniture.
The order in which you tighten connections is vital for stability and ensuring the piece is square. Don't fully tighten any single connection until all parts in a given step are joined. This allows for adjustments and keeps the build from becoming skewed.
Imagine building a house – you wouldn't attach the roof before the walls are in place. Similarly, tightening IKEA furniture connections in the correct order ensures structural integrity.
IKEA furniture often incorporates cam locks and wooden dowels. These small but effective mechanisms are crucial for creating strong and stable joints. They do, however, require careful handling.
When inserting dowels, make sure they are fully inserted and flush with the surface. For cam locks, tighten them gradually and evenly. Avoid excessive force, which could strip the threads or damage the particleboard. Think of these connectors as the ligaments and tendons of your furniture—handle them with care. You might be interested in: How to master IKEA furniture assembly with these 12 helpful tips.
Some IKEA furniture can be bulky and difficult to maneuver, particularly during specific assembly steps. Plan your assembly sequence to minimize heavy lifting and awkward positioning.
If possible, assemble larger items on the floor, then carefully lift them into place once partially constructed. This protects your back and prevents accidental damage.
While general assembly principles apply to most IKEA furniture, some categories benefit from specialized techniques. When assembling drawers, ensure the slides are properly aligned and lubricated for smooth operation.
When constructing wardrobes, pay close attention to door alignment for a seamless, professional finish. Understanding these nuances enhances the functionality and appearance of your finished piece.
While IKEA's instructions are generally well-designed, there are occasions when slight deviations might be helpful. This might involve using wood glue for added reinforcement or pre-drilling pilot holes to prevent the particleboard from cracking.
However, consider these deviations carefully. Implement them only if you understand the furniture's construction. A little extra knowledge creates a truly sturdy and durable piece of furniture.
Assembling IKEA furniture can be a rewarding experience, but it’s also easy to make common mistakes. Learning from others can save you time, frustration, and possibly money. This section explores frequent assembly errors and offers solutions to get your build back on track.
One frustrating mistake is installing a piece backward. This often isn’t noticeable until several steps later, requiring partial disassembly. Before tightening everything, double-check each component’s orientation against the instructions. If you find a backward piece, carefully loosen connections and reorient it. You might find this helpful: How to master IKEA furniture assembly.
Another common issue is stripped screws. This often happens from excessive force or the wrong screwdriver. Always use the correct size and tighten gradually. If a screw strips, try a slightly larger screwdriver or a screw extractor.
Partial disassembly, while sometimes unavoidable, requires caution. Avoid forcing parts apart, which could cause damage. Instead, loosen all relevant connections before separating components. This gentler approach protects your furniture.
Measurement errors can cause misaligned pieces or an unstable finished product. Always double-check your measurements and ensure all components are flush before tightening. For complex builds, consider using a tape measure and a level to ensure accuracy.
Even with precise measurements, alignment problems can happen. This can be from slightly warped pieces or uneven surfaces. Using shims under furniture legs can address these issues and create stability.
Stability problems can also occur if connections aren't fully tightened or if the furniture is on an uneven surface. Always fully tighten all connections and, if needed, reinforce them with wood glue. Check out our guide on How to master furniture assembly and prep for your project.
Performing quality control throughout assembly prevents major issues later. After each major step, check alignment, stability, and connection tightness. This proactive approach helps you catch problems early.
Also, recognize warning signs to pause and reassess. If a piece doesn’t fit or the instructions are unclear, take a break. Review the instructions carefully or consult online resources before continuing. The global impact of IKEA's assembly-friendly furniture is clear in its sales. In FY24, IKEA reported 71% of its products were sold in stores, while 26% were sold online. This shows how the company's products are designed for easy assembly at home, appealing to both in-store and online shoppers. Explore this topic further here.
By understanding these common errors and solutions, you can approach IKEA furniture assembly with confidence and a greater chance of success. Remember, patience and attention to detail are key to a smooth and rewarding experience.
Moving beyond simple IKEA furniture, many homeowners aspire to create more ambitious projects. Think custom built-in wall units, complete kitchen installations, or intricate wardrobe systems. These complex endeavors demand a different level of planning and patience. This section explores how to approach these larger IKEA projects with confidence.
When working with multiple units, such as a wall unit, the assembly sequence is crucial. Begin by visualizing the completed project. Consider how each unit contributes to the overall structure. Start by assembling corner or base units, which often dictate the alignment for the rest of the project. Then, meticulously attach the remaining components.
Ensure perfect alignment and secure connections at each step. This methodical approach allows for adjustments along the way, ultimately achieving a professional, built-in appearance.
Larger IKEA projects can often span multiple days. This necessitates careful planning and organization. Divide the project into manageable phases. For example, assemble all drawers on one day, then focus on the frame the next. This structured approach prevents feeling overwhelmed. It also allows for breaks and reassessment between stages.
Remember to store assembled components properly to prevent damage or misplacement. This minimizes frustration and avoids unnecessary rework later on.
Precise alignment is paramount when joining multiple IKEA units. Use a level throughout the assembly process. This ensures even surfaces and prevents crooked cabinets. If your floor is uneven, use shims to achieve a perfectly balanced and aligned structure.
Clamps can be invaluable for holding pieces together securely while adhesive sets. This ensures a tight and uniform fit across the entire structure, contributing to a polished, professional result.
While IKEA furniture is designed for standard assembly, some modifications can enhance functionality. Adding extra shelves or customizing drawer configurations within the existing framework is sometimes possible. However, exercise caution when altering the original design. Modifications could compromise the structural integrity of the furniture.
IKEA emphasizes sustainability and customer involvement in the assembly process. The company aims to use 100% renewable or recycled materials by 2030. This strategy, combined with DIY assembly, allows IKEA to reduce waste. More detailed statistics are available here.
Some projects, like full kitchen installations, may benefit from professional assembly services. While IKEA furniture is generally designed for DIY assembly, large-scale projects often involve specialized tools and knowledge. Experience with plumbing and electrical work, plus a deep understanding of IKEA’s systems, may be necessary.
In these situations, hiring a professional can save considerable time and frustration. A professional installer can ensure a precise and functional result. This investment offers peace of mind and a flawless, professional finish. Carefully consider the project’s complexity, your skill level, and available time before tackling extensive IKEA projects alone.
Assembling IKEA furniture can feel like a marathon. But the final steps are just as important as the first. These finishing touches ensure your new furniture not only looks great, but also lasts. This section covers those essential final adjustments, stability checks, and maintenance tips that elevate an amateur assembly to a professional result.
After the main structure is complete, it’s time for fine-tuning. This includes adjusting drawer slides for smooth operation, aligning doors perfectly, and securely mounting wall-mounted pieces. For drawers, check that they slide effortlessly. If not, slightly loosen the screws attaching the slides and adjust their position. For doors, ensure even gaps and proper closure by adjusting the hinges. Small adjustments make a big difference in both functionality and aesthetics.
When securing wall-mounted pieces, always use appropriate hardware for your wall type. Using the wrong anchors can lead to instability and potential damage. The goal is not just assembly, but building something that lasts.
Before calling the project complete, conduct thorough stability checks. Ensure the furniture stands firm on a level surface. If it wobbles, identify the source. It could be an uneven floor, a loose connection, or an improperly installed leg. Use shims to compensate for uneven floors and tighten all connections securely.
Inspect the entire piece for any damage or imperfections. Now is the time to address these issues, before they become bigger problems. This quality assurance ensures long-term satisfaction.
Your assembled IKEA furniture requires maintenance to stay in top condition. Dust regularly with a soft cloth and clean spills promptly. Avoid placing heavy objects on surfaces not designed for them. Periodically check all connections and tighten them as needed. These simple practices keep your furniture looking and functioning like new.
Let's take a look at some realistic assembly time estimates for popular IKEA furniture:
IKEA Furniture Assembly Time Estimates
Description: Realistic time estimates for assembling popular IKEA furniture pieces based on complexity and experience level
| Furniture Type | Beginner Time | Experienced Time | Difficulty Level |
|---|---|---|---|
| MALM Dresser (3-drawer) | 2 hours | 1 hour | Medium |
| HEMNES Bookcase | 1.5 hours | 45 minutes | Easy |
| PAX Wardrobe (simple configuration) | 4 hours | 2.5 hours | Hard |
| LACK Coffee Table | 30 minutes | 15 minutes | Easy |
| POÄNG Armchair | 1 hour | 30 minutes | Medium |
This table provides a general idea of the time commitment involved in assembling these common IKEA items. Actual assembly times can vary based on individual skill and unforeseen circumstances.
Documenting your assembly process, perhaps with photos or videos, can be incredibly helpful for future moves or modifications. This documentation provides a visual guide if you ever need to disassemble and reassemble the furniture. Keep the original instructions and any leftover hardware. These resources can be invaluable for troubleshooting or repairs.
If you encounter missing parts or have warranty issues, IKEA offers customer support. Contact them directly for assistance. They can provide replacement parts or guidance on addressing warranty claims.
Contact IKEA customer service for assistance with missing parts or warranty issues. They offer dedicated support. These final steps make a big difference in the longevity of your IKEA furniture.
Assembling IKEA furniture can be rewarding, but sometimes you need a helping hand. Assembly Smart offers professional in-home assembly services specializing in boxed DIY furniture and recreational products. Serving Texas, Florida, and nationwide, we provide stress-free setup of your IKEA furniture, from dressers and desks to wardrobes and more. Learn More about how Assembly Smart simplifies your life
