-
CALL US:
- (866) 952-3456
Sooner or later, every recliner owner faces the same puzzle: how to get that big, comfy chair through a doorway that's suddenly way too small. Knowing how to take a recliner apart isn't just a neat party trick—it's a practical skill you'll be glad you have.
Whether you're moving to a new place, trying to fix a broken mechanism, or just getting rid of an old chair, disassembly makes the whole process significantly easier.
Before you start wrestling with levers and screws, it helps to know why you're doing it. Most people don't decide to dismantle their favorite chair for fun; it’s usually born out of necessity.
This is the big one. A fully assembled recliner is a beast to move. It’s bulky, heavy, and seems custom-made to get stuck in hallways and stairwells. Breaking it down is often the only way to get it from point A to point B without damaging the chair or your walls.
This is especially true if you’re using services like moving home self-storage, where every square inch counts. Splitting the chair into two manageable pieces—the back and the base—makes it a breeze to load, transport, and store.
When that smooth reclining action suddenly feels clunky, or the motor gives up, you've got to get inside to see what's wrong. You can’t reach a broken spring, a fried motor, or a cracked frame piece without taking off the backrest and sometimes the whole seat.
Learning how to do this yourself means you can handle basic repairs and keep your chair in good shape for years.
The global recliner market hit about USD 4.4 billion in 2024, and it’s not slowing down. With so many of these chairs in homes, it’s no surprise that an estimated 35% of owners will need to take them apart at some point.
Here's something you might not have thought of: recliners are often a lifesaver for people recovering from major surgery, like a mastectomy or heart procedure. Sleeping in one can be much less painful than a flat bed. Being able to easily move and set up the chair where it's needed is incredibly important.
Lastly, if your recliner has reached the end of its life, you can't just toss it on the curb. Proper disposal or recycling often means breaking it down into its core materials—wood, metal, fabric, and foam. Knowing how to disassemble it makes the job manageable.

A smooth and stress-free disassembly starts long before you even touch the first screw. I've seen it time and time again: proper prep is the real difference between a quick, successful job and a frustrating afternoon spent hunting for a missing bolt or the right-sized wrench.
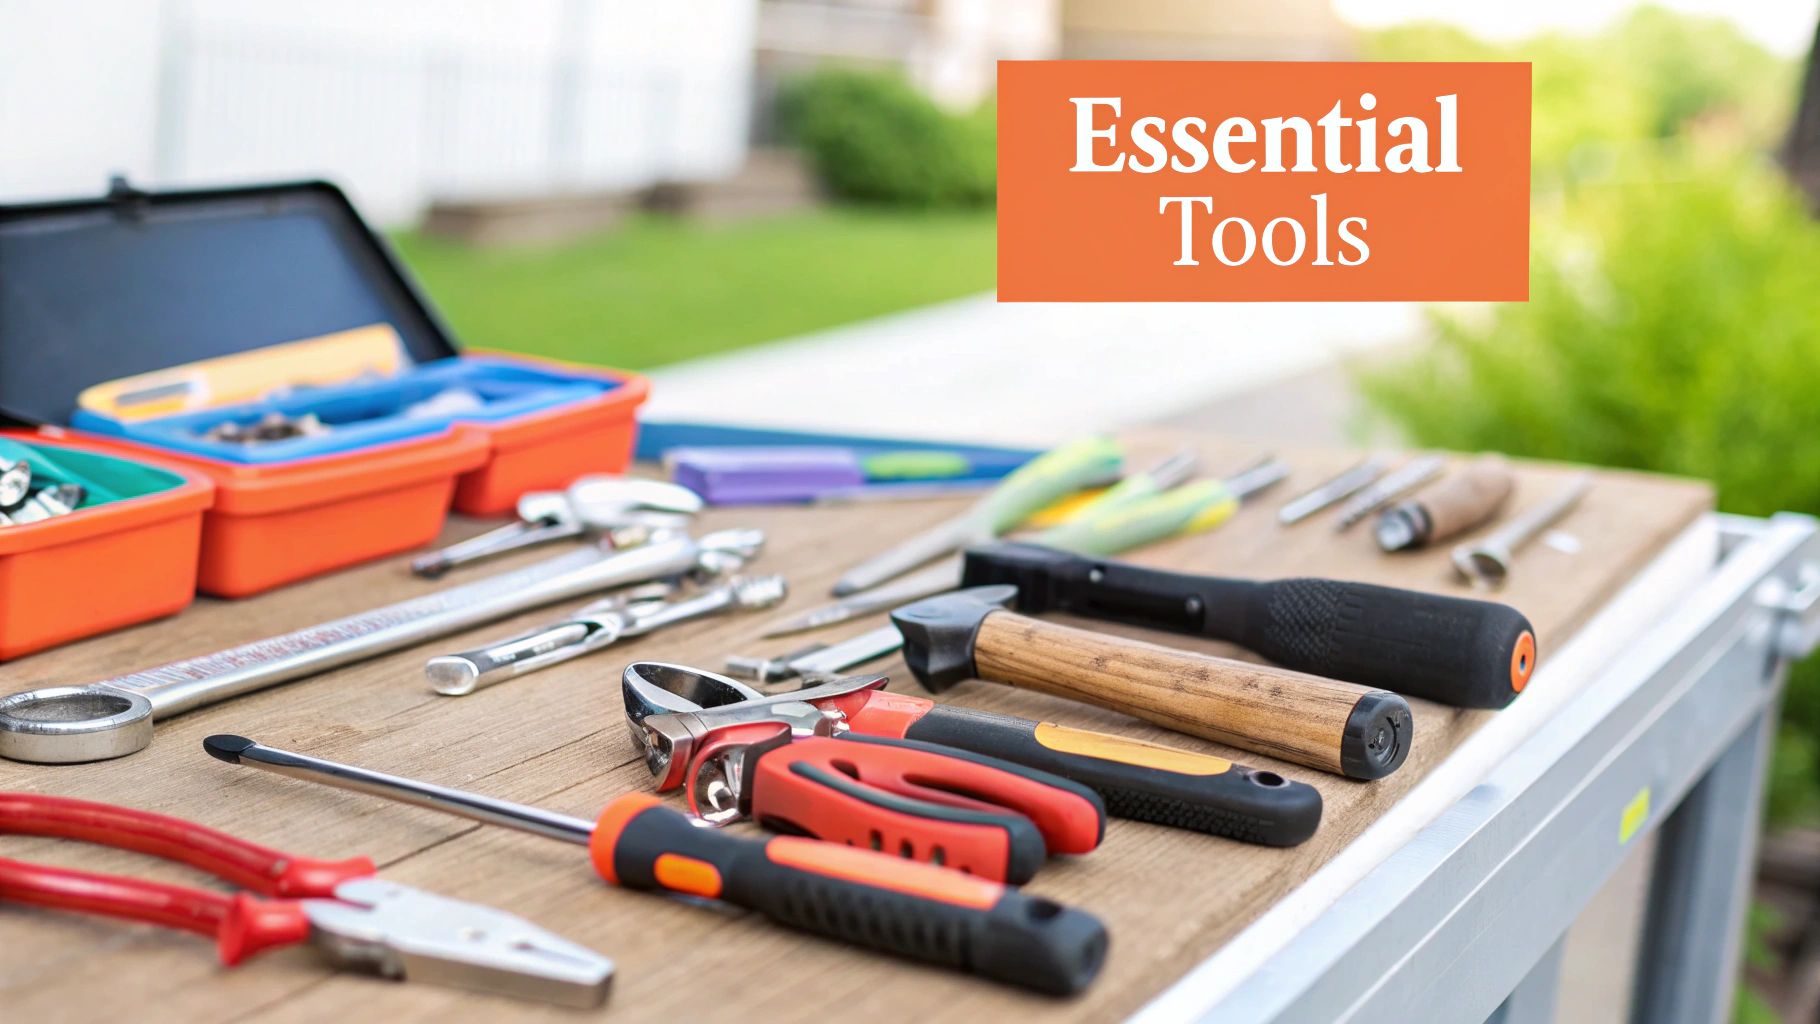
It's not just about having tools; it’s about having the right ones ready to go before you start. The good news is, most recliners can be taken apart with just a few common household items.
Before you get started, it's a smart move to pull together a basic toolkit. I've put together a quick checklist of the essentials you'll want to have within arm's reach.
| Tool | Primary Use | Pro Tip |
|---|---|---|
| Screwdrivers | Removing panels, covers, and sometimes frame components. | Get both a Phillips head and a flathead. You'll be surprised how often you need both. |
| Wrench or Socket Set | Loosening the bolts that hold the main frame together. | A small, adjustable wrench can work in a pinch, but a basic socket set makes life much easier. |
| Pliers | Pulling out tricky cotter pins or gripping small parts. | Needle-nose pliers are your best friend here. They get into tight spaces a regular pair can't. |
| Flashlight | Seeing into the dark nooks and crannies of the mechanism. | Your phone's light will do the job perfectly. You'll definitely need it. |
Having these items laid out and ready means you won't have to stop mid-project to dig through your garage. It keeps your momentum going and turns a potentially complicated task into a straightforward one.
Now, let's talk about your space. You'll need a clear, well-lit area with enough room to flip the chair over and lay out the pieces as you take them off. Trust me, you need more space than you think.
Lay down an old sheet, a tarp, or a moving blanket first. This is a must to protect your floors from potential scratches or grease stains from the chair's inner workings.
Pro Tip: Before you remove a single screw, grab a few magnetic bowls or some labeled plastic baggies. Tossing all your hardware into one of these will save you a massive headache when it's time to put everything back together.
This simple act of organizing your workspace is a core principle for any successful assembly or disassembly project. If you want to dive deeper into getting ready, check out our guide on how to prepare for your furniture assembly project. A little bit of planning now makes the whole process feel much more manageable.
Alright, let's get into the nitty-gritty of taking that recliner apart. It’s not about brute force; there's a method to it. We’re going to tackle this like a pro, which means starting with the biggest and usually easiest part to get off: the backrest.
Most recliners these days are designed with moving in mind, so the backrest is almost always made to be detached without a huge tool-and-die set. Getting it off is the key to making the chair manageable.
First things first, gently tip the chair forward. You might need to pop the footrest out to give it some balance. Now, run your hands along the bottom edge of the back, right where it meets the seat. You're feeling for a flap of fabric, which is usually held down with Velcro or a few snaps. Just peel that flap up and out of the way to get a look at the chair’s skeleton.
You should see two metal tracks, one on each side, which is how the back connects to the base. Your mission is to find the locking mechanism. It’s usually one of two types:
Once you've disengaged the locks, get a firm grip on both sides of the backrest and lift straight up. It should slide right off the tracks. If it feels a bit stubborn, a little side-to-side wiggle as you lift usually works wonders. Just don't try to force it—you could end up bending the brackets, and that's a headache you don't need.
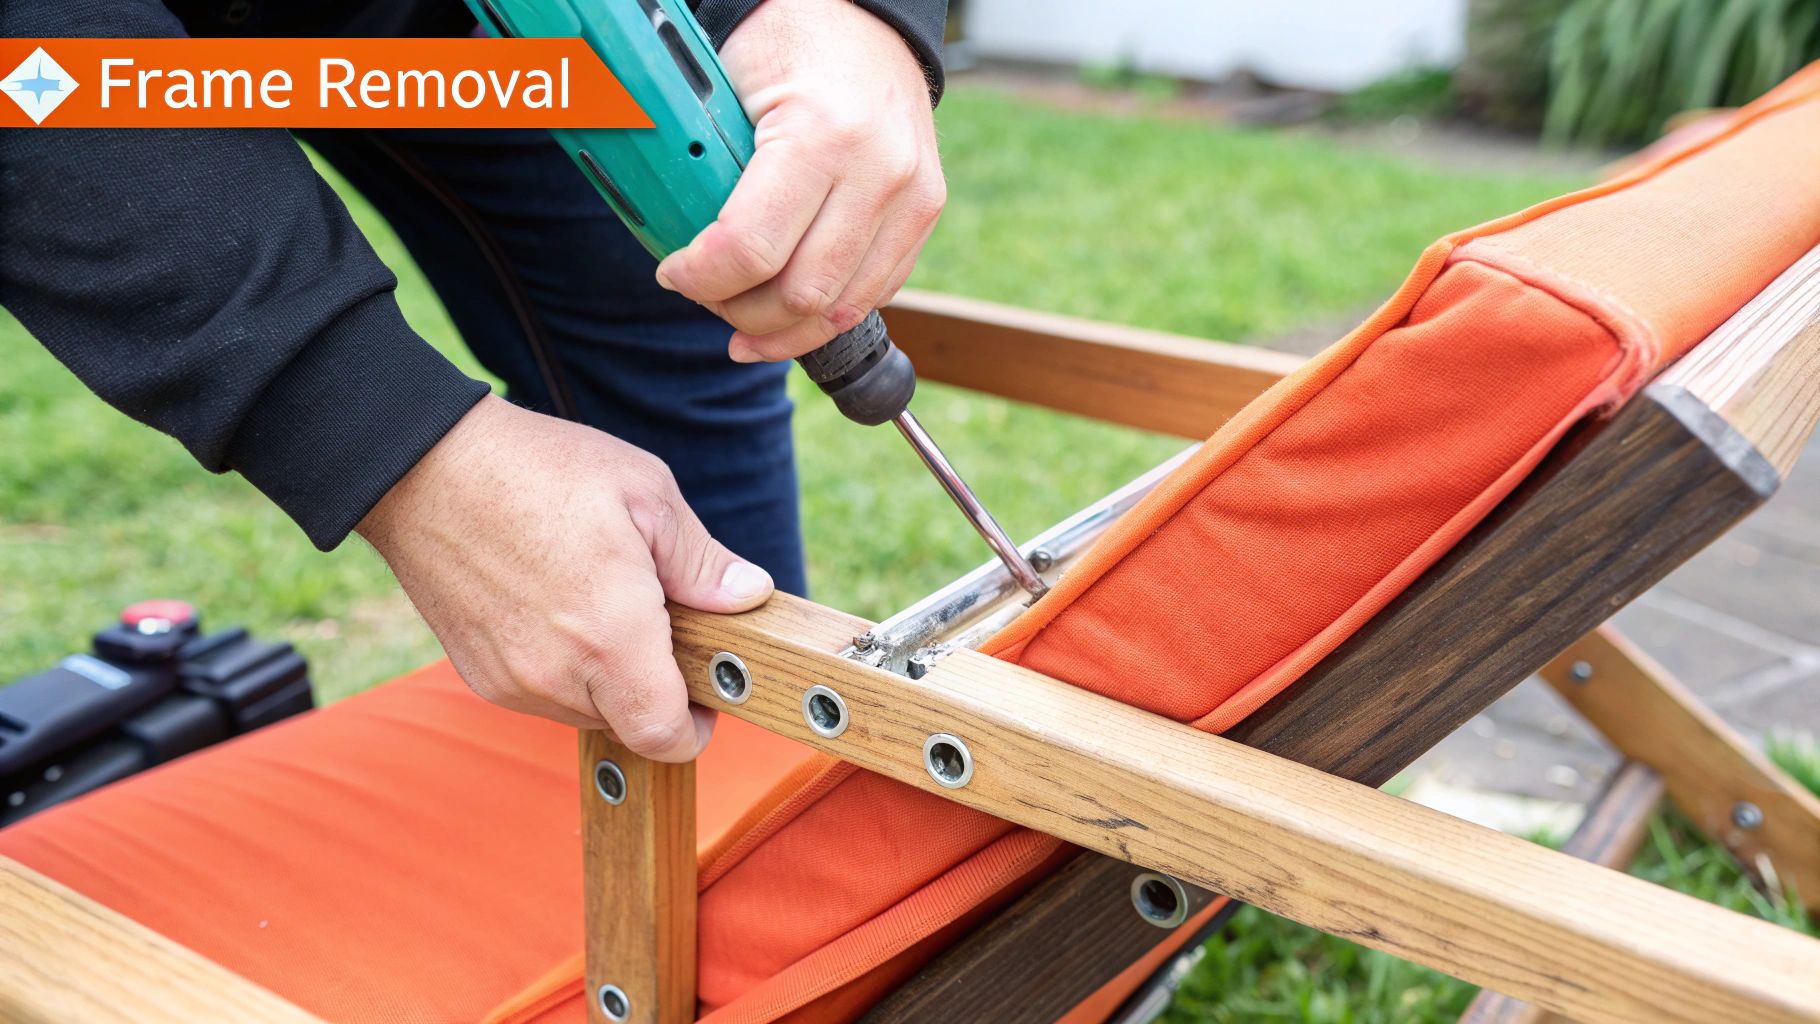
With the back out of the way, the rest of the job gets a lot more straightforward. Go ahead and flip the chair base completely upside down or lay it on its side. This gives you a clear view of the complex web of wood, metal, and springs that make up the seat and footrest.
This is where your smartphone becomes your best friend. Seriously, take a few pictures from different angles showing how the springs are hooked up and where the main bolts are. You’ll thank yourself later when it’s time to put it all back together. You're looking for the bolts or screws that hold the entire seat cushion frame to the metal reclining guts.
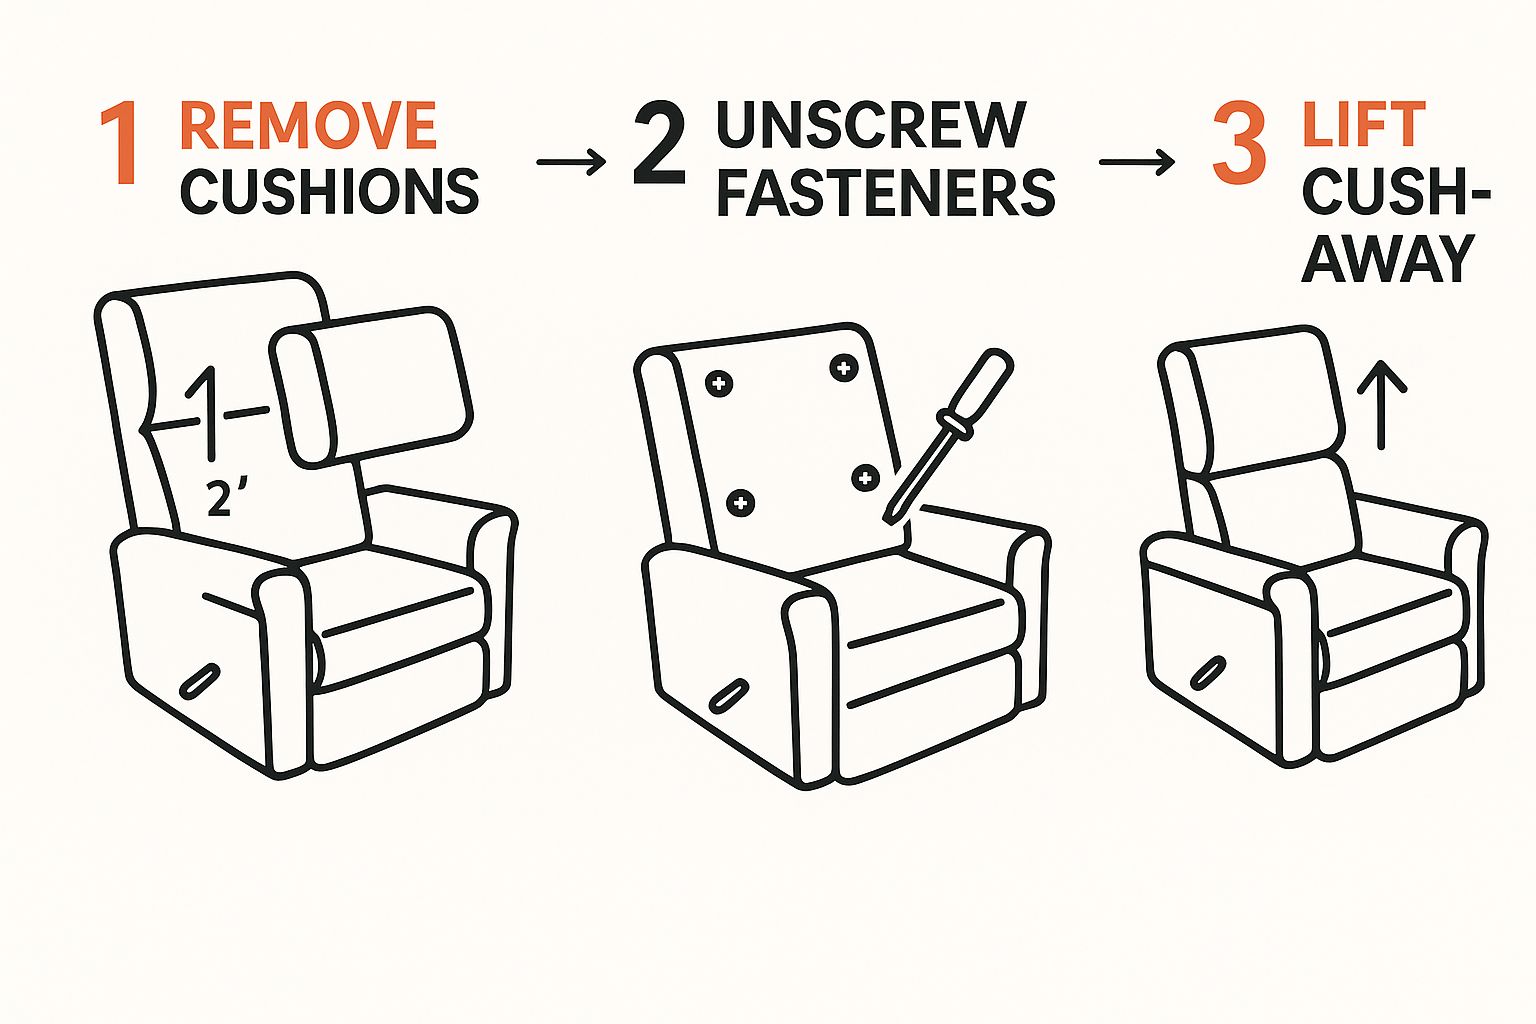
As you can see, once you have any loose cushions off, it's often just a few key fasteners holding the whole seat assembly on.
Grab your socket set or wrench and start carefully removing those bolts. It’s a good idea to keep track of which bolts came from where, since they can be different lengths. Once they're all out, you can usually lift the entire seat and footrest section off the base as one unit.
Expert Insight: Watch out for the tension springs. If your goal is to separate the footrest from the seat, those springs are going to be under a lot of pressure. Put on some safety glasses and use pliers to carefully unhook them. They can snap back with more force than you’d expect.
If the job starts feeling like it’s spiraling out of control, or if you're dealing with a tricky power recliner with lots of wiring, don't be a hero. It's often smarter and safer to get some professional furniture assembly help. A pro can get it done quickly without damaging your investment, saving you time and a whole lot of frustration.
It would be nice if every recliner was built the same, but the reality is that knowing what you're up against is half the battle. The mechanism is really the heart of the chair, and its design completely dictates how you should approach taking it apart.
The biggest split you'll see is between manual and power recliners. Manual models are pretty straightforward, using simple levers and your own body weight to kick back. Taking them apart usually just means releasing some basic locking tabs and unbolting the frame.
Power recliners, of course, throw motors, wiring, and sometimes even backup battery packs into the mix. The disassembly process isn't that different, but it comes with one absolutely critical first step.
Safety First: Before you even think about grabbing a tool for a power recliner, you must unplug it from the wall. If you don't, you're looking at a serious risk of electric shock or frying the motor. It’s just not worth it.
Beyond the simple manual vs. power question, you might run into some specialized designs that need their own game plan. Spotting these early can save you a world of frustration.
The good news is that as ergonomic designs have become more popular, so have more modular chairs. This often makes taking them apart much easier than with the old, clunky models of the past.
Think of it like working on a car. The core ideas are the same, but you wouldn't use the exact same steps for a Ford as you would a Honda. The techniques for popping off the backrest, for instance, will work on almost any chair. But a wall-hugger might have its bolts tucked away in a weird spot to make room for that sliding track.
This kind of modular thinking is everywhere these days, from your phone to flat-pack furniture. If you’ve ever found yourself wrestling with a complex cabinet, you’ll find that our guide to IKEA furniture assembly shares a similar logic—it's all about following a specific sequence. The key is to always adapt the general steps you know to the specific chair sitting in front of you.
Taking the recliner apart is half the battle, but the war isn't won until it's reassembled and functioning just like it did before. The good news? Reassembly is essentially just reversing the steps you just took. The key is to start from the ground up.
You'll have a much easier time if you begin with the base and frame. This creates a solid foundation to work from before you even think about adding the seat and, finally, locking the backrest into place.
Pro Tip: As you start putting bolts back in, don't tighten them all the way down immediately. Thread them in loosely first. This gives you a little play to get every component lined up perfectly. Once everything is sitting just right, then you can go back and give all the bolts a final, secure tightening.
While following the disassembly steps in reverse is your best bet, a few common slip-ups can quickly turn this straightforward job into a headache. We want to avoid that classic moment of thinking you're done, only to discover a wobbly back or a motor that won't budge.
Based on our experience, these are the most frequent missteps people make:
Even with the best instructions, you can still hit a few bumps in the road. It happens. After taking apart hundreds of recliners, we've seen it all. Here are the answers to the questions we hear most often.
You're pulling and wiggling, but that backrest is stuck solid. I've been there. First, go back and give those locking levers another firm push—sometimes they don't fully release on the first try.
If it’s still stubborn, try a gentle side-to-side rocking motion while you lift. For an older chair that's seen a lot of use, a little lubricant on the metal brackets can be a lifesaver. Just be sure to tuck a towel underneath to keep your upholstery clean.
For the most part, no, but they do have their own little quirks. Many La-Z-Boy models use a brand-specific locking system. Instead of the usual levers, you’ll often find a small, slotted lock on the mounting brackets.
You'll need a simple flathead screwdriver for this. Just give the lock a quarter-turn on each side, and the back should pop right off like any other recliner.
At the end of the day, it's all about finding and releasing the locking mechanism. The core idea is the same across almost every brand; it's just the tool or specific technique that changes.
Absolutely! A reclining sofa is really just two or three individual recliner chairs sharing a single frame.
You'll treat each reclining section as its own project, removing one backrest at a time using the same methods. If you have a stationary console between the seats, that will likely need to be unbolted from the frame before you can fully separate the pieces for moving.
For more answers to common furniture headaches, you can find a ton of helpful info in our comprehensive FAQ section.
Dealing with stubborn parts or complicated pieces can turn a simple task into a major frustration. If you'd rather not deal with the hassle, let the pros at Assembly Smart take care of it for you. We offer fast, next-day service to get your furniture disassembled and ready for your move. You can book a stress-free appointment today at https://assemblysmart.com.
