-
CALL US:
- (866) 952-3456
Putting in a new water filter might seem daunting, but it’s a totally doable weekend project. At its core, the job really comes down to three things: turning off the water, making solid connections, and then carefully checking your work for any leaks. The trick is knowing that not all filters are created equal—the steps can change quite a bit depending on what kind you've got.
This guide is your roadmap. We’ll walk through installing the most common types you’ll find in homes, like the ones that go under the sink or in your fridge. Think of this as your game plan, laying out all the tools and prep work so you can get it done without those annoying, last-minute runs to the hardware store.
It’s not just you, either. More and more people are taking control of their water quality. The global market for water filters was valued at a massive USD 15.88 billion and is expected to climb to USD 26.42 billion by 2032. This boom is happening because homeowners are proactively installing their own systems.
Any good DIYer knows that success comes down to having the right tools and a clear plan before you start. This is true whether you're learning how to install a water filter or tackling that new bookshelf. A little prep work saves a ton of frustration and makes sure the job is done right the first time.
If you've ever found yourself staring at a pile of parts from a flat-pack box, you know exactly what I mean. For some jobs, calling in an expert is the smart move. Our guide on professional IKEA furniture assembly shows just how valuable that can be for more complex projects.
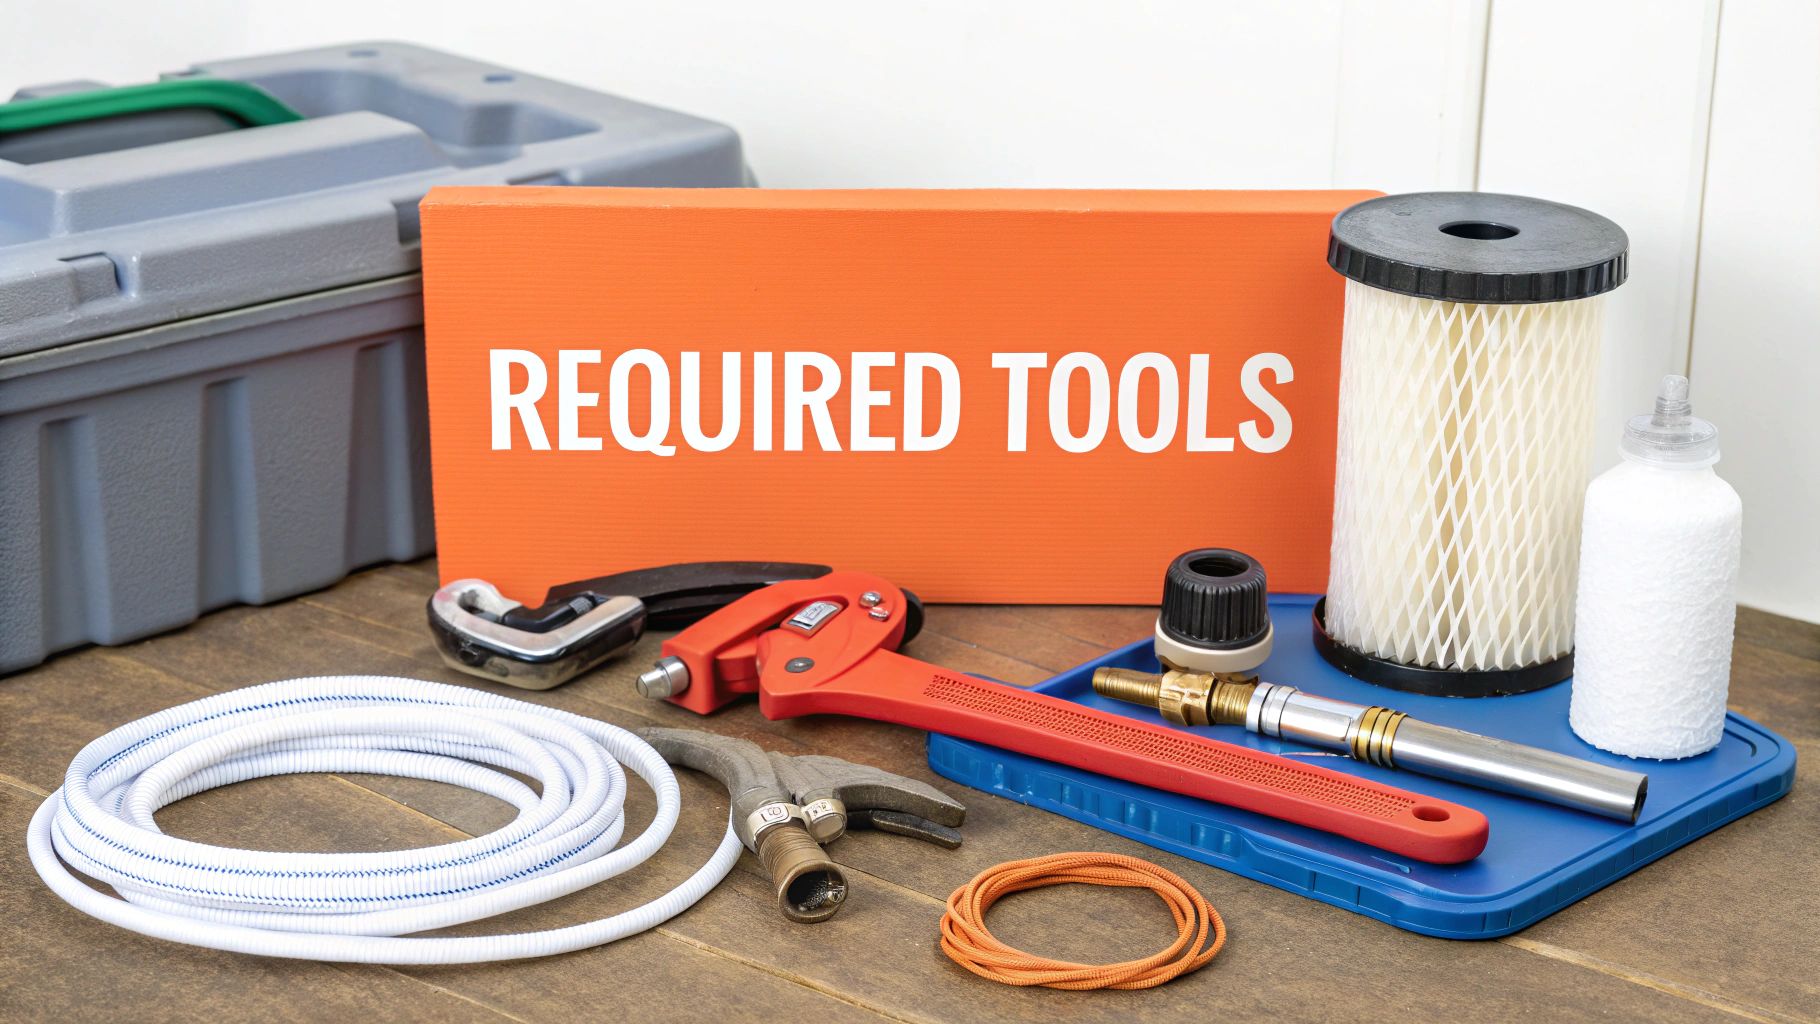
Before you even slice the tape on the filter's box, take a few minutes to gather your tools. It’s a simple step that can turn a potentially messy afternoon into a smooth, satisfying project.
Before you get started, it's a good idea to lay out all your tools. This avoids the frustration of having to stop mid-project to search for a wrench. The table below covers the basics you'll likely need for the most common filter installations.
| Tool or Supply | Under-Sink Filter | Refrigerator Filter | Whole-House Filter |
|---|---|---|---|
| Adjustable Wrenches | ✓ | ✓ | |
| Bucket & Towels | ✓ | ✓ | ✓ |
| Drill with Bits | ✓ | ✓ | |
| Tube Cutter | ✓ | ✓ (if adding a line) | ✓ |
| Teflon Tape | ✓ | ✓ | |
| Safety Glasses | ✓ | ✓ | ✓ |
Having these items within arm's reach will make the entire process much smoother. Now, let's look at why some of these are so important.
The tools you need will really depend on the filter you’re installing. A simple refrigerator filter might just be a twist-and-lock affair, but an under-sink or whole-house system is a bit more involved.
I’ve seen it a hundred times: someone uses regular scissors or a dull knife to cut the water line. This almost always pinches or crushes the end of the tube, meaning it won’t seat properly in the quick-connect fitting. The result? A slow, maddening drip that you’ll be chasing for hours.
Getting your toolkit ready beforehand is the best thing you can do. It’s a small bit of prep that makes a huge difference in how the project goes and, more importantly, how you feel when it’s done.
Any seasoned DIYer will tell you that a successful installation starts way before you ever pick up a wrench. Proper prep work is what separates a quick, satisfying project from a frustrating afternoon filled with unexpected trips to the hardware store. Rushing this stage is a rookie mistake that almost always leads to leaks or damage.
First things first: shut off the water to the sink you're working on. You're looking for the cold water shutoff valve, often called an angle stop. It's usually a small, football-shaped handle on the pipe coming out of the wall. Give it a firm turn fully clockwise until it stops. You don't need to crank on it, but make sure it's all the way closed.
Now, pull everything out from under the sink. Seriously, everything. You'll need more room than you think, not just for your tools but to maneuver yourself comfortably. Trying to work around a maze of old cleaning bottles is how you end up with a sore back and a sloppy connection.
Once it's clear, lay down some old towels or, even better, a shallow baking pan. This will catch the inevitable drips and dribbles when you start disconnecting the water lines.
This idea of setting up a clean, organized space is universal for home projects. As we cover in our guide on how to prepare for your furniture assembly project, a bit of tidying upfront prevents a massive headache later. You're just setting the stage for success.
Before you go any further, unbox your new water filter kit and lay every single piece out on a clean towel. Take a minute to compare what’s in front of you with the parts inventory list in the instruction manual.
I once spent an hour hunting down a leak, convinced I had overtightened a connection. The real problem? The kit was missing a tiny rubber O-ring that should have been pre-installed in a fitting. A two-minute parts check at the beginning would have saved me so much grief.
Discovering you're missing a critical part mid-install is the worst. It’s far better to find out now, while you can still run to the store or call the manufacturer, than when your kitchen sink is completely taken apart. This simple check is your best insurance for a smooth project.
Alright, with your prep work done and all the parts laid out, it's time to get this filter installed. This is one of the most satisfying DIY plumbing jobs you can do. It's a noticeable upgrade you'll appreciate every time you get a glass of water from the tap.
Let’s get started.
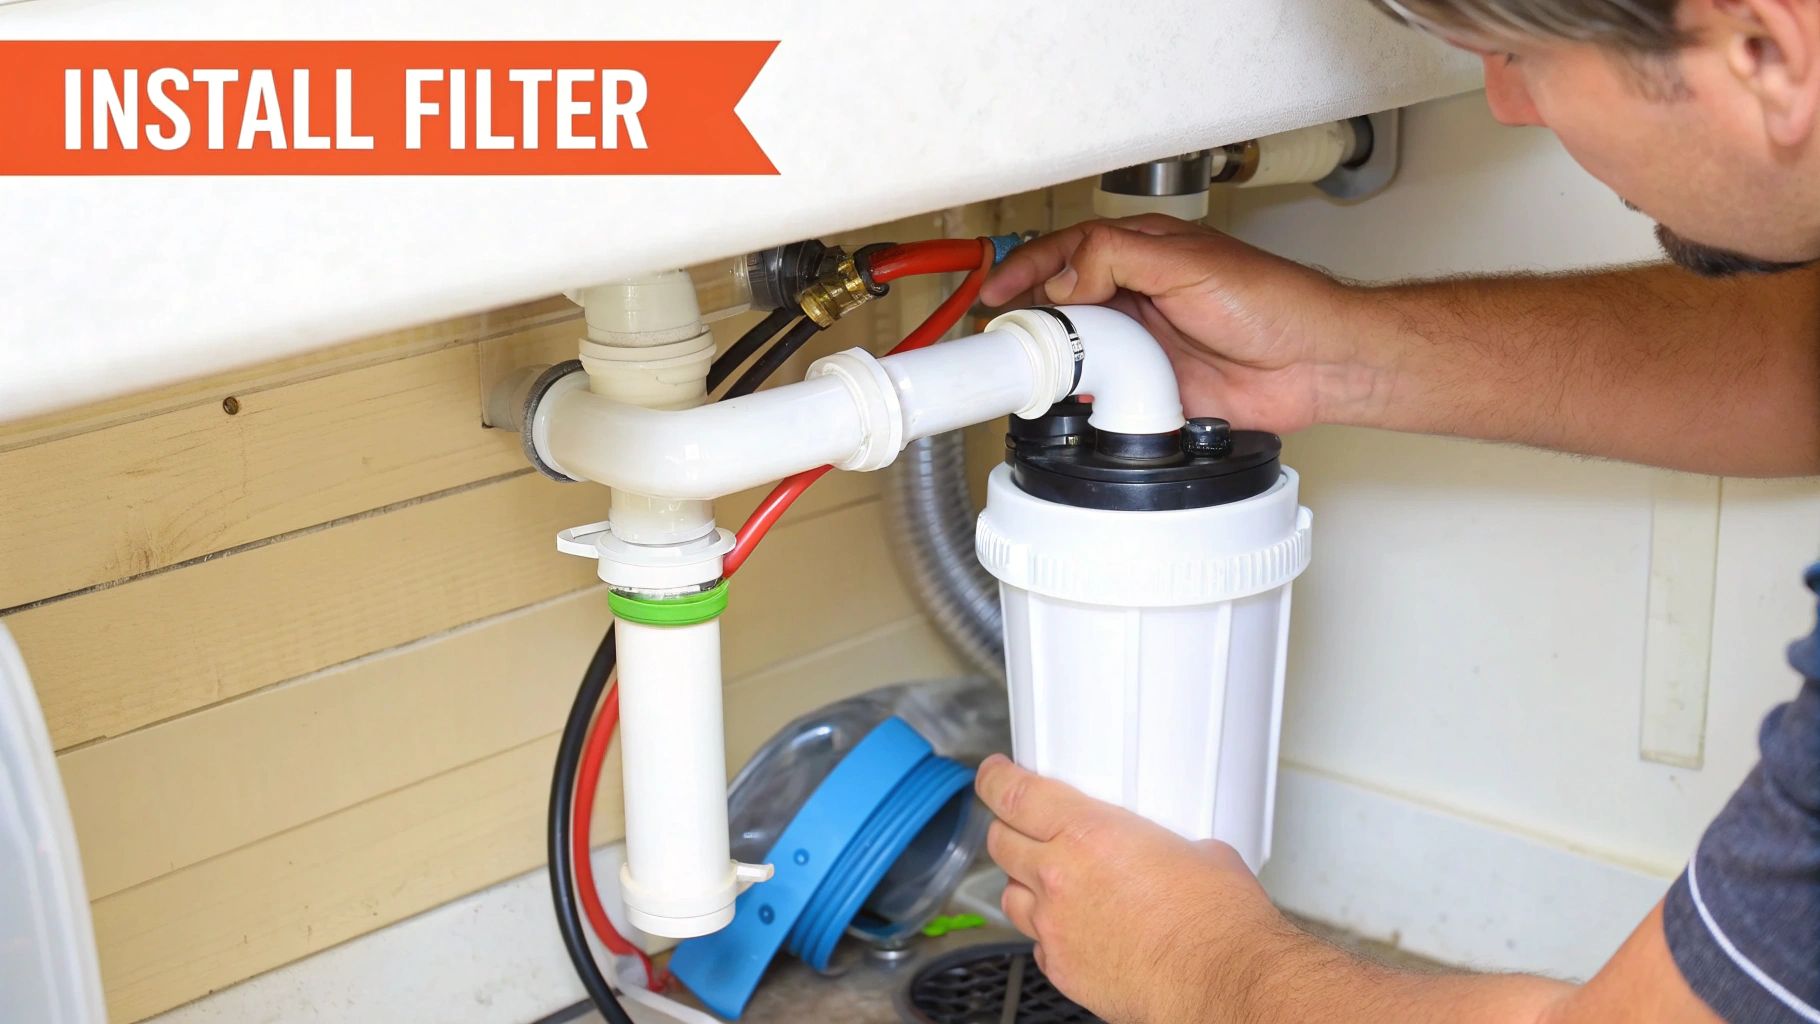
First things first, you need to decide where the main filter unit will live. Look for a nice, flat spot inside your cabinet. You want it to be easy to get to, because you'll be changing those filters out down the line. Hold the mounting bracket up against the cabinet wall and use a pencil to mark where the screws will go. A quick tip from experience: make sure you leave plenty of room below the bracket to unscrew the filter housing later.
Once you’re happy with the placement, drill your pilot holes and screw the bracket securely to the wall. But hold off on attaching the actual filter unit for now. It's way easier to connect the water lines when you can move the filter head around freely, rather than wrestling with it under the sink.
Next up is the faucet. If your sink has an extra hole—maybe from an old soap dispenser or a side sprayer you never use—you're golden. If not, you'll have to drill a new one. I know, drilling into your countertop sounds terrifying, but it's totally manageable with the right tool. Use a carbide-tipped hole saw for a stainless steel sink or a diamond-grit version for granite or quartz. Just go slow and steady.
The image below gives you a good sense of how a clean, prepped under-sink area should look before you start connecting everything.
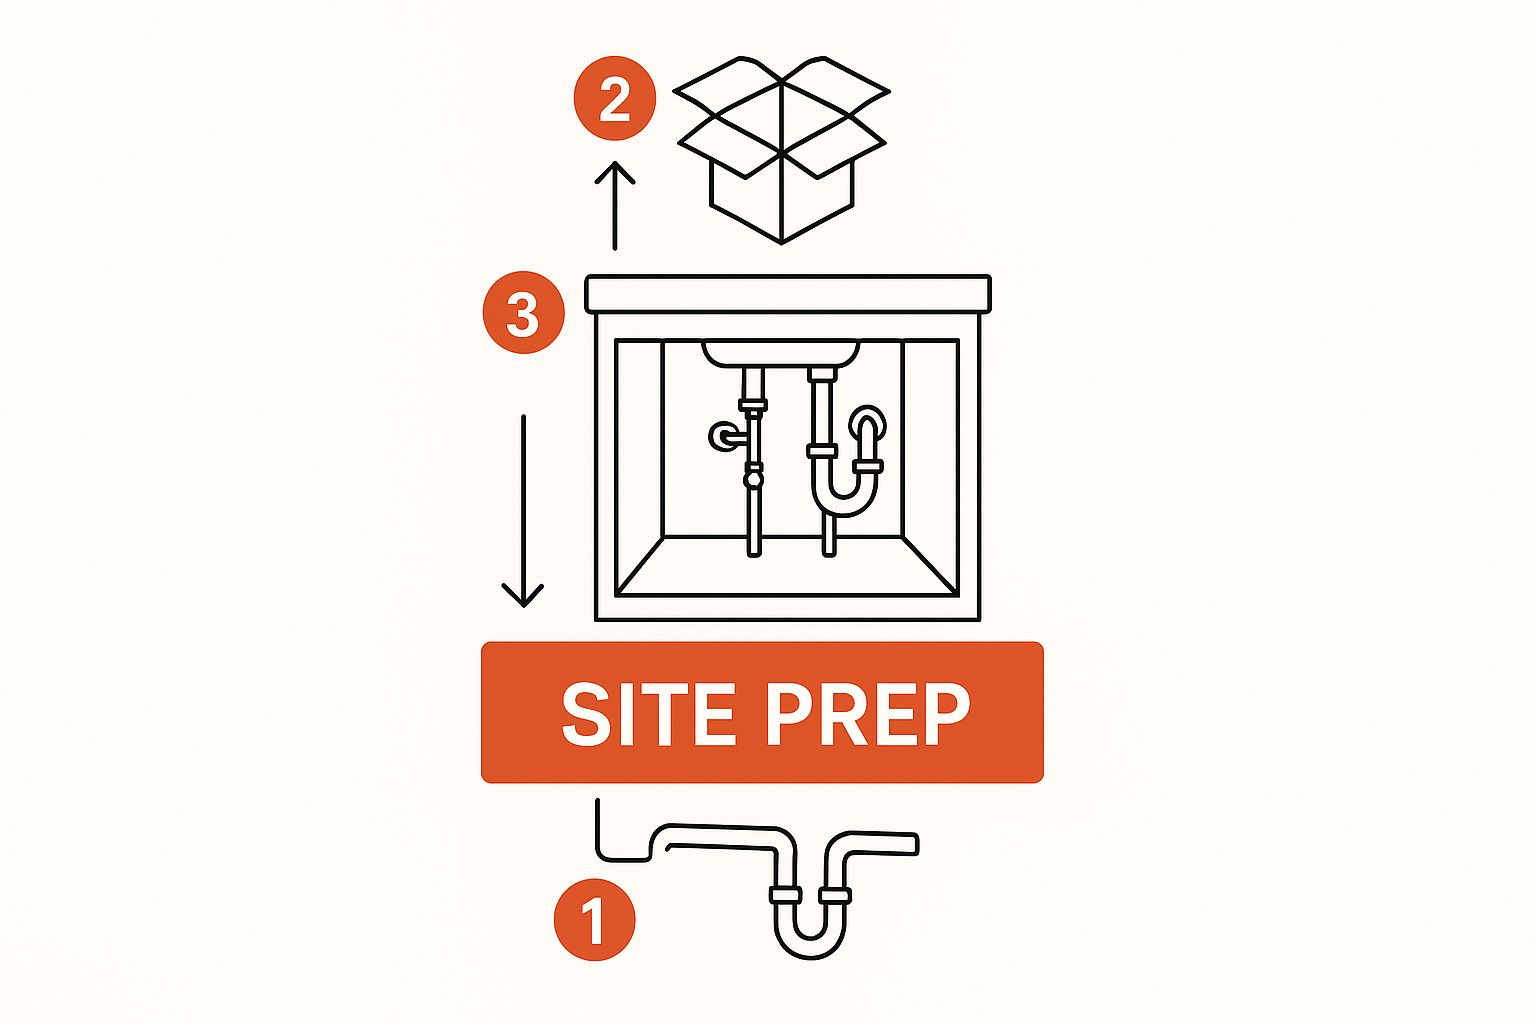
Getting this stage right sets you up for a smooth, leak-free installation.
This is where you need to pay close attention, as it's the most critical part of the job. You'll start by installing the T-valve adapter that came with your kit. This little piece is what will divert cold water over to your new filter. Go ahead and disconnect the cold water supply line from the shutoff valve under your sink. Keep that bucket and a few towels handy to catch the drips.
Now, screw the T-valve directly onto the shutoff valve. Then, reconnect your sink’s original cold water line to the top connection on the "T". Just like that, you've created a dedicated port for the filter system.
A Pro Tip from the Trenches: When you're dealing with compression fittings, remember the goal is "snug," not "crushed." A rookie mistake is to crank down on them with a wrench, which can easily damage the fitting or the tiny brass ring (the ferrule) that actually creates the seal. My rule of thumb is to tighten it by hand until it stops, then give it just another quarter-turn to a half-turn with a wrench. That's almost always enough.
Grab the plastic tubing from your kit. For the cleanest cut, use a dedicated tube cutter—it gives you a perfectly square edge that prevents leaks. Push one end firmly into the quick-connect port on the T-valve and the other end into the port marked "inlet" on your filter head. You'll feel a solid "click" when it seats properly.
Do the same thing for the outlet line, running a piece of tubing from the filter's "outlet" port up to the base of your newly installed faucet.
Water filtration systems, whether they're reverse osmosis or simple activated carbon, are becoming standard in many homes. For the best performance, it helps to mount the system about 30 to 40 centimeters above the floor of the cabinet, which helps maintain good water pressure.
To avoid leaks, industry guidelines for these types of connections suggest tightening the fittings to a torque value between 0.3 and 0.5 Nm. That’s just enough to get a good seal without risking damage. If you want to dive deeper into the technical side of things, there's a lot of information on the technical specifications of water filtration systems on Custom Market Insights.
With all the water lines connected, you can finally screw the filter cartridge (or the whole housing) onto the bracket. Don’t go crazy here—hand-tight is all you need. And that's it! The main installation is done.
Learning how to install a new water filter in your refrigerator is one of the most satisfying five-minute jobs you can do around the house. It’s a simple fix that pays off immediately with better-tasting water and ice. Best of all, unlike under-sink systems that can be a real project, this usually requires no tools at all.
The trickiest part is often just figuring out where the filter is hiding. Refrigerator designers have gotten pretty clever about tucking them away. Here are the most common spots to check:
Once you’ve found it, you’re on the home stretch.
Most refrigerator filters are designed for a simple twist-and-lock removal. For filters inside the main compartment or door, a firm quarter-turn counter-clockwise is typically all you need. You'll feel it unseat, and then you can pull it straight out. It’s a good idea to have a small towel handy, as a little water will almost always drip out.
If your filter is in the base grille, you might have to press a button to eject it slightly before you can grab it and pull it the rest of the way. Now, unbox your new filter and remember to pull off any protective caps from the connection points.
Installing the new one is simply the reverse of removal. The market for these filters is huge—valued at nearly USD 3.9 billion and expected to climb to USD 6.9 billion by 2035, so manufacturers have made the process pretty standard. For more details on this trend, you can check out the data on the growth of the refrigerator filter market on Future Market Insights.
Align the new filter with the housing, push it in gently, and turn it clockwise until it feels snug and locked in place. This usually takes about a 180-degree turn and applies roughly 20 Newton-centimeters of torque, which is just enough to create a tight seal without over-tightening or damaging the plastic.
You’re almost there! With the new filter locked in, there's one last thing you absolutely must do: flush the system. This step is critical because it activates the carbon filter media and pushes out any trapped air or loose carbon particles from the manufacturing process.
Grab a large pitcher and run about three to five gallons of water through the dispenser. At first, the water might look cloudy or even a bit gray—don't worry! That's just air bubbles and harmless carbon dust. Keep running it until the water is crystal clear.
After a thorough flush, your work is done. The only thing left is to reset the "change filter" light on your refrigerator's control panel. It's an easy step to forget, but doing it ensures you get a reminder when it's time for the next replacement, keeping your water consistently fresh.
If you hit a snag like a leak or the filter won't seat properly, don't panic. These problems are common and usually have a simple fix.
Here’s a quick guide to solving the most frequent issues people run into.
| Problem | Likely Cause | Solution |
|---|---|---|
| Leaking after installation | The filter isn't fully seated or the O-rings are dry. | Remove the filter, lightly moisten the O-rings with water, and reinstall it, ensuring you twist it until it clicks or stops firmly. |
| The new filter won't go in | It’s the wrong model, or it's not aligned correctly. | Double-check the filter model number against your fridge's manual. Try re-aligning it with the housing before twisting. |
| Water flow is slow or sputtering | Air is trapped in the water line. | This is normal right after installation. Continue flushing the system for another gallon or two until the flow is smooth and steady. |
| The "change filter" light won't reset | The reset procedure varies by brand. | Check your refrigerator's manual. Most require you to press and hold one or two buttons simultaneously for three seconds. |
Running through these quick checks will solve 99% of installation headaches and get your new filter working perfectly.
https://www.youtube.com/embed/WxvAF_dh6-s
Your new water filter is installed, but you're not quite ready to call it a day. Honestly, this last part is the most critical for your peace of mind. A slow, hidden leak can cause an absolute disaster under your sink, so we need to bring the water back into the system carefully.
Don't just crank the water supply valve all the way open. Instead, give it just a quarter turn. You'll hear a gentle hiss as the filter housing and lines begin to fill. This slow-and-steady approach prevents a sudden blast of pressure that could easily pop a connection that isn't perfectly seated.
Once the hissing stops, it's time to put on your detective hat. Grab a good flashlight and a couple of dry paper towels—the paper towel is your secret weapon, as it will instantly show even the tiniest drop of moisture you might otherwise miss.
Now, meticulously check every single connection you touched.
Knowing how to spot a problem is just as important as the installation itself. A comprehensive water leak detection guide is a great resource for learning the early signs of trouble, which can save you a lot of headaches and protect your home.
Pro Tip: Don't just give each connection a quick glance. I've learned from experience to stare at each point for at least 30 seconds. A very slow seep might take a moment to form a visible drip. If everything looks bone dry, go ahead and turn the water valve all the way on and do the entire inspection one more time.
When you're completely satisfied that there are no leaks, you can finally tidy up the cabinet. It's tempting to just cram everything back in, but a little organization will make future filter changes much less of a chore. For projects that demand this kind of precision, getting an expert in is often the smartest move. If you're tackling other home upgrades, you can get professional furniture assembly help to make sure the job is done right.
One last trick. Place a dry bowl or a few folded paper towels directly under the filter for the first 24 hours. Think of it as a simple, zero-effort insurance policy. It's your final chance to catch any tiny "settling-in" drips that might pop up after the system has been under pressure for a while.
Even after a successful installation, a few questions can pop up. It’s completely normal. Let's walk through some of the most common things people ask after getting their water filter up and running. Think of this as your quick-start guide to understanding your new system.
We've tackled a lot of home assembly and maintenance questions over the years. If you don't spot your answer below, you can find a whole lot more on our full FAQ page.
This is probably the number one question we hear, and the honest answer is: it depends. Most manufacturers will tell you to swap out the filter every six months, and for most under-sink or refrigerator filters, that's a solid rule of thumb.
But that's just a starting point. Your local water quality is the real decider. If you're dealing with hard water or a lot of sediment, you might find yourself needing a new filter closer to the four-month mark. The best way to know for sure is to trust your senses. A noticeable drop in water pressure or any change in taste or smell are dead giveaways that it's time for a fresh cartridge.
First off, don't worry. This is a very common and temporary side effect of a new installation. If your water looks milky or cloudy, it’s just tiny air bubbles that got trapped in the system while you were connecting everything. They’re harmless and will clear up on their own.
That initial "off" taste, sometimes a bit plasticky or metallic, is usually just some loose carbon dust from the brand-new filter. Luckily, the fix for both issues is simple: flush the system. Just turn on the dedicated faucet and let it run for a solid five minutes. Another way is to fill and dump a few large pitchers—aim for about three to five gallons. This simple step pushes out all the air and rinses the filter clean.
After I put in my first under-sink filter, the water came out looking like skim milk. My first thought was, "Oh no, what did I break?" But I just followed the manual, flushed it for a few minutes, and it went crystal clear. It's just part of the process.
This one is an absolute and definite no. Home water filtration systems, whether they're for your fridge or a big unit under the sink, are engineered for cold water only.
Hot water will wreak havoc on the filter's internal parts. It can warp the plastic housing, break down the filter media like activated carbon, and destroy the rubber O-rings that keep everything sealed tight. Hooking a filter to the hot water line won't just make it useless—it's a recipe for leaks and total system failure. Always, always connect to the cold water supply.
Feeling in over your head with a DIY project? Let the pros at Assembly Smart take care of it. From tricky furniture to home equipment installations, we offer fast, expert assembly services that save you time and frustration. Book your stress-free appointment today at https://assemblysmart.com.
