-
CALL US:
- (866) 952-3456
Thinking about getting a trampoline? You're probably wondering if you really need to hire a pro to put it together. For most families, the answer is a big, unqualified yes. This isn't just about saving yourself a Saturday afternoon and a headache; it's one of the most important safety calls you can make for your backyard.

Let's be honest, bringing in a professional for your trampoline setup is about a lot more than just convenience. Think of it as an investment in your family's safety, the trampoline's performance, and how long it's going to last.
Sure, the DIY route seems like a good way to save a few bucks. But these things are more complex than they look, and a small mistake during assembly can easily compromise the whole structure, creating some pretty serious safety risks down the road.
An experienced installer brings a trained eye to the job. They're not just reading the instruction manual; they're making sure every single component is perfectly aligned, secured, and tensioned. This know-how is what really counts when you run into the little quirks every backyard has.
For example, what if your yard has a slight grade? It might be so subtle you don't even notice it. A DIYer could easily build the trampoline without accounting for the slope, leading to an unstable frame that shifts and wobbles. A pro knows exactly how to level and anchor the structure, creating a rock-solid foundation that prevents extra strain on the legs.
We also see this with the more complex, high-performance models. Springless trampolines, for instance, often use fiberglass rods that need special tools and techniques to get right. If you don't tension them correctly, you'll get a lousy bounce, or worse, you could damage the rods or have them pop out of place.
Key Takeaway: Professional installation is about precision. An expert makes sure every bolt is torqued just right and every spring has the same tension. This is what prevents the premature wear and tear that almost always happens with DIY setups.
Deciding between DIY and hiring a pro can feel like a toss-up. To make it easier, here’s a quick breakdown of what you're looking at with each option.
DIY vs Professional Installation: A Quick Comparison
| Factor | DIY Installation | Professional Installation |
|---|---|---|
| Safety | High risk of assembly errors that can lead to injury. | Assembly follows manufacturer and safety standards, minimizing risk. |
| Time | Can take 4-8+ hours, often with interruptions and frustration. | Typically completed in 2-4 hours by an experienced technician. |
| Tools | May require purchasing or borrowing specialized tools you don't own. | Technicians arrive with all necessary professional-grade tools. |
| Expertise | Relies on interpreting often-confusing instruction manuals. | Deep knowledge of various models and common installation issues. |
| Longevity | Improper assembly can cause premature wear on parts. | Correct installation extends the life of the trampoline. |
| Peace of Mind | Lingering doubt about whether it was assembled correctly. | Confidence that the trampoline is safe and secure for your family. |
At the end of the day, the choice depends on your comfort level, but the benefits of professional work often speak for themselves, especially when it comes to safety and equipment lifespan.
And it’s not just a backyard trend. The commercial side of things—like trampoline parks and gyms—accounts for over two-thirds of the trampoline market's revenue. That right there tells you how critical professional-grade installation is when safety and liability are on the line.
Ultimately, a professionally installed trampoline simply performs better, lasts longer, and gives your family a much safer place to play. It becomes a seamless part of your yard, just like other projects for enhancing your outdoor living space. By letting an expert handle it, you skip the common DIY mistakes and get straight to years of fun with total peace of mind.
A little prep work before the professional trampoline installation team arrives can make a world of difference. When you create the perfect environment for the build, you're setting the crew up for success—letting them work safely and efficiently to get your trampoline built right the first time.
The most critical decision you'll make is choosing a safe and suitable location. It all starts with the ground.
The ideal spot is a perfectly level patch of grass. An uneven surface puts weird, uneven stress on the trampoline's legs and frame, which is a recipe for instability and damage over time. Before the installers even pull up, take a walk around your yard and pinpoint the flattest area you can find.
Once you've picked your spot, it's time to clear it out completely. We're talking about removing any rocks, sticks, stubborn tree roots, or other debris that could puncture the mat or create a nasty surprise underfoot.
You'll also need to identify and mark any sprinkler heads in the vicinity. A small flag or even just a brightly colored rock on top will do the trick, ensuring the crew can easily spot and avoid them.
Now, what if your chosen area isn't perfectly flat? A minor slope is something our installers can often work with, making small adjustments on-site. However, a significant grade is a bigger issue that needs to be addressed beforehand. For homeowners needing some detailed guidance on this, our guide on how to level ground for a swing set shares very similar principles that can be a huge help.
A professional installer will always check the site when they arrive. If the ground is too sloped or the area is unsafe, they may have to reschedule. A little prep work on your end prevents that kind of frustrating setback.
Safety isn't just about what's under the trampoline; it's also about the space around and above it. These buffer zones are non-negotiable for preventing accidents, and it's something we take very seriously.
Make sure your chosen location has:
Finally, think about logistics. Can the crew get from their truck to the installation site easily? Make sure there's a clear and unobstructed path. Moving heavy boxes and equipment through tight gates or around patio furniture can slow things down. A clear path means a faster, smoother professional trampoline installation from start to finish.
So, the professional installation crew is on their way. What happens next? You can expect a smooth, methodical process that’s a world away from the headache of a weekend DIY project. This is a streamlined operation handled by technicians who have probably built hundreds of trampolines and know every trick in the book.
The first thing they’ll do is a quick site verification. Even if you've prepped the area, they'll give it a final look-over. They're checking that the ground is genuinely level and that you’ve got all the required safety clearance around the spot. It's their last chance to confirm the location is safe before a single part comes out of the box.
Once they give the site the green light, the team will unbox and lay out all the components. This isn't just about dumping the contents on the lawn; it’s a systematic inventory check. They’ll account for every frame piece, spring, nut, and bolt to make sure nothing is missing or damaged.
With all the parts laid out, the frame assembly begins. The technicians will connect the steel sections, making sure every joint is flush and totally secure. They work fast, using their experience to piece together parts that might leave the average person scratching their head at the instruction manual. A solid, level frame is the absolute foundation of a safe trampoline, and it's a step no pro will ever rush.
Next up is the most physically demanding part: attaching the springs and the mat. This is where professional tools and techniques really make a difference. Installers use specialized spring-pulling tools that give them the leverage to safely stretch and hook each spring into place with just the right amount of tension.
They’ll almost always work in a star pattern, attaching springs on opposite sides of the frame. Why? This distributes the tension evenly across the mat, preventing it from warping and ensuring a consistent, predictable bounce. Trying to do this without the right tool or technique is where many DIY jobs go wrong, often resulting in pinched fingers or improperly seated springs.
Expert Insight: An experienced installer can literally feel the tension in the springs. If one feels too loose or tight, they know to inspect the frame and spring for defects. It’s a subtle skill that prevents future problems and guarantees a better, safer bounce right from day one.
After the jumping surface is perfectly tensioned, the crew will put up the safety enclosure. They'll slide the padded foam over the poles, attach them securely to the trampoline legs, and then carefully thread the safety net. Getting this net pulled taut and free of any gaps is absolutely critical for safety.
The team makes sure the net is properly secured at both the bottom and the top, creating a complete barrier that prevents falls. They'll also install the spring cover pad, checking that it completely covers the frame and springs with no exposed metal edges.
The best trampoline installation companies are also well-versed in the latest designs and safety features. They're not just assembling a basic trampoline; they’re familiar with heavy-duty steel frames, durable polypropylene mats, and even advanced springless systems that use flexible fiberglass rods to reduce injuries.
The infographic below really drives home how important the initial site prep is—it's the foundation for the whole job.
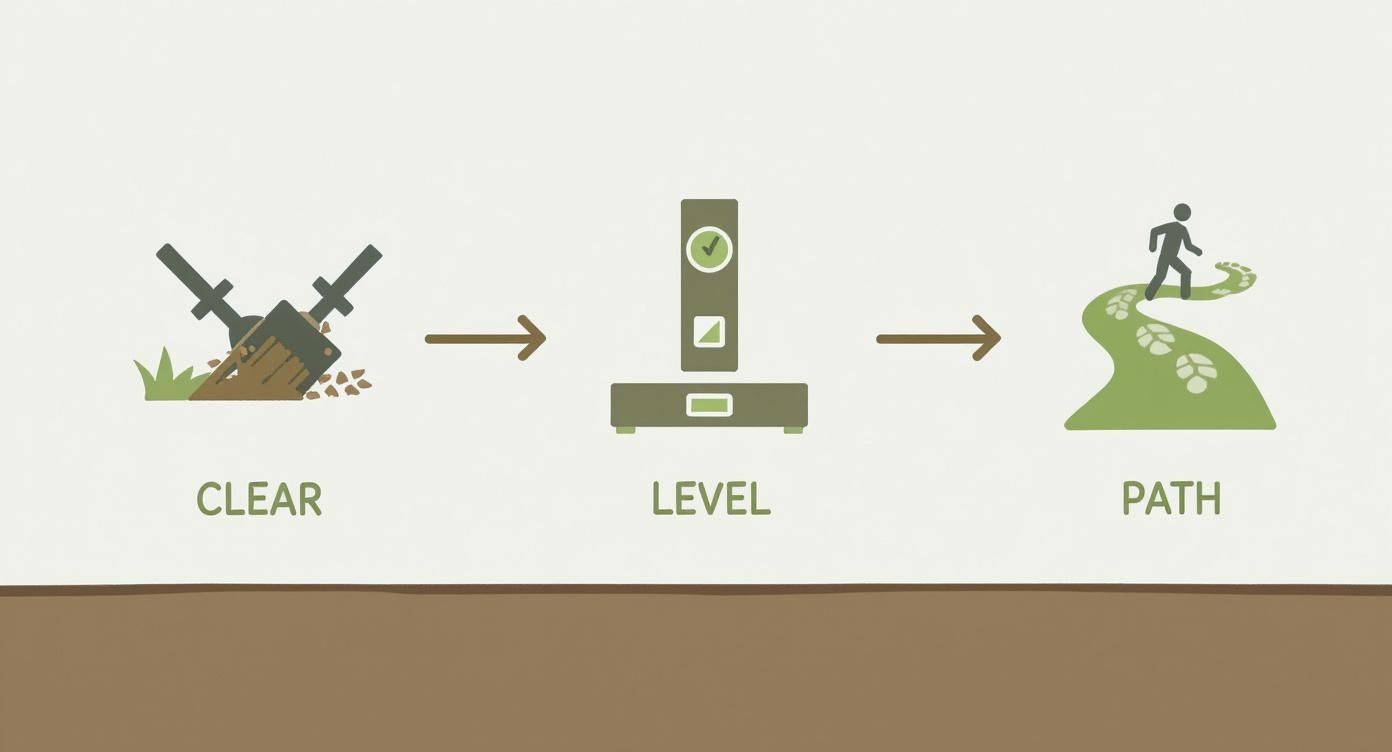
As you can see, a successful installation starts long before the trampoline itself is built. It all begins with a clear, level, and accessible space. By understanding what the pros do, you’ll have a clear benchmark for what a high-quality, professional setup looks like from start to finish.

The last spring is pulled and the safety net is zipped up, but a professional’s job isn't quite done. The final step is probably the most important one: walking you through a detailed safety check.
This isn’t just a quick “sign here” moment. It’s your chance to inspect the finished product with an expert right there beside you. You get to understand how to keep your new trampoline in great shape for years of safe fun. Any reputable installer will always finish the job this way.
During the walkthrough, you'll want to check the stability of the whole thing. Go ahead and give the frame a good, firm shake from a few different spots. It should feel completely solid—absolutely no wobbling or shifting.
The technician should guide you through several key checkpoints. Don't be shy about asking questions or pointing out anything that looks off. This is your opportunity to get a professional to confirm everything was done correctly.
Here’s a quick rundown of what you should review together:
This final check isn't just about the assembly—it’s about passing on the knowledge. Your installer should empower you with the info you need to keep every jump a safe one.
Beyond just looking over the fresh assembly, a true pro service includes a briefing on upkeep. The installer should give you simple, clear instructions for ongoing maintenance to prevent normal wear and tear from becoming a problem.
This should cover a basic schedule for routine checks, like tightening frame bolts or inspecting the mat for any fraying. For a broader look at keeping your backyard play-ready, this detailed playground safety checklist has some great principles that apply to trampolines, too.
The whole point of this final step is to leave you feeling 100% confident. You’ll know the job was done to the highest standard and, just as importantly, you'll know how to perform the basic checks that ensure years of safe bouncing for your family.
When you're ready to get a professional trampoline installation, two big questions probably pop into your head: How long is this going to take, and what's it going to cost me? Getting a handle on the numbers and the schedule upfront helps you budget the right way and plan your day without any surprises.
The final price tag isn't a simple, one-size-fits-all number. A few key things will influence the cost, with the trampoline's size and complexity leading the pack. Think about it: a standard 10-foot round trampoline is a much quicker build than a massive 17-foot rectangular model, which has a more intricate frame and a ton more springs to hook up.
Your yard's condition also plays a big part. If you've got a perfectly level and clear spot ready to go, the job is pretty straightforward. But if the crew needs to do some minor leveling or clear out debris, that extra labor is going to add to the bottom line. Our in-depth guide on trampoline installation costs really gets into the weeds on these variables.
So, how much of your day should you set aside? The time needed for a pro to work their magic can vary quite a bit depending on what you've got.
It's no secret that trampolines have become a backyard staple. With the push for outdoor family activities and fitness, backyard models now make up nearly two-thirds of all sales. This trend across North America has really ramped up the demand for professional installers who know how to get the job done efficiently and safely. You can read more about this market boom here.
Pro Tip: When you call for a quote, have the exact model of your trampoline handy and snap a quick photo of where you want it to go. Sending that over helps us give you a much more accurate estimate for both the cost and the time it'll take.
At the end of the day, paying for a professional setup is an investment in expertise and efficiency. It buys you the peace of mind that comes from knowing the job was done right. A pro can knock it out in a fraction of the time it would take you to wrestle with it yourself, getting your family jumping and having fun that much sooner.
Even after you've decided to hire a professional, it's totally normal to have some lingering questions. Knowing the ins and outs of the installation process helps set your expectations and makes sure you’re ready when the crew shows up. We’ve pulled together some of the most common questions we get from homeowners, with straightforward answers.
This is about more than just logistics; it's about feeling confident that professional installation is the right call for your family's safety and your own peace of mind.
Let's clear up any confusion about the timeline, what your yard needs, and what happens after the job is done.
This is probably the number one question we hear, and for good reason—you need to plan your day. The time a professional installation takes can swing quite a bit depending on the trampoline's size and how complicated the model is.
For a standard, round trampoline around 12 feet in diameter—the kind we see most often—an experienced tech can usually get it done in about 2 to 3 hours. These guys work fast because they’ve built hundreds just like it.
However, the clock starts to tick a little slower with bigger or more complex trampolines.
This is a fantastic and very common question. While a perfectly level surface is the dream scenario, the reality is that many yards have a slight, barely-noticeable grade. An experienced installer can absolutely work with a very minor slope.
They use professional leveling techniques to make tiny adjustments to the legs, ensuring the frame itself is perfectly horizontal and stable. This is critical because it prevents uneven stress on the structure—a huge problem we see with DIY setups on imperfect ground.
A true professional will always assess your site the moment they arrive. They can tell you right away if the slope is manageable or if it's a safety hazard. A significant incline is a deal-breaker, as it completely compromises the trampoline's stability.
Your job isn't over once the crew leaves. Keeping a trampoline safe for years of fun requires some simple but consistent maintenance. Any good installer should walk you through these basic checks before they consider the job done.
Think of it as a quick "pre-jump inspection." Here’s a simple checklist to follow:
It’s easy to think a smaller trampoline means a simpler, safer build. But when it comes to safety, size really doesn't matter. The same rules apply to every single trampoline: the spring tension has to be right, the frame has to be stable, and the net has to be secure.
Even on an 8-foot model, a poorly installed net can leave dangerous gaps, or incorrect spring tension can create a wonky, unpredictable bounce. A professional ensures every single part, no matter the trampoline's size, is installed to the manufacturer's exact specifications. That makes expert assembly a smart investment for any trampoline, big or small.
Ready to ensure your trampoline is assembled safely and correctly by experts? The team at Assembly Smart is here to provide fast, reliable, and professional installation services. Visit https://assemblysmart.com to get your free estimate and book your stress-free appointment today.
