-
CALL US:
- (866) 952-3456
Adding doors to a bookcase is one of those high-impact DIY projects that can totally transform a room. It takes your open, sometimes-cluttered shelves and turns them into sleek, hidden storage. The whole process is pretty straightforward: you’ll be measuring your bookcase frame, picking out materials like MDF or plywood, and then installing hinges and hardware. It’s a project you can definitely tackle in a weekend, and it adds serious value and style.
Let's be honest, that open bookcase you once loved for displaying your favorite things can quickly become a magnet for visual clutter. We've all been there. This project is your ticket to turning it from a source of stress into a clean, intentional cabinet. Adding doors isn't just about hiding a mess; it completely elevates the look of a room, giving a standard piece of furniture a custom, built-in feel.
This upgrade is more than just looks—it’s a seriously practical way to create storage you can actually use. When you start personalizing your space, it's always smart to have a good resource, like a comprehensive guide to customizing your home, to lean on. The benefits you'll see from this one change are immediate and pretty impressive.

By adding doors, you're not just tweaking a piece of furniture; you're creating a bespoke item that's tailored exactly to your needs. This small change can solve some big organizational headaches, especially in smaller rooms where every inch of storage really counts.
This project is a fantastic entry point if you're looking to get into woodworking or home improvement. It only requires basic tools and some careful measuring, but it delivers a professional-looking result that will boost your confidence right along with your home’s appeal. You'll quickly find that clever modifications like this are some of the best storage solutions for small spaces.
In the next sections, we'll get into the nitty-gritty and walk through the practical steps for measuring, choosing the right materials, and getting that hardware installed perfectly.
The doors you choose will completely define the final look of your bookcase. This isn't just about looks, though—the material you pick impacts everything from your budget and the tools you'll need to the kind of finish you can pull off. Think of it as setting the foundation for the whole project.
Your choice here really sets the tone. A simple Shaker-style door can give the bookcase a timeless, classic feel, while a flat, minimalist slab door creates a much more modern, seamless look. The idea is to find a style that either fits right in with your existing decor or creates a contrast you love.
The material is the heart of your door. Your decision here is going to influence the door's durability, weight, and just how easy it is to get a professional-looking paint job.
It’s no surprise that home customization projects like this one are getting more popular. The global door market, valued at $117.76 million, is expected to jump to $169.46 million. That reflects a serious trend towards homeowners wanting to put their own stamp on their space. You can dive deeper into these market trends and get more details about the growth of the door industry.
Making the right material choice upfront saves a lot of headaches later. To help you decide, let's break down the most common options side-by-side.
| Material | Average Cost (per sq. ft.) | Best For | Pros | Cons |
|---|---|---|---|---|
| MDF | $2 – $5 | Painted Finishes | Perfectly smooth surface, budget-friendly, won't warp | Heavy, can be damaged by water, doesn't hold screws as well as wood |
| Plywood | $3 – $7 | Painted or Stained Finishes | Strong yet lightweight, attractive wood grain, holds screws securely | Edges need finishing, can have voids, requires more prep for a smooth paint finish |
| Solid Wood | $5 – $15+ | Stained Finishes | Beautiful natural grain, highly durable, repairable | Most expensive, can warp or crack with humidity changes |
Ultimately, the best material depends on your budget, your skill level, and the final look you're trying to achieve.
Hardware is like the jewelry for your new cabinet doors. The right hinges, pulls, and catches are just as important as the doors themselves for getting a polished, functional result.
The type of hinges you pick affects both the look and the entire installation process.
Pro Tip: When you're choosing pulls or knobs, think about the scale of your bookcase. Larger, heavier doors often look and feel better with more substantial pulls, while smaller doors are better suited to more delicate knobs. It’s a small detail, but it makes a huge difference.
Finally, you need to decide how the doors will stay shut. Simple magnetic catches are inexpensive and get the job done. But if you want a more refined touch, think about adding soft-close dampers. They prevent slamming and give your DIY project a high-end feel.
Getting the measurements right is everything in this project. Trust me, spending a little extra time with your tape measure now is going to save you a world of frustration later. A mistake of even a quarter-inch can throw off the entire look, so let's nail this from the get-go.
First, you need to decide what kind of doors you're going for: overlay or inset. Overlay doors are the more forgiving option for a DIY project. They sit on top of the bookcase frame and slightly overlap the opening, hiding any minor imperfections. Inset doors, on the other hand, sit perfectly flush inside the frame. They look incredibly sharp and professional, but they demand absolute precision to get those clean, even gaps all around.
Here’s a hard-earned tip: never assume your bookcase is perfectly square. It almost never is. Over time, wood can shift and settle, so you need to account for that.
To get an accurate width, measure the opening in three different spots:
Always use the smallest of these three numbers as your final width. This is your insurance policy against the door binding or scraping if the frame is a bit narrower in one spot. You'll do the exact same thing for the height, measuring the left, middle, and right sides. If you're building doors for multiple openings, label every single measurement. You’ll thank yourself later. For a deeper dive, our guide on how to measure furniture has some great step-by-step advice.
This handy visual breaks down the key decisions you'll be making as you plan out your new doors.
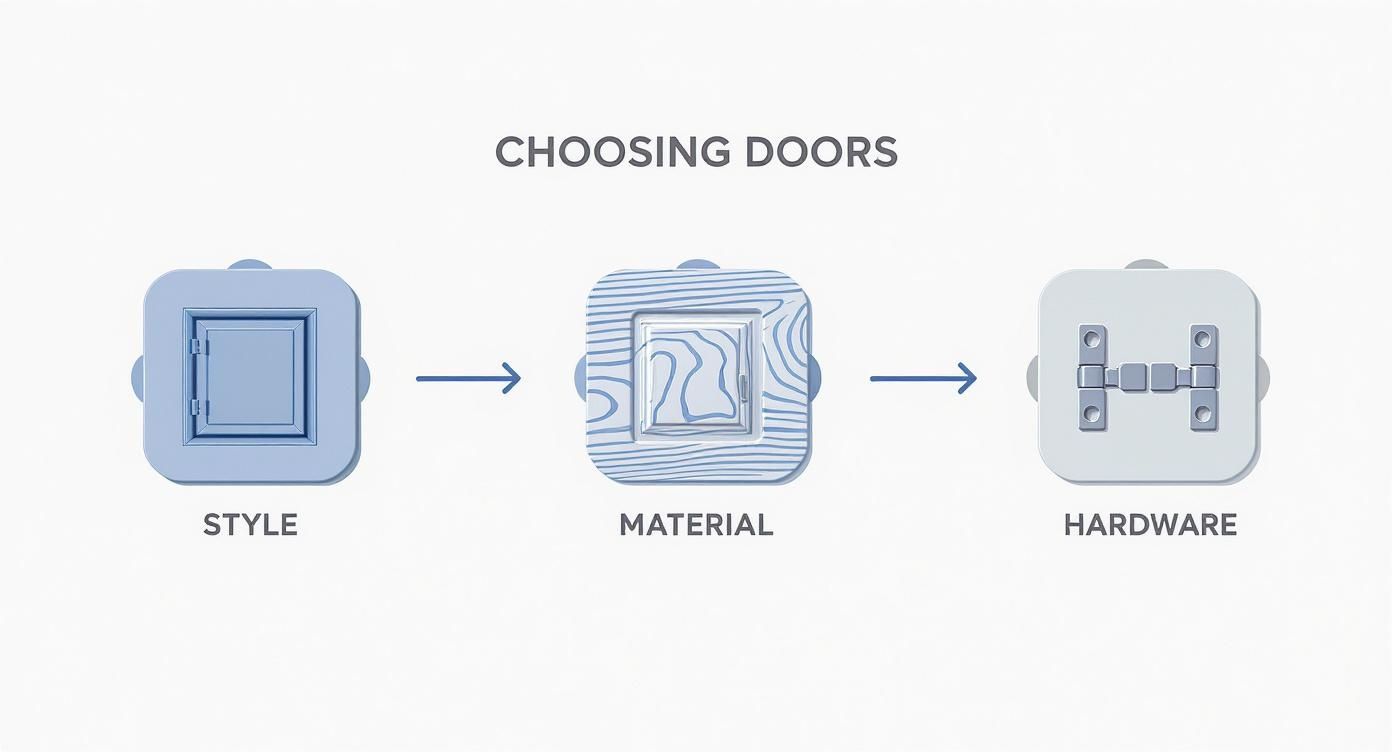
It really shows how everything from your door style to the hardware you choose is connected, starting with the overall look you want and moving into the practical parts.
Okay, you've got your numbers. The next phase is all about prep work, and it’s the secret to making your new doors look like they were always part of the piece.
Start by giving the bookcase a good, thorough cleaning. Grab a degreasing cleaner and wipe away any dust, grime, or oils that have collected over the years. You'll want to pay special attention to the spots where you plan to mount the hinges—a clean surface is non-negotiable for a solid installation.
The most overlooked step is a light sanding. You don't need to go crazy and strip off the old finish. Just a quick scuff-up with some fine-grit sandpaper (around 180-220 grit) is all it takes. This creates a slightly textured surface for your primer and paint to grab onto, which is the key to preventing chips and peeling down the road.
Once you’re done sanding, wipe everything down with a tack cloth or a slightly damp rag. You want to get rid of every last speck of dust. Any little particles left behind will get trapped in your paint and create a gritty, amateur-looking texture. This careful groundwork ensures your primer will stick perfectly, giving you that smooth, long-lasting finish that really makes a project shine.

This is the moment of truth. Installing the hinges is where your flat pieces of wood finally become a functional cabinet with doors. It might seem a little intimidating, but if you break it down into manageable steps, it's totally doable. A little patience and the right technique now will mean your doors operate smoothly for years to come.
You've really got two main roads you can go down here: concealed European hinges or the more traditional surface-mount hinges. The one you choose will completely define the final look and the installation process, so let's walk through how to tackle each one like a seasoned pro.
Want that clean, high-end finish where the hardware just disappears? Concealed hinges are your best friend. They are completely hidden when the doors are closed, giving your bookcase a sleek, modern vibe.
These hinges look complicated, but a simple jig makes the process almost foolproof and guarantees perfect results. The hinge itself sits inside a shallow, circular hole (called a "cup") that you drill into the back of the door. Trying to do this freehand is just asking for trouble, but a concealed hinge jig is an inexpensive tool that clamps right onto your door and guides your drill bit perfectly. It takes all the guesswork out of getting the depth and distance from the edge just right.
Once you’ve drilled the cup holes, the hinge just presses into place and gets secured with a couple of screws. The other half of the system is the mounting plate, which you’ll attach to the inside of the bookcase frame. Measure carefully to get these plates attached, making sure they are perfectly level with one another.
Pro Tip: Before you even think about drilling into your beautiful new doors, grab a scrap piece of the same wood. Practice on it first. This is your chance to set the correct drill depth and get a feel for the jig without risking a costly mistake on the real thing.
If you're aiming for a more traditional look or just prefer a simpler installation, surface-mount hinges are an excellent choice. True to their name, these hinges attach directly to the surface of the bookcase frame and the back of the door—no special cuts or holes required.
With these hinges, alignment is everything. Start by laying your door flat and figuring out where the hinges will go. A good rule of thumb is to place the top of the top hinge about 1.5 to 2 inches down from the top edge of the door, and do the same for the bottom hinge, measuring up from the bottom edge.
Use a combination square to make sure each hinge is perfectly perpendicular to the door's edge. A great little trick to avoid scratching your finish is to put a strip of painter's tape down where you plan to drill. You can mark your screw locations right on the tape. Always, always pre-drill small pilot holes to keep the wood from splitting when you drive the screws in.
It's projects like this that are driving a major trend in home improvement. The market for door installation services, currently valued at $8.5 billion, is expected to jump to $12.3 billion, and it's residential renovations that are fueling most of that growth. Adding custom doors to a bookcase is a perfect example of the kind of project that boosts a home's value and functionality.
After attaching the hinges to the door, it’s time to mount the whole thing to the bookcase. This is often where you need an extra set of hands. Use shims or even a stack of books to prop the door up to the right height, ensuring you have an even gap at the bottom. Once you're happy with the placement, mark your holes, drill your pilots into the frame, and secure the final screws. Having the right furniture assembly tools on hand can make this final step much less of a headache.
This is where all your hard work pays off and the project really starts to look like something. With the prep work behind you, it's finally time to hang the doors and turn that open bookcase into a proper, stylish cabinet.
Getting the doors perfectly aligned can feel like a game of patience, but a few simple tricks I've learned over the years make it a whole lot easier.
Before you even think about driving a screw, you've got to get the door supported in the right position. An extra pair of hands is obviously a huge help here. But if you're flying solo, don't worry. A stack of books or a few wood shims placed on the bottom shelf of the opening works like a charm. This lets you hold the door at the perfect height, giving you that even gap at the bottom and stopping it from dragging later.
Just getting the doors mounted is only half the battle. The real magic happens when you start fine-tuning them. This is especially true if you went with concealed European hinges, which are literally designed for these kinds of precise adjustments. Don't let all the little screws intimidate you—each one has a very specific job.
There are three main adjustments that let you move the door exactly where it needs to go for a flawless fit:
Take your time with these tweaks. Seriously. Make one small change to one screw at a time, then step back and look at it. It’s all about making tiny corrections until it’s perfect.
If you're still wrestling with the alignment and just can't get it right, our more detailed guide on adjusting cabinet doors has a ton of great visuals and troubleshooting tips that can help you nail even the trickiest alignment problems.
It’s the final details that take a project from feeling "DIY" to looking like a custom piece of furniture. Installing your knobs or pulls is the last big step, and a cabinet hardware jig is a lifesaver here. It's a cheap tool that guarantees your pulls are perfectly centered and level every single time, completely eliminating any stressful guesswork.
Once the hardware is on, a couple of little extras can really add a touch of quality.
With those final touches in place, you're done! You've successfully added doors to a bookcase, creating a beautiful and functional piece that gives you both style and some much-needed hidden storage.
Even with the best instructions, you're bound to hit a few snags or have questions pop up mid-project. It happens to everyone. Getting those little uncertainties cleared up can be the difference between a smooth build and a major headache.
We've pulled together some of the most common questions we hear from fellow DIYers to give you straight-up, practical answers.
This kind of project is more popular than ever. The hidden door bookcase market, which was valued at $1.2 billion, is expected to jump to $2.8 billion. It just goes to show how much people want clever furniture that looks good and saves space. You can dig into more of the market trends over at ResearchIntelo.
You absolutely can. In fact, the Billy bookcase is probably one of the most common pieces people choose for this exact upgrade. But you have to be smart about it—its particleboard construction demands the right hardware if you want it to last.
Make sure you grab screws specifically made for particleboard; they have a much better grip. It’s also a good idea to go with European-style hinges, since they do a better job of spreading the door's weight across the frame. To keep from putting too much stress on the whole unit, stick with lightweight doors made from MDF or a quality plywood rather than heavy, solid wood.
Here's a pro tip: Don't treat particleboard like it's solid wood. If you use standard wood screws, you’ll strip the material and end up with loose, wobbly hinges down the road. The right hardware isn't just a suggestion—it's essential.
If you're new to this kind of work, your best bet is to go with surface-mount or non-mortise hinges. They're the most forgiving option by far.
You just screw them directly onto the front of the bookcase frame and the back of the door. No special cuts, no complex tools needed. They'll be visible when the door is closed, but the trade-off is a much simpler installation.
If you've got your heart set on that clean, concealed look, a simple tool like a concealed hinge jig can make installing European hinges a whole lot easier for a novice.
Getting that perfect, seamless finish is what really makes a DIY project look professional. The first step is figuring out what kind of finish your bookcase has right now—is it paint, laminate, or a wood veneer?
Before you paint the entire door, always test your new paint on a scrap piece of wood or a hidden spot to make sure the color and sheen are a perfect match.
Feeling inspired but think you might be in over your head? Let the pros at Assembly Smart take care of it. We handle everything from furniture assembly to custom jobs like this. Our insured and reliable team delivers professional results without the DIY stress. Book your free estimate today at https://assemblysmart.com and get the job done right.
