-
CALL US:
- (866) 952-3456
So, you're staring at a giant, flat-packed box and wondering, "How long is this really going to take?" Let's get right to it. For most standard, round backyard trampolines, you should block out 2 to 4 hours. That's a safe bet to get everything unboxed, sorted, built, and safety-checked without feeling rushed.
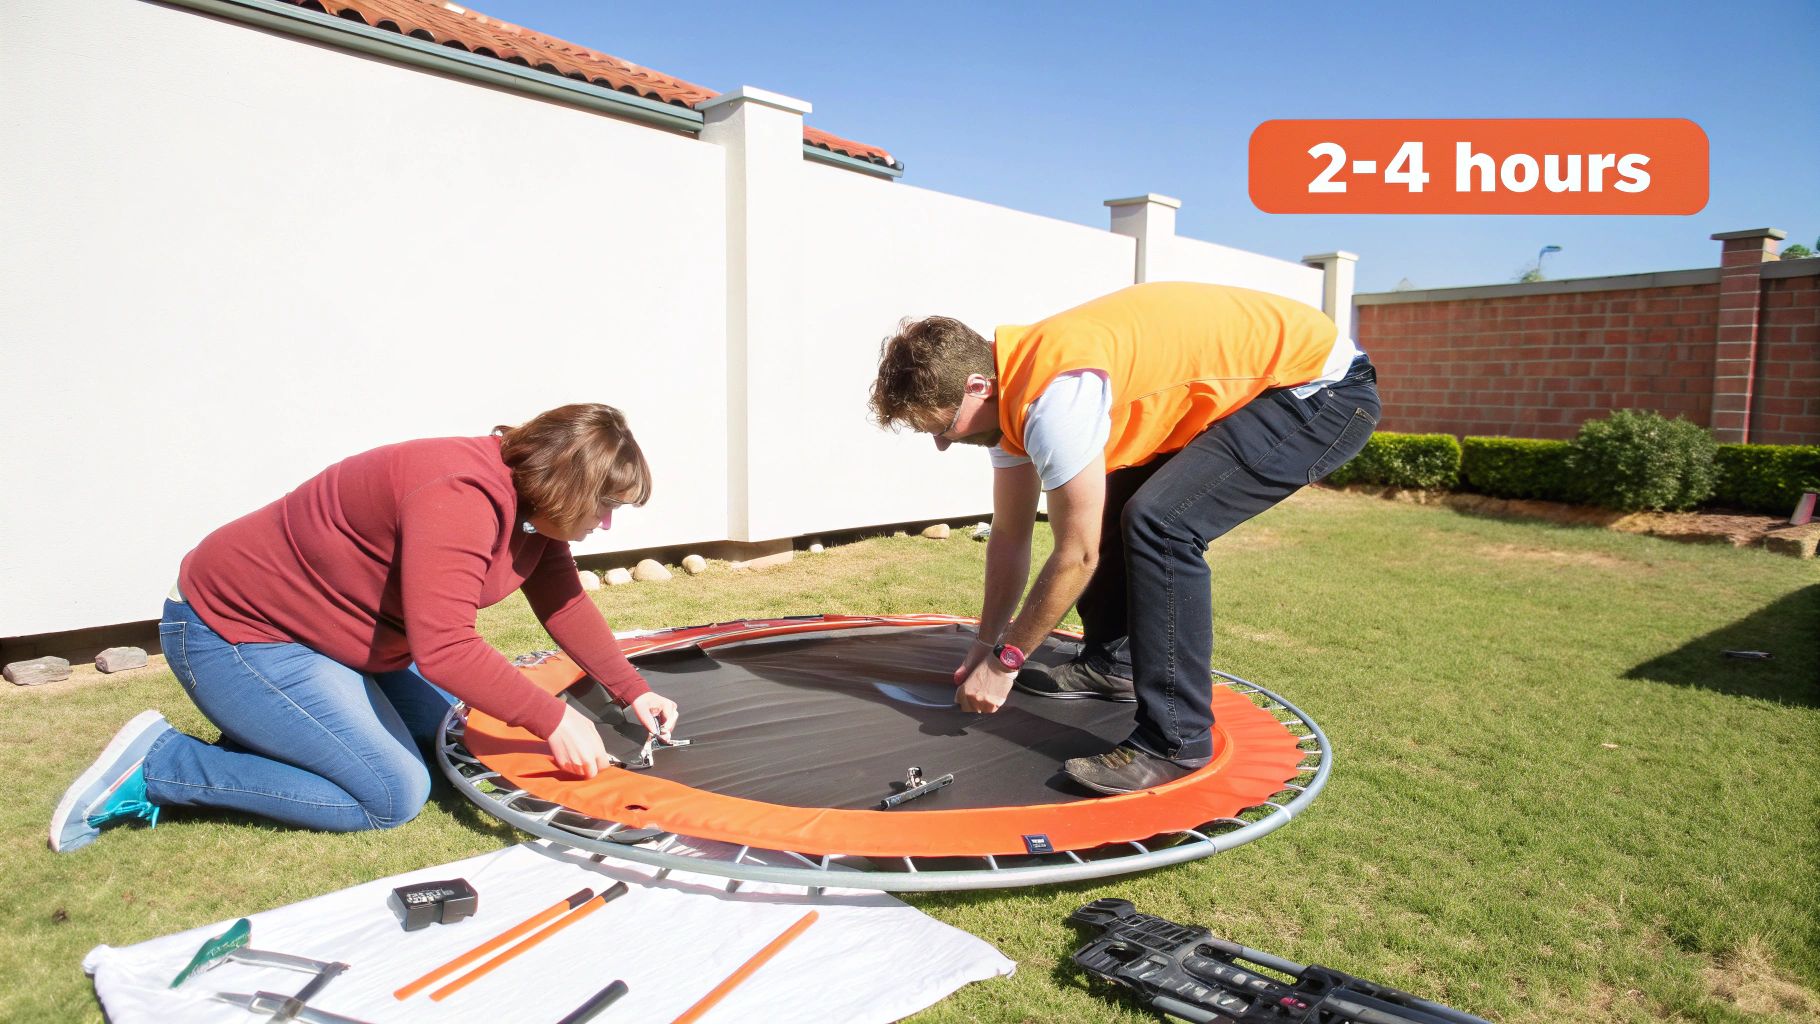
That 2-4 hour window is a great starting point, but the final time really hinges on the trampoline's size and how many people you have helping you out. It's a lot like putting together IKEA furniture; a small bookshelf is a pretty quick solo job, but a massive wardrobe definitely calls for a partner and a bit more patience. Same idea here.
From what we see out in the field, one person with some basic DIY skills can typically get a trampoline built in 1.5 to 3 hours. The smaller 8 to 10-foot models will be on the quicker end of that scale. Once you get into the bigger 12 to 15-foot trampolines, you're easily looking at the three-hour mark or more. You can always dig into more data on trampoline market trends to see how these things stack up.
To give you a much clearer idea of what you’re in for, I’ve put together a simple chart. Think of this as your realistic timeline, based on the trampoline's diameter and whether you're tackling it alone or with a friend.
| Trampoline Size (Diameter) | 1 Person (Experienced) | 2 People (Average Skill) |
|---|---|---|
| 8-10 ft (Small) | 1.5 – 2.5 hours | 1 – 2 hours |
| 12-14 ft (Medium) | 2.5 – 4 hours | 2 – 3 hours |
| 15-17 ft (Large) | 3 – 5 hours | 2.5 – 4 hours |
| Rectangular/Specialty | 4 – 6+ hours | 3 – 5 hours |
A quick word of advice: bringing in a second person does more than just cut the time. It makes the whole process safer and way less frustrating, especially when you're wrestling with the heavy frame or stretching dozens of springs into place. Trust me on that one.
These numbers are your baseline. Up next, we'll get into the details that can really change the game—things like the tools you have, how complicated the safety net is, and ground prep. These are the factors that determine whether this is a quick Saturday morning project or an all-day affair.
Thinking of the assembly time as a single, fixed number is the first mistake. The truth is, that 2-4 hour estimate is more like a starting point on a GPS; your actual arrival time depends on traffic, detours, and how fast you’re going.
Several key factors will determine whether your assembly is a quick trip around the block or a long, frustrating haul.
The most obvious variable is the trampoline's size and shape. A compact 10-foot round trampoline has fewer parts and a smaller footprint than a massive 15-foot model. Rectangular trampolines, often favored for their superior bounce, introduce more complexity with their frame structure, almost always adding an extra hour or two to the job.
Next, consider the power of teamwork. It might seem like two people would just cut the time in half, but the effect is even bigger than that. One person can hold a frame piece steady while the other secures bolts, preventing that frustrating cycle of parts slipping out of alignment. This kind of teamwork becomes absolutely essential when you get to stretching the jump mat and attaching dozens of high-tension springs.
The tools you use can be a massive game-changer. That small, flimsy wrench included in the box is technically functional, but it's like trying to dig a foundation with a garden spade.
Your own skill level also plays a part, of course. How easily you can follow instructions often depends on your personal learning approach. Knowing your own kinesthetic learning style and following assembly manuals can help you anticipate challenges and power through the hands-on tasks more efficiently.
Your trampoline build is a project with moving parts—literally. The number of helpers, the quality of your tools, and the complexity of the safety features are the three biggest factors that can turn a two-hour job into a five-hour marathon.
Don't underestimate the time it takes to install all the safety components. Sliding foam sleeves onto poles, securing the spring cover pad, and installing the enclosure net are crucial steps that require patience and precision. These features aren't just an afterthought; they make up a big part of the job, accounting for roughly 20-30% of the total setup duration.
This isn't just about time; it's about getting it right. Improper assembly is a significant concern, as data shows that about 18% of trampoline-related injuries happen during the setup process or because of mistakes made then. Taking your time here is non-negotiable.
Finally, one of the most overlooked time sinks is ground preparation. If you start building on an uneven surface, you probably won't discover the problem until you're well into the process. That forces you to partially disassemble and move the entire structure.
Taking 30 minutes at the very beginning to find and level a perfect spot will save you hours of backtracking and frustration later on.
A successful trampoline build starts long before you tighten the first bolt. Think of it like cooking a complex meal; the best chefs practice mise en place, getting all their ingredients prepped and organized before the heat is even turned on. This pre-assembly prep is your key to a frustration-free experience that saves you hours of backtracking.
This planning phase is just as important as the build itself. The principles are universal, whether you're building a trampoline or figuring out how to prepare for your furniture assembly project. A few key steps now will pay off massively later.
Before you do anything else, open every box and lay out all the components. Grab your instruction manual and meticulously check each part against the inventory list. It might feel tedious, but discovering you're missing a crucial bolt halfway through the build is a guaranteed project killer.
Catching a missing piece early means you can contact the manufacturer immediately, often without losing a full day of progress. This single step is the most effective way to prevent a major delay.
The small wrench and Allen key included in the box are technically enough to get the job done, but they will make the process slow and painful. Upgrading your toolkit is the fastest way to speed up the assembly.
Don't just read the instructions—study them. Understanding the full sequence of events before you start helps you anticipate tricky steps and avoid common mistakes, like installing parts in the wrong order.
Choosing the right location is non-negotiable for safety. The ground must be as level as possible to prevent the trampoline from becoming unstable and tipping over during use.
Find a clear, flat area in your yard with at least 24 feet of overhead clearance and a safe zone of about 6-8 feet around the entire perimeter. Make sure it's free from trees, fences, or other hazards.
Use a long, straight board and a carpenter's level to check the ground. If it's slightly uneven, it's better to dig out the high side a bit rather than trying to prop up the low side with unsafe blocks. Taking 30 minutes to perfect your spot will save you from having to move a half-built trampoline later.
Staring at a giant box full of metal tubes and springs can feel a little intimidating. We get it. But assembling a trampoline is really just like following a recipe—if you tackle it one stage at a time and follow the sequence, you’ll have something amazing at the end. Think of this as your high-level roadmap, not a replacement for your manual, designed to show you the path from start to finish.
Let's break the whole project down into four main phases. This simple visual lays out the prep work, which is always the most important part of any successful build.
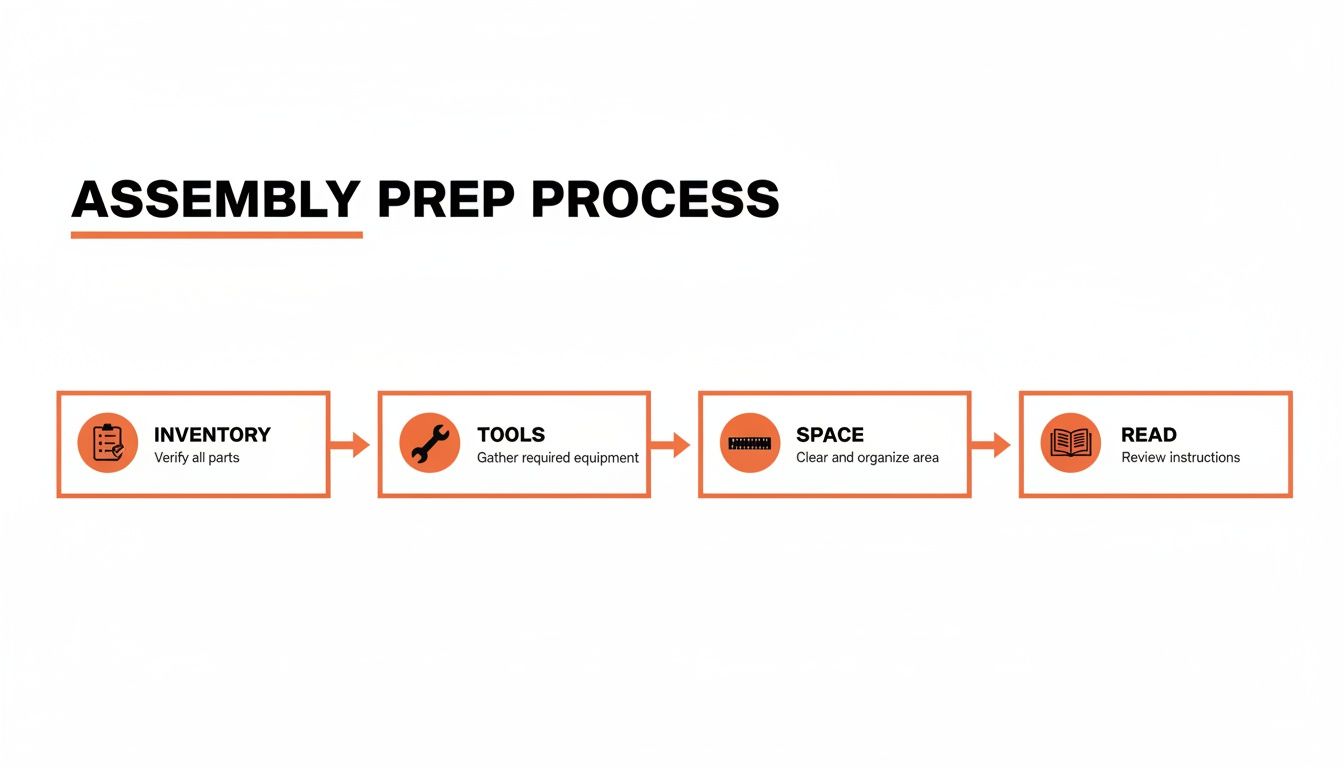
As you can see, a great build starts with great organization. Getting your parts inventoried, tools gathered, and space cleared before you even touch a bolt is the secret sauce.
This is the skeleton of your trampoline. You’ll start by connecting the circular or rectangular steel pieces to form the main ring, then you'll attach the legs. This part really benefits from a bit of open space and is a whole lot easier with a helper to hold pieces steady while you pop in the screws. A rubber mallet can also be your best friend here, letting you gently nudge stubborn joints into place without denting the metal.
Get all the bolts snug, but wait to do the final tightening until the frame is fully assembled and sitting on level ground. The vast majority of trampolines sold—globally, 70-75% of home trampoline sales are for outdoor models like these—have assembly times averaging 1.5 to 3 hours.
Alright, here comes the workout. This is easily the most physically demanding part of the job. You'll use a spring-pulling tool (an absolute must-have, often included) to stretch each spring from the frame to the D-rings on the jump mat. It takes some muscle and, more importantly, a smart strategy to keep the tension even across the mat.
Pro Tip: Whatever you do, don't just attach the springs in a circle. You’ll make it nearly impossible to finish. Instead, use a "star pattern." Attach springs at the 12, 6, 3, and 9 o'clock positions first. Then, keep adding springs directly opposite from the one you just installed. This stretches the mat evenly and prevents it from warping.
This step is where having the right gear makes a world of difference. For a deeper dive, check out our guide on essential furniture assembly tools that can make tough jobs like this much faster and safer.
Once the mat is taut and every last spring is locked in, it's time to cover them up. The safety pad is that thick, cushioned ring that lays right over the springs and the outer edge of the frame. This is a non-negotiable safety feature that keeps feet, hands, and heads from getting pinched or caught.
Most pads secure underneath with a series of elastic toggles or straps that you wrap around the frame. Just make sure the padding is centered correctly and pulled tight so it doesn’t bunch up or shift around when people are jumping. This part is usually pretty quick, taking maybe 10-15 minutes.
You're in the home stretch! The final phase is putting up the safety net. You'll start by sliding the long foam sleeves over the enclosure poles. This can be surprisingly tricky if the fit is tight. A little trick is to spray the poles with a bit of soapy water—it helps the foam slide right on.
Next, you’ll attach the poles to the trampoline legs and then hang the net itself. The net usually secures at the top and bottom, sometimes by threading it through the same D-rings you used for the jump mat springs. Take your time here. You want to make absolutely sure there are no gaps between the bottom of the net and the mat.
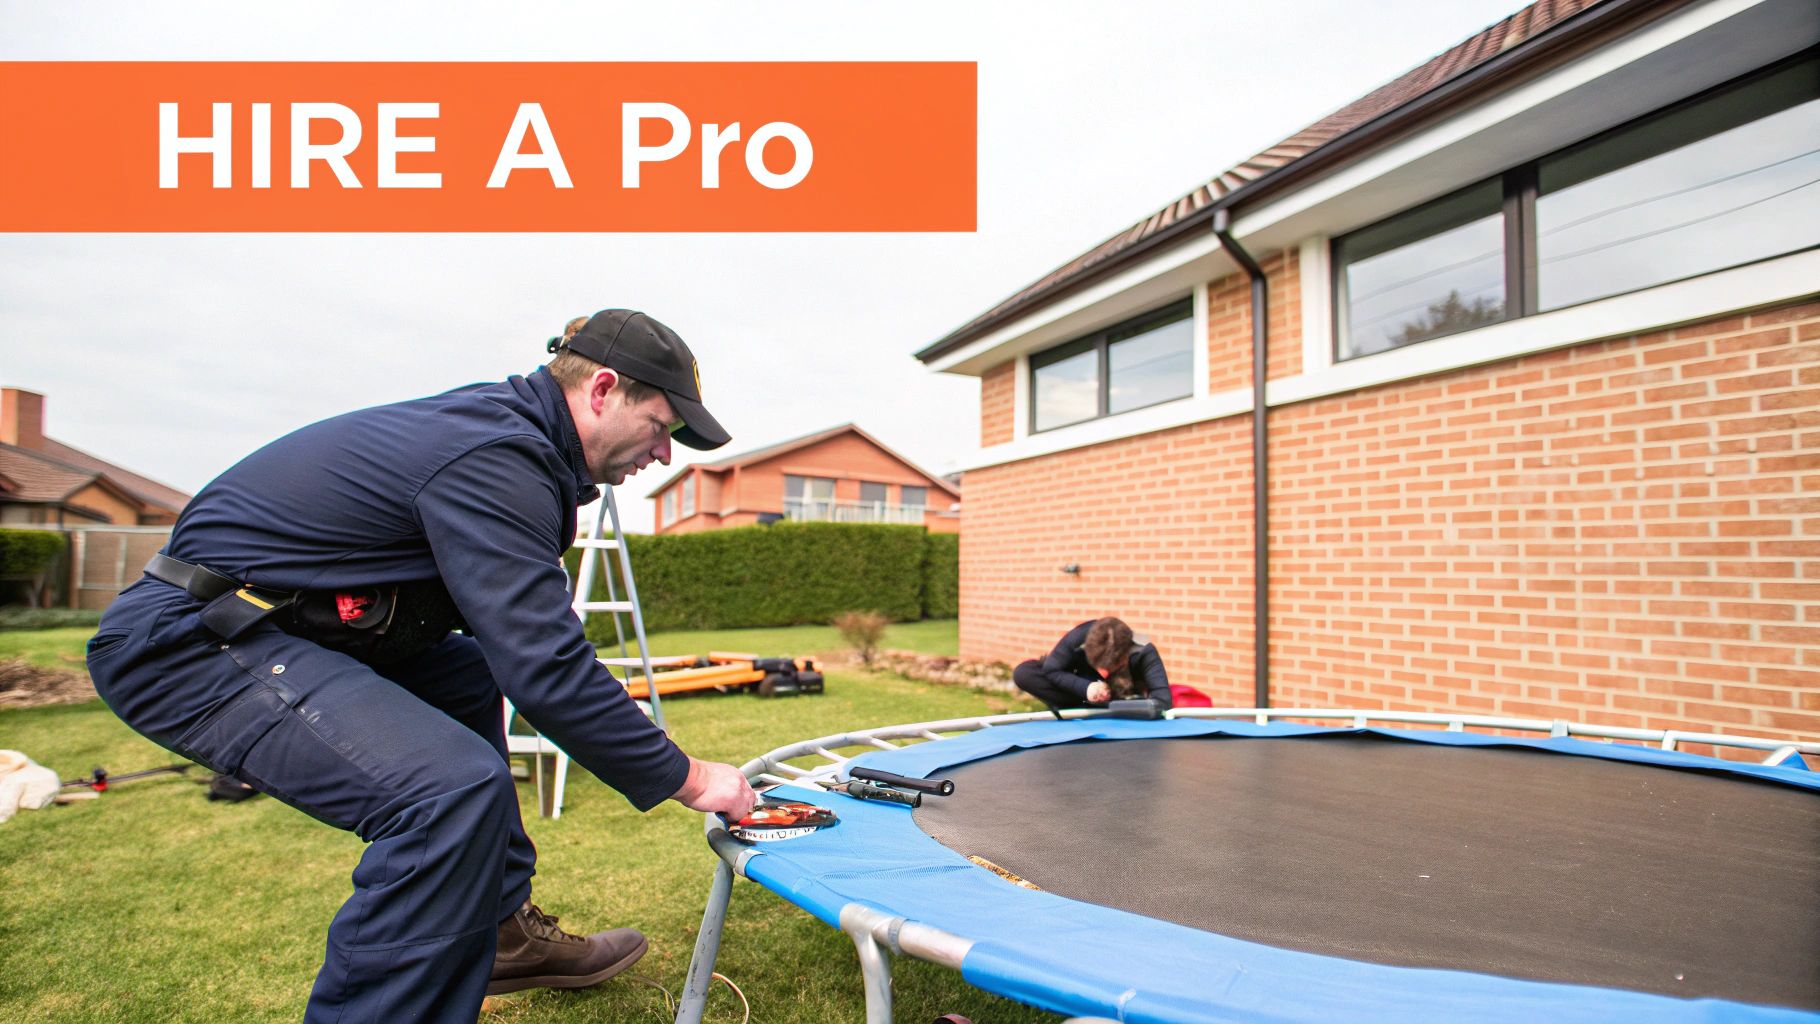
Sometimes, the smartest DIY move is knowing when not to do it yourself. While putting together a trampoline is definitely a manageable project for a lot of people, there are clear signs when handing the job to an expert is the best call for your safety, sanity, and schedule. This isn’t about admitting defeat; it's about making a smart, strategic choice.
The decision to hire an installer usually comes down to a few key things. If you just bought a massive 17-foot model or a complex in-ground trampoline, the sheer scale of the project can get overwhelming, fast. These bigger, more complicated builds demand more precision, muscle, and experience to get right.
Let's be real, not everyone has a free weekend to dedicate to a multi-hour assembly project, nor is everyone comfortable with the physical side of it. Building a trampoline means lifting heavy steel parts, wrestling with high-tension springs, and deciphering sometimes-confusing instructions.
You should seriously consider calling a pro if you:
A professional service changes the "how long to assemble trampoline" question from a weekend-long headache into a simple, scheduled appointment. You're trading your time and effort for a guaranteed, safe, and correct installation.
Hiring an assembly service is a pretty straightforward process. Companies like Assembly Smart offer a simple trampoline assembly service where you can get a quote and book an appointment without any hassle. A professional tech shows up with all the right tools and know-how to get the job done right, usually finishing in just 1-3 hours.
The process isn't that different from hiring help for other outdoor jobs. In fact, many of the same tips in this action plan for hiring outdoor project professionals apply here—like checking for clear pricing and proper insurance.
At the end of the day, hiring a pro is an investment in safety, correctness, and getting your valuable time back.
Even with the best instructions, a few head-scratchers are bound to pop up during a project this size. I've been there. Let's walk through some of the most common questions people have when they're staring at a giant box and wondering how long this is really going to take.
We'll cover everything from trying to be a one-person assembly crew to figuring out which steps are going to test your patience the most.
Technically, yes, for a very small one. But should you? Absolutely not. Trying to build a standard backyard trampoline by yourself is a recipe for frustration and potential injury.
Think of it like trying to make a king-sized bed alone—you can do it, but you'll spend most of your time running from side to side, and the result is never quite right. Working alone will easily double your assembly time, and it seriously increases the risk of pinched fingers or dropping a heavy frame piece on your foot. For your own safety and sanity, grab a friend. This is especially true when it's time to pull the springs; a partner is essential for balancing the tension as you work your way around the mat.
Hands down, the springs. Attaching them is the part of the build that makes most people wish they'd hired a pro. It takes a surprising amount of strength to stretch each spring from the frame to the mat, even with the little tool they give you. You also have to follow a specific star pattern to keep the tension even, which is easy to mess up if you're not paying close attention.
The second-biggest headache is often the safety net. It’s not physically demanding like the springs, but it requires a ton of patience. You have to thread long, flexible poles through tight fabric sleeves and then get everything secured just right. It's tedious, meticulous work, and rushing it can leave you with dangerous gaps.
The two biggest time sinks in any trampoline assembly are the physical challenge of the springs and the meticulous detail of the safety net. Budget extra time and patience for these steps, and you’ll avoid the most common points of frustration.
The box will come with a few flimsy, single-use "tools," but relying on them is like trying to eat a steak with a plastic spork. You'll get it done, but it won't be pretty. To save yourself a ton of time and sore knuckles, I strongly recommend grabbing a few things from your own garage.
Here are a few essentials that make a huge difference:
This one is non-negotiable. An unlevel base is the #1 cause of trampoline accidents and damage. The easiest way to check your spot is with a long, straight 2×4 and a carpenter's level.
Lay the board across your chosen area and place the level on top. Check it in a few different directions, like the hands of a clock. If that little bubble isn't perfectly centered, you've got some work to do. For a slight slope, you can dig out the high side to level it. Whatever you do, never prop the trampoline legs up on bricks, pavers, or wood blocks. They can—and will—slip out, leading to a serious accident.
If you're feeling overwhelmed by the process and weighing your options, understanding the typical trampoline assembly cost can help you decide if bringing in a pro is the right move for you.
At Assembly Smart, we turn a weekend-long headache into a worry-free afternoon. If you'd rather spend your time enjoying your new trampoline instead of building it, our professional technicians are ready to help. Book your stress-free assembly today at https://assemblysmart.com.
