-
CALL US:
- (866) 952-3456
Thinking about adding a basketball hoop to your home? It's easy to get excited about the fun, but the installation itself is a whole other ball game. Going with a professional basketball hoop installation is more than just a convenience—it's about getting it done right for safety, stability, and years of perfect shots. For in-ground and wall-mounted hoops, hiring an expert is almost always the smartest and safest bet you can make.
Sure, the idea of a weekend DIY project can be tempting. But installing a basketball hoop, especially a permanent one, is a serious job. It’s way more involved than just piecing parts together. This is a project that demands precision, specialized tools, and a real understanding of how to prep the site and ensure everything is structurally sound. An improperly installed hoop isn’t just an eyesore; it's a genuine safety hazard waiting to happen.
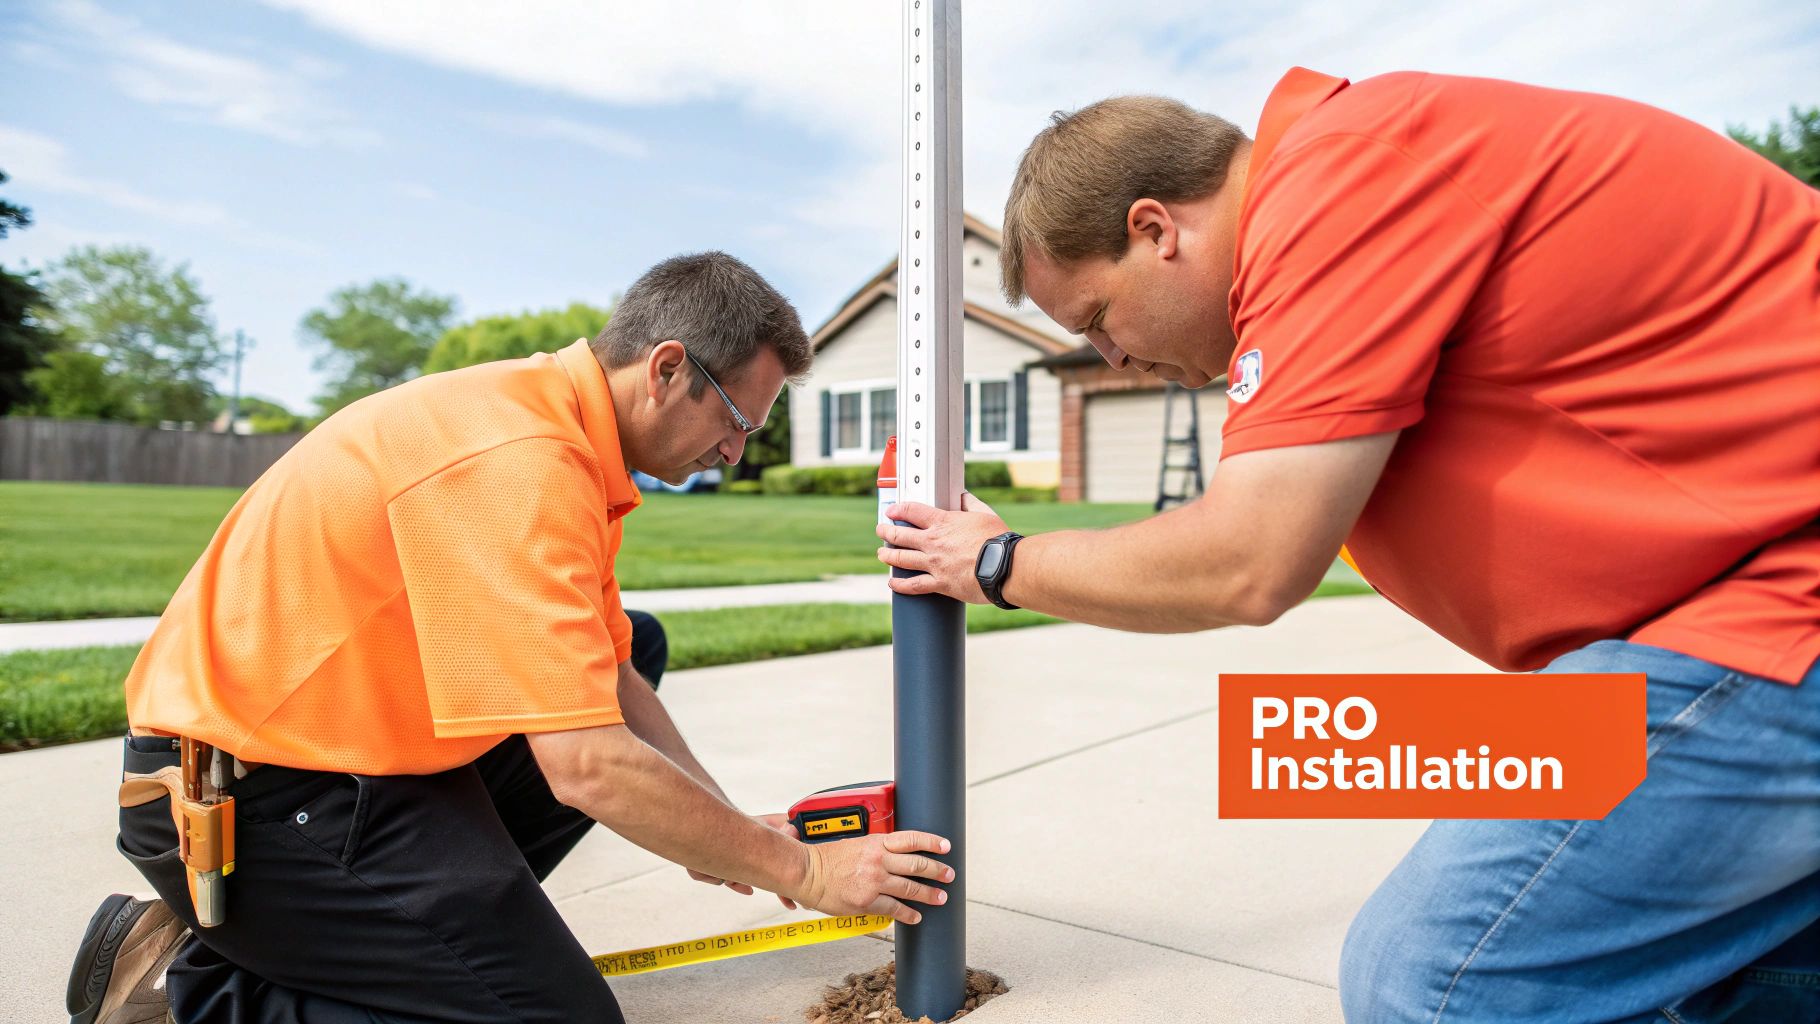
With in-ground hoops, everything hinges on the foundation. A professional crew knows exactly how to dig to the right depth, mix and pour concrete that meets industry standards, and—most importantly—set the anchor kit so it's perfectly level. This step is absolutely critical. Even a tiny angle in the anchor will leave you with a pole that’s noticeably crooked.
Wall-mounted systems bring their own set of challenges. An installer needs to assess the wall's structural integrity, pinpoint the studs with complete accuracy, and use the right heavy-duty hardware to support the hoop's weight and the forces of aggressive gameplay. One mistake here could cause serious damage to your home.
Hiring an expert turns what could be a frustrating, multi-day ordeal into a smooth and efficient process. They show up with the right equipment for the job, from commercial-grade diggers to lifts, which most of us don't have sitting in the garage. The skill needed is a lot like when you hire someone to assemble furniture, but with the added layers of outdoor site work and concrete.
A professional installation ensures that every single component, from the anchor system to the backboard, is put together exactly as the manufacturer intended. This not only guarantees peak performance but also keeps your warranty intact.
The demand for high-quality, professional setups is growing. In North America, which holds the largest regional market share at 40–45%, consumers are increasingly opting for premium in-ground systems that require expert installation. Ultimately, investing in a professional gives you peace of mind and a court that’s ready for action—the right way.
Deciding between hiring a pro and tackling the job yourself can be tough. This table breaks down the key differences to help you make the right call for your situation.
| Consideration | Professional Installation | DIY Installation |
|---|---|---|
| Time & Effort | Minimal. The crew handles everything in a few hours to a day. | Significant. Can take a full weekend or more, especially for first-timers. |
| Tools & Equipment | All-inclusive. Pros arrive with specialized tools (diggers, mixers, levels). | Requires investment. You may need to buy or rent heavy-duty tools. |
| Expertise & Safety | High. Experienced installers ensure structural integrity, safety, and a level setup. | Variable. Risks of improper foundation, crooked poles, or structural damage. |
| Cost | Higher upfront cost. You're paying for labor, expertise, and convenience. | Lower upfront cost. You only pay for the hoop and any needed tools/materials. |
| Warranty | Preserved. Proper assembly per manufacturer specs keeps the warranty valid. | Risk of voiding. Mistakes during installation can void the manufacturer's warranty. |
| Peace of Mind | Guaranteed. You know the job is done right and is safe for your family. | Stressful. The responsibility for a safe and correct installation is all on you. |
While a DIY project can save you some money upfront, the expertise, safety, and guaranteed quality that come with a professional installation are often worth the investment for a permanent fixture like a basketball hoop.
The perfect basketball hoop really comes down to what fits your space, your budget, and how you plan to play. Before you even think about a professional basketball hoop installation, you first have to pick the right system. It’s a long-term investment for your home, after all.
The choice usually boils down to three main types: in-ground, portable, and wall-mounted.
Each one serves a different purpose. What works great for a big suburban driveway might be totally impractical for a tighter spot in the city. Let’s walk through the real-world scenarios for each to help you picture the best fit.
For families and players who take their game seriously, the in-ground hoop is the undisputed champ. These systems are set permanently in concrete, giving them a level of stability and rigidity that no other type can touch.
What does that mean for you? A much more authentic rebound off the backboard and a solid feel that’s just like playing on a real court.
Consider an in-ground system if:
The main thing to know about an in-ground hoop is its permanence. That concrete foundation is a huge part of the installation and requires some careful planning and digging. Once it's in, it’s not going anywhere.
Portable hoops offer the ultimate convenience. You can roll them into the garage for the winter, move them out of the way to make more parking space, or even pack them up if you move. They’re also typically the most budget-friendly option and don’t require any permanent changes to your property.
But all that convenience comes with some performance compromises.
Even when you weigh them down with sand or water, portable hoops are just more likely to shake. The rebound off a plastic backboard won't be as true, and they’re generally not as durable as their in-ground cousins.
A portable hoop is an excellent starting point for casual play or for families in rental homes where a permanent installation isn't an option. Just be realistic about its performance limitations for more competitive players.
What if your driveway is narrow, or the only space you have is right above the garage door? That’s where a wall-mounted hoop comes in. It’s a fantastic solution that provides excellent stability—often as good as in-ground models—without taking up any precious ground space.
Before you commit, though, a structural check is non-negotiable. The wall has to be strong enough to handle not just the hoop's weight but also the dynamic forces of gameplay.
A professional installer can verify that your chosen spot has the right structural support, which prevents serious damage to your home. This is where professional expertise really pays off.
Making a decision is always easier when you can compare models side-by-side. Our comprehensive basketball hoop reviews can help you evaluate the best options on the market.
A successful professional basketball hoop installation actually starts long before our crew ever pulls up to your home. Taking a few key steps to get your property ready ahead of time is the secret to making sure the process is smooth, safe, and free of any last-minute headaches.
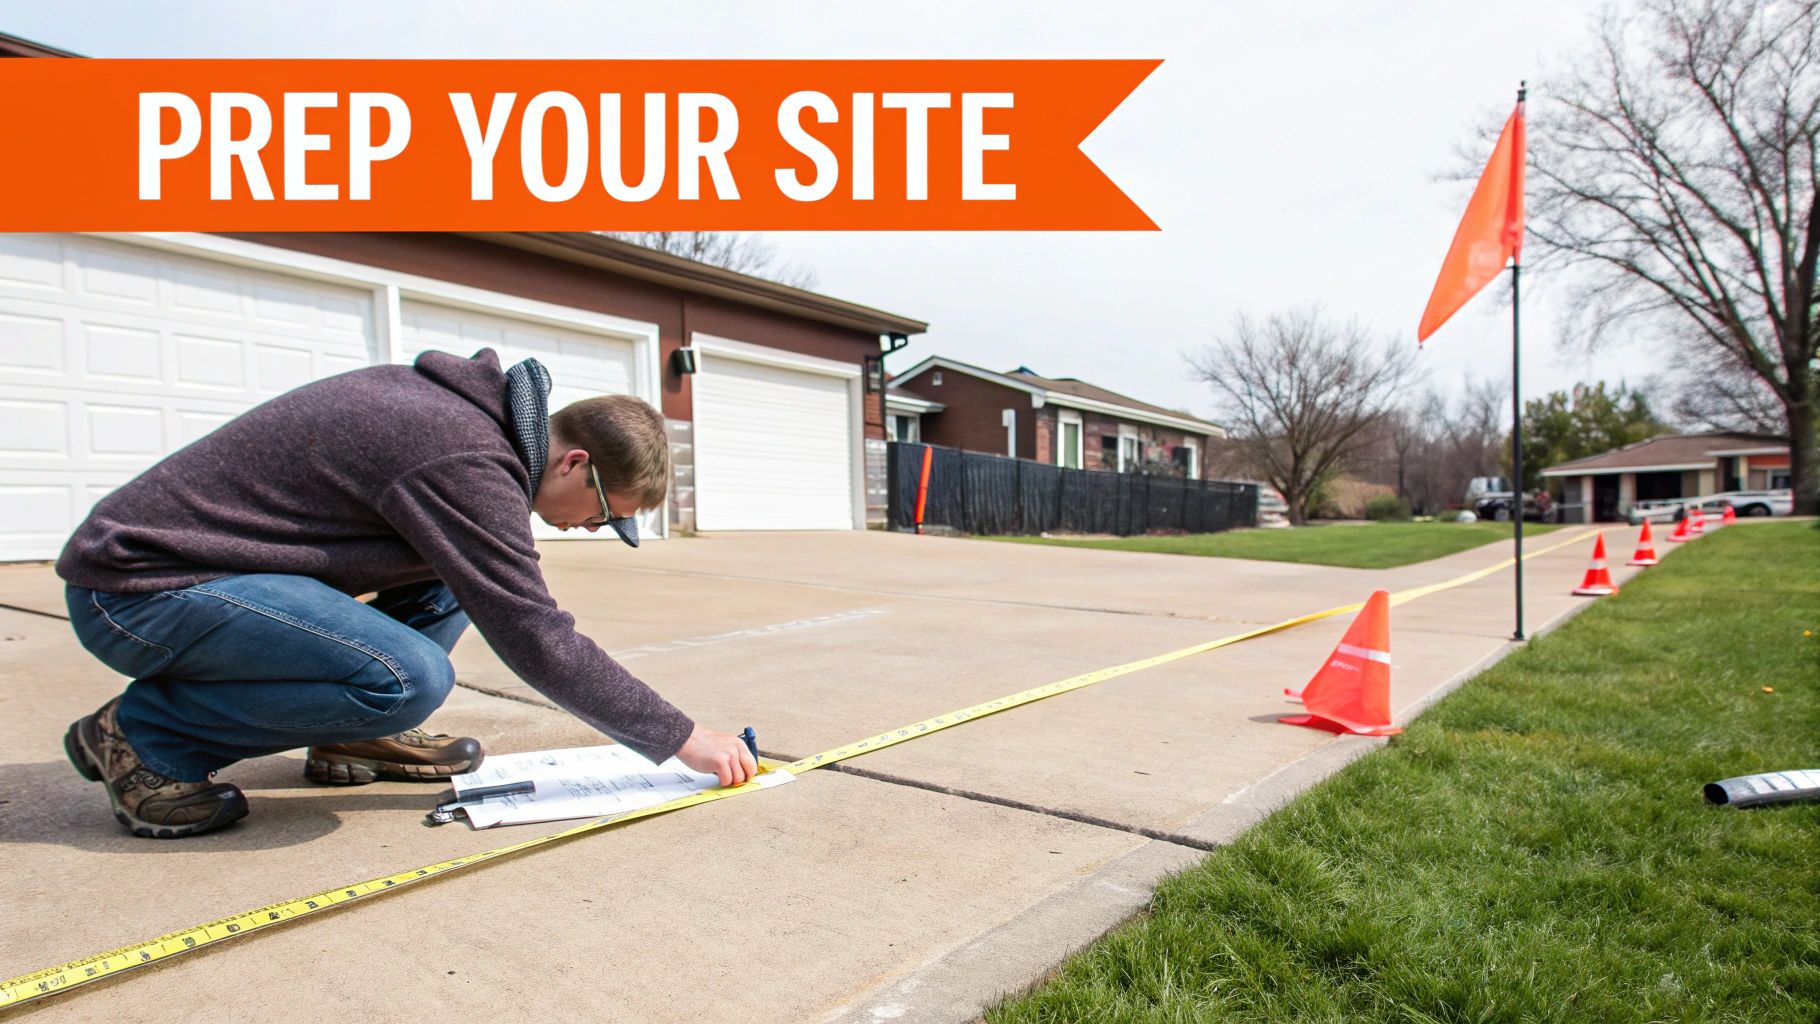
Think of it this way: your main goal is to create a clear, safe, and easily accessible work area. It all starts with picking the perfect spot. You'll need a reasonably level playing surface with plenty of clearance on all sides. Make sure it's a safe distance from the street, and look up! Check for overhead power lines and tree branches. Proper clearance not only prevents players from running into hazards but also gives the installation team the space they need to work efficiently.
For any in-ground hoop, there's one step that is absolutely non-negotiable: you have to call 811 before anyone puts a shovel in the ground. This is a free national service that contacts all your local utility companies. They'll come out and mark the approximate locations of any underground lines with small flags or spray paint.
Trust me, hitting a buried gas, water, or electrical line is a nightmare you want to avoid. It’s incredibly dangerous and can lead to seriously expensive repairs. Calling 811 isn't just a good idea—it’s required by law in most places and protects you, your property, and our crew. It's the single most important thing you can do to prepare for a safe installation.
Homeowner Pro Tip: We had a customer in a neighborhood with a strict HOA who absolutely nailed this. Before submitting their request, they printed out their property survey, drew a simple site plan showing the hoop's location, and wrote their 811 confirmation number right on it. They even noted the clearance from the property line. The HOA approved it on the first try, saving weeks of potential back-and-forth.
Once the location is picked out and the utilities are marked, your next job is just to make sure our installers have a clear shot to the work site. This means clearing a path from where they'll park all the way to the installation spot.
Here’s a quick checklist to get you ready:
The popularity of sturdy, concrete-anchored systems has really grown since the 1980s, which is what created the need for pros who are skilled in both site prep and excavation. This move toward more stable, permanent hoops is what built the specialized industry we’re in today. You can actually read more about the evolution of the basketball hoop market on futuredatastats.com.
Taking these simple prep steps helps those pros do their job right, getting your court ready for action without any delays.
Alright, let's talk numbers. What should you actually expect to budget for a professional to install your new basketball hoop? The honest answer is that the price tag can swing quite a bit, but once you know the key factors, you can get a really solid estimate.
The final cost really boils down to two things: the type of hoop you bought and the specifics of your property. A simple portable hoop assembly, for example, is the most wallet-friendly option, usually running between $150 and $300. Wall-mounted hoops are the next step up, typically falling in the $250 to $500 range, mostly depending on what your wall is made of and how complex the mount is.
In-ground hoops are the biggest investment of both time and money. For these, installation costs generally land between $450 and $750. That higher price covers some serious labor—we're talking about digging a deep foundation, mixing and pouring hundreds of pounds of concrete, and making a mandatory return trip to finish the assembly after the concrete has set. For a deeper dive, check out our complete guide on the cost to install a basketball hoop.
A few variables can definitely nudge the price up or down. Any good pro will factor in these site-specific conditions when giving you a quote.
Here’s what they’re looking at:
The biggest surprise for most homeowners is the timeline for an in-ground hoop. It's a multi-day process for a very important reason: the concrete footing needs at least 72 hours to properly cure. Rushing this critical step will absolutely compromise the hoop's stability and safety down the road.
Once you’ve got a budget in mind, it's time to find the right person for the job. And trust me, not every handyman is cut out for this kind of specialized work. When you're investing in a pro installation, knowing how to pick the right expert is crucial. For more great advice on vetting skilled workers, this guide on hiring qualified installation professionals is a fantastic resource.
Start by looking for installers who specialize in recreational equipment. Check their recent online reviews and, more importantly, look for photos of their past work. A true professional should be fully insured with liability coverage—don't feel awkward asking for proof. This is what protects you if something goes wrong.
The best installers are also great communicators. They should be more than willing to walk you through the process and answer every single one of your questions before you agree to anything. Remember, a premium in-ground system is built to last 10–20+ years, so getting the installation right from day one is everything. It's why this service is always in demand for new homes and facility upgrades.
Before you give anyone the green light, make sure you ask these questions:
Getting straight answers here will help you hire with confidence and make sure there are no bad surprises on installation day.
So, the big day is here. You’re probably wondering what actually happens when the pros show up to install your new hoop. Knowing the game plan ahead of time makes the whole experience a lot less stressful and clears up any guesswork. A professional crew doesn't just wing it; they come with a clear, efficient plan to get your hoop set up safely and correctly, with as little disruption to your day as possible.
Right off the bat, the first thing the installers will do is walk the site with you to confirm the exact placement. This is your last chance to give the final nod of approval before they start digging or drilling. Once you give them the green light, they’ll get to work.
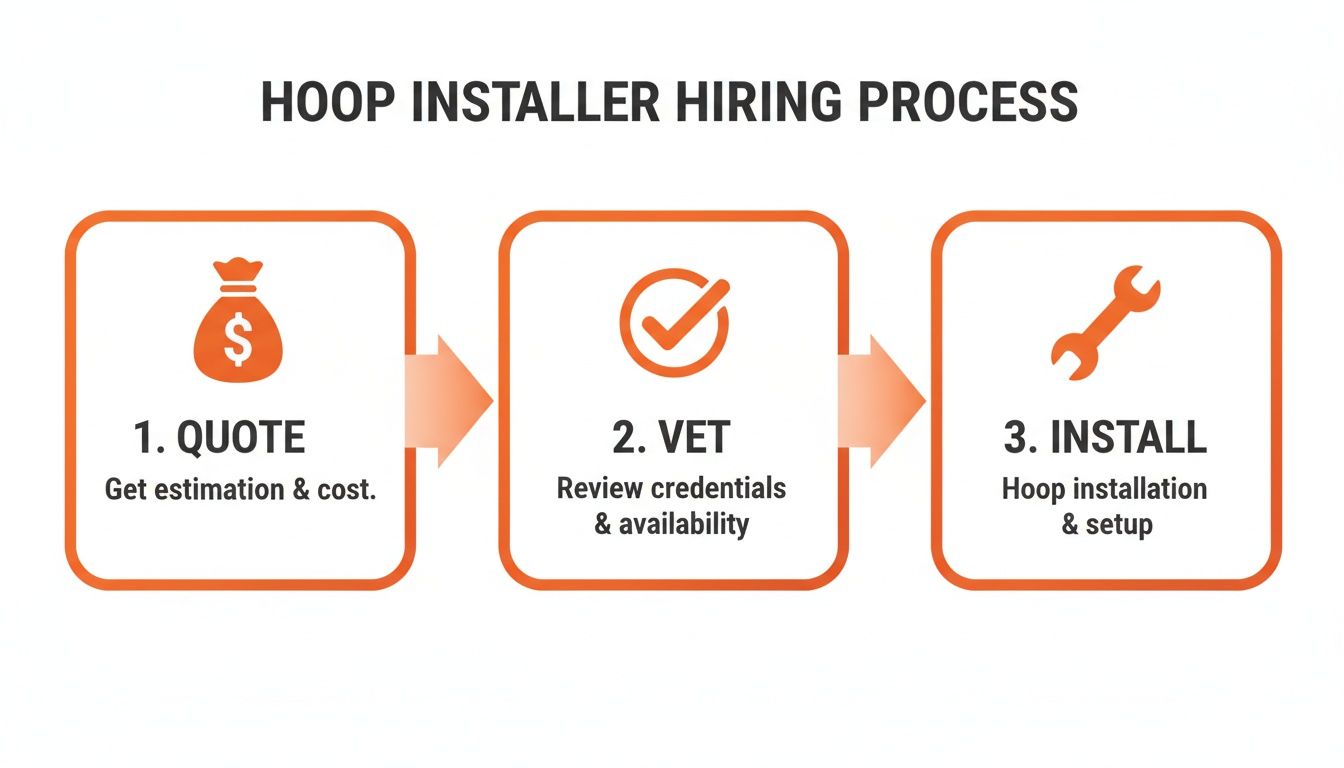
Hiring a pro isn't just about the final step, though. It's a simple, three-part process: getting your quote, checking out the installer's credentials, and then, finally, the installation itself.
Think of the installation as the payoff for doing your homework upfront.
If you've gone with an in-ground system, the first visit is all about building a rock-solid foundation. The crew will meticulously measure and mark the spot before digging a precise hole, usually a few feet deep. Then comes the concrete—they'll mix and pour a high-strength batch, carefully setting the anchor kit so it's perfectly level.
And now, we wait. The crew will pack up and head out for 2-3 days. This isn't a break; it's a crucial curing period for the concrete. Trying to mount a heavy pole and backboard onto wet concrete is a disaster waiting to happen—you’ll end up with a leaning, wobbly hoop.
Once the concrete is fully hardened, they’ll be back for visit number two. This is when they mount the main pole, attach that big glass backboard and rim, and dial in the final assembly. For a much deeper dive into this critical process, check out our guide on how to install an in-ground basketball goal.
Your main job on installation day? It's simple but important: be available to confirm the hoop's location at the start and keep the work area clear. Making sure kids and pets are safely inside prevents any accidents and lets the crew focus on their work without any interruptions.
For wall-mounted and portable hoops, things are a lot quicker—it's a one-and-done visit.
With a wall-mounted unit, the installers will use stud finders and their knowledge of home construction to securely fasten the brackets to your garage or wall. This step demands absolute precision. One wrong move, and you could compromise the hoop's stability or, worse, damage your home's structure.
Even portable hoops, which seem simple enough, really benefit from a professional touch. An experienced installer makes sure every single bolt is tightened to the right torque specification. They'll also ensure the base is filled and sealed correctly to prevent any annoying leaks or instability down the road.
Before the team packs up their tools, they’ll do a final walkthrough with you. This is your chance to give it a once-over. Is the rim level? Is the pole perfectly vertical? Do the height adjustment mechanisms work smoothly? A quality professional basketball hoop installation ends with you feeling 100% confident and ready to play.
Alright, the pros have packed up and your new hoop is officially installed. But the job isn't quite over just yet. If you want to protect that investment, a little proactive care goes a long way, starting right now. The very first thing you should do is a quick but thorough post-installation inspection.
Walk around the new hoop and give it a good once-over. Does the pole look perfectly vertical from every angle? Even a slight lean now can turn into a serious problem down the road. You'll also want to confirm the rim is perfectly level and measures exactly 10 feet from the ground, assuming it’s set to regulation height.
If you have an adjustable system, now's the time to test it. Run the crank or mechanism up and down its full range. You're listening for any grinding and feeling for any catching—it should be a smooth operation. This immediate check is your golden opportunity to have the installer make any small tweaks while they’re still there.
When it comes to upkeep, you don't need to be a pro. A little attention every few months makes a huge difference, especially if your hoop faces tough weather like salty coastal air or brutal winters. A bit of routine care will stop small issues from snowballing into expensive repairs.
Just add these simple tasks to your regular home maintenance checklist:
Don't underestimate the power of a quick check-up. We've seen hoops last for decades with basic care, while neglected ones can show significant wear and tear in just a few seasons. Your proactive approach is the best defense against the elements.
This straightforward routine ensures your basketball hoop remains a safe, stable, and great-looking part of your home court for many years of play.
If you're thinking about a professional basketball hoop installation, you're not alone. We get a lot of the same questions from homeowners, and getting a few key details sorted out beforehand can make the whole process feel a lot smoother.
For any in-ground hoop, patience is the name of the game. That concrete anchor needs a solid 72 hours to cure, minimum. This isn't just a suggestion—it's critical.
This hardening period ensures the foundation can handle the incredible stress from the pole, the heavy backboard, and all the high-energy play it's going to see. If you rush it and hang the hoop too soon, you're seriously compromising the entire system's stability.
This one really depends on where you live. For permanent, in-ground hoops, it's pretty common to need a permit from your city or at least a green light from your Homeowners Association (HOA). It's always a smart move to check these rules before you even break ground to avoid any headaches down the road.
While you can't just pull a traditionally cemented pole out of the ground, many modern hoops use a removable anchor kit. This awesome feature lets you unbolt the pole and take it with you, installing it at a new place with a new anchor.
Ready for a flawless setup without the hassle? The expert crew at Assembly Smart handles every detail of your professional basketball hoop installation. Book your appointment with Assembly Smart today
